Welcome to the Psychonauts 2 Trophy & Achievement guide! This is an easy and enjoyable list to complete. It is also pretty well balanced in terms of Trophy/Achievement type. It is a good mix of story related, combat, collectibles, completion and miscellaneous based Trophies and Achievements.
There are two missables here. Both “Duck, Duck, Goose” and “I’m always here for you, darling” can be missed. Other than that, nothing else is missable. That includes side missions and collectibles.
There is free roam after finishing the story. You can go back to every area and clean up any collectibles or side missions that you have yet to complete.
There are a lot of collectibles to find, but the areas are not that complex, so these shouldn’t take you too much time to find. You won’t be able to collect them all until after game, but as long as you’re thorough in the areas, you’ll find these rather easily.
Invincibility Mode
You can turn on invincibility at any time from the settings menu. This will not disable Trophies or Achievements. You will need to turn it off in order to earn “Hiccup in the Giddyup” and “Take a Lickin’” as those require you to take damage.
 Platinum
Unlock all Psychonauts 2 Trophies

 Employee of the Year!
Navigate Loboto’s Labyrinth
This is an unmissable story related Trophy/Achievement.
 Mentee Fresh
Receive your first assignment
This is an unmissable story related Trophy/Achievement.
 EVERYBODY Hates Socks with Sandals
Make a connection in Hollis’ Classroom
This is an unmissable story related Trophy/Achievement.
 Know When to Fold’em
Shut Down the Luctopus
This is an unmissable story related Trophy/Achievement.
 High Roller Revelations
Cool Hollis’ Hot Streak
This is an unmissable story related Trophy/Achievement.
 Jung at Heart
Visit the Collective Unconscious
This is an unmissable story related Trophy/Achievement.
 Sane in the Membrane
Repair Ford Fractured
This is an unmissable story related Trophy/Achievement.
 Ram It Down
Plate Compton’s Cookoff
This is an unmissable story related Trophy/Achievement.
 Feast of the Senses
Complete PSI King’s Sensorium
This is an unmissable story related Trophy/Achievement.
 A Little Off the Top
Treat Ford’s Follicles
This is an unmissable story related Trophy/Achievement.
 Perfect Game
Bowl Strike City
This is an unmissable story related Trophy/Achievement.
 To the Letter
Deliver Cruller’s Correspondence
This is an unmissable story related Trophy/Achievement.
 Buried Memories
Raid the Tomb of the Sharkophagus
This is an unmissable story related Trophy/Achievement.
 The Relic Room
Discover the Astralathe
This is an unmissable story related Trophy/Achievement.
 Archetypal Victory
Peruse Cassie’s Collection
This is an unmissable story related Trophy/Achievement.
 Bob’s Your Uncle
Empty Bob’s Bottles
This is an unmissable story related Trophy/Achievement.
 Tattered Family
Soothe Lucrecia’s Lament
This is an unmissable story related Trophy/Achievement.
 Deluginist Darkness
Frequent Fatherland Follies
This is an unmissable story related Trophy/Achievement.
 Finish What Was Started
Dissolve the Deluge of Grulovia
This is an unmissable story related Trophy/Achievement.
 Home Run
Find the Family Camp
This is a side mission, but it will be introduced to you as part of the story.
All you have to do is find where your family is camped in the Questionable Area. From where you meet them, head straight across the area toward the Psychoisolation Chamber. Take the path to the right of the Psychoisolation Chamber toward the Abandoned Mine.
Follow the short path in the mine to the exit where you will then be in the Questionable Area. Once in the Questionable Area, follow the signs that point toward to the Campgrounds. You’ll reach the Campgrounds and have a conversation with your family and the Trophy/Achievement will pop.


 Family is in Tents
Help Dion Setup Aquatodome
This can be earned while you find where your family is camped in the Questionable Area. Follow the same path as “Home Run” above to reach the Questionable Area.
Dion is found in the parking lot area where you exit the mine. Speak to him and tell him you’ll help set everything up.
Climb up the tree to the right of where Dion is standing and reach the platform. Aim at the highest pole and you should see a a circular target. Shoot it with PSI Blast and the tent will will pop open and be set up.
 Dance, Baby, Dance
Complete Queepie Quest
After speaking to your mom at the family campground, you’ll be given this side mission that tasks you with finding your brother 6 times. He will move locations each time you find him.
- In the Questionable Area just outside of where your family is camped.

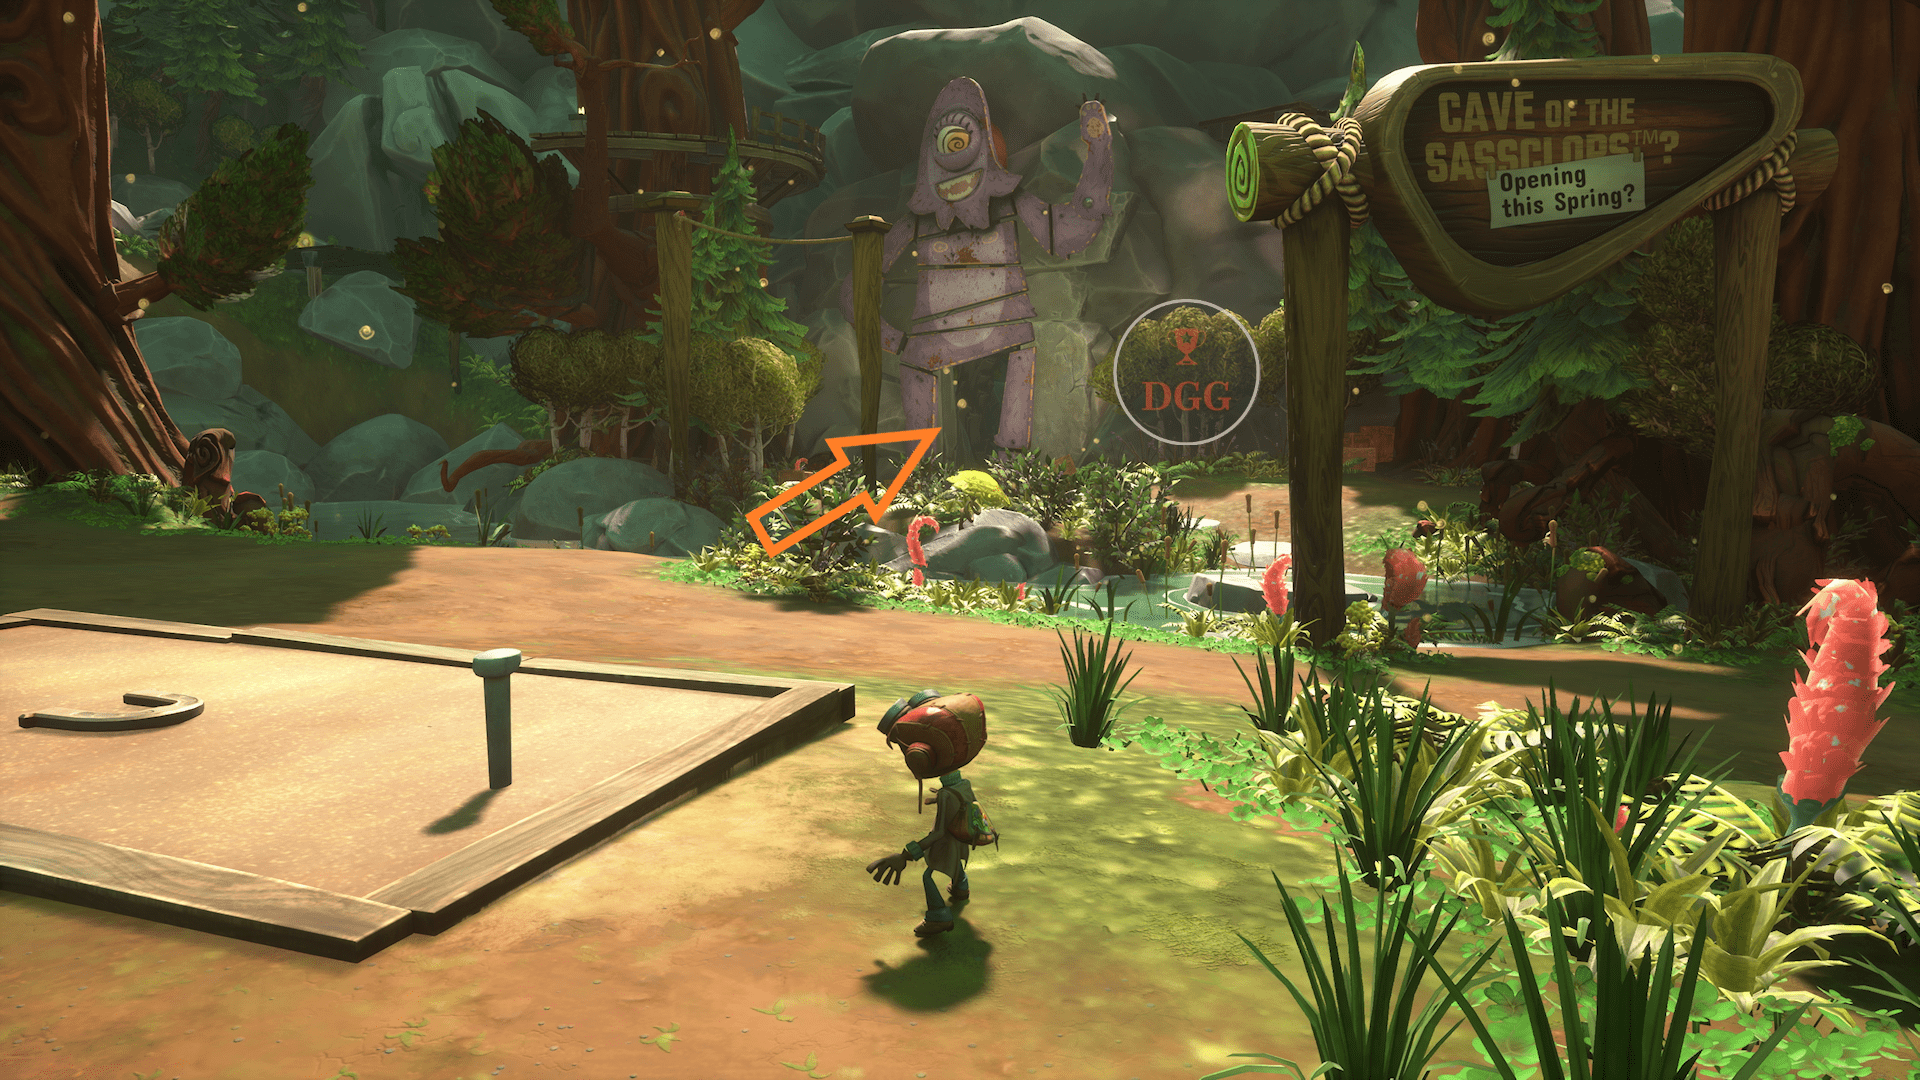
- He can be found in the Cave of the Sassclops which is directly behind you from the previous location.
- Starting from the parking lot of the Questionable Area, go through the gate that has multiple green arrows around it and a green ticket booth. Immediately to your left through the gate will be a climbable tree. Climb up and follow the path that’ll take you across ropes and another climbable tree higher up. Queepie will be at the very top on a platform.
- Follow the signs that point toward “Funicular.” Jump up on top of the bathroom building and then jump up to the ladder. Climb the ladder and follow the path across the rope and up the trees and platforms to find Queepie.


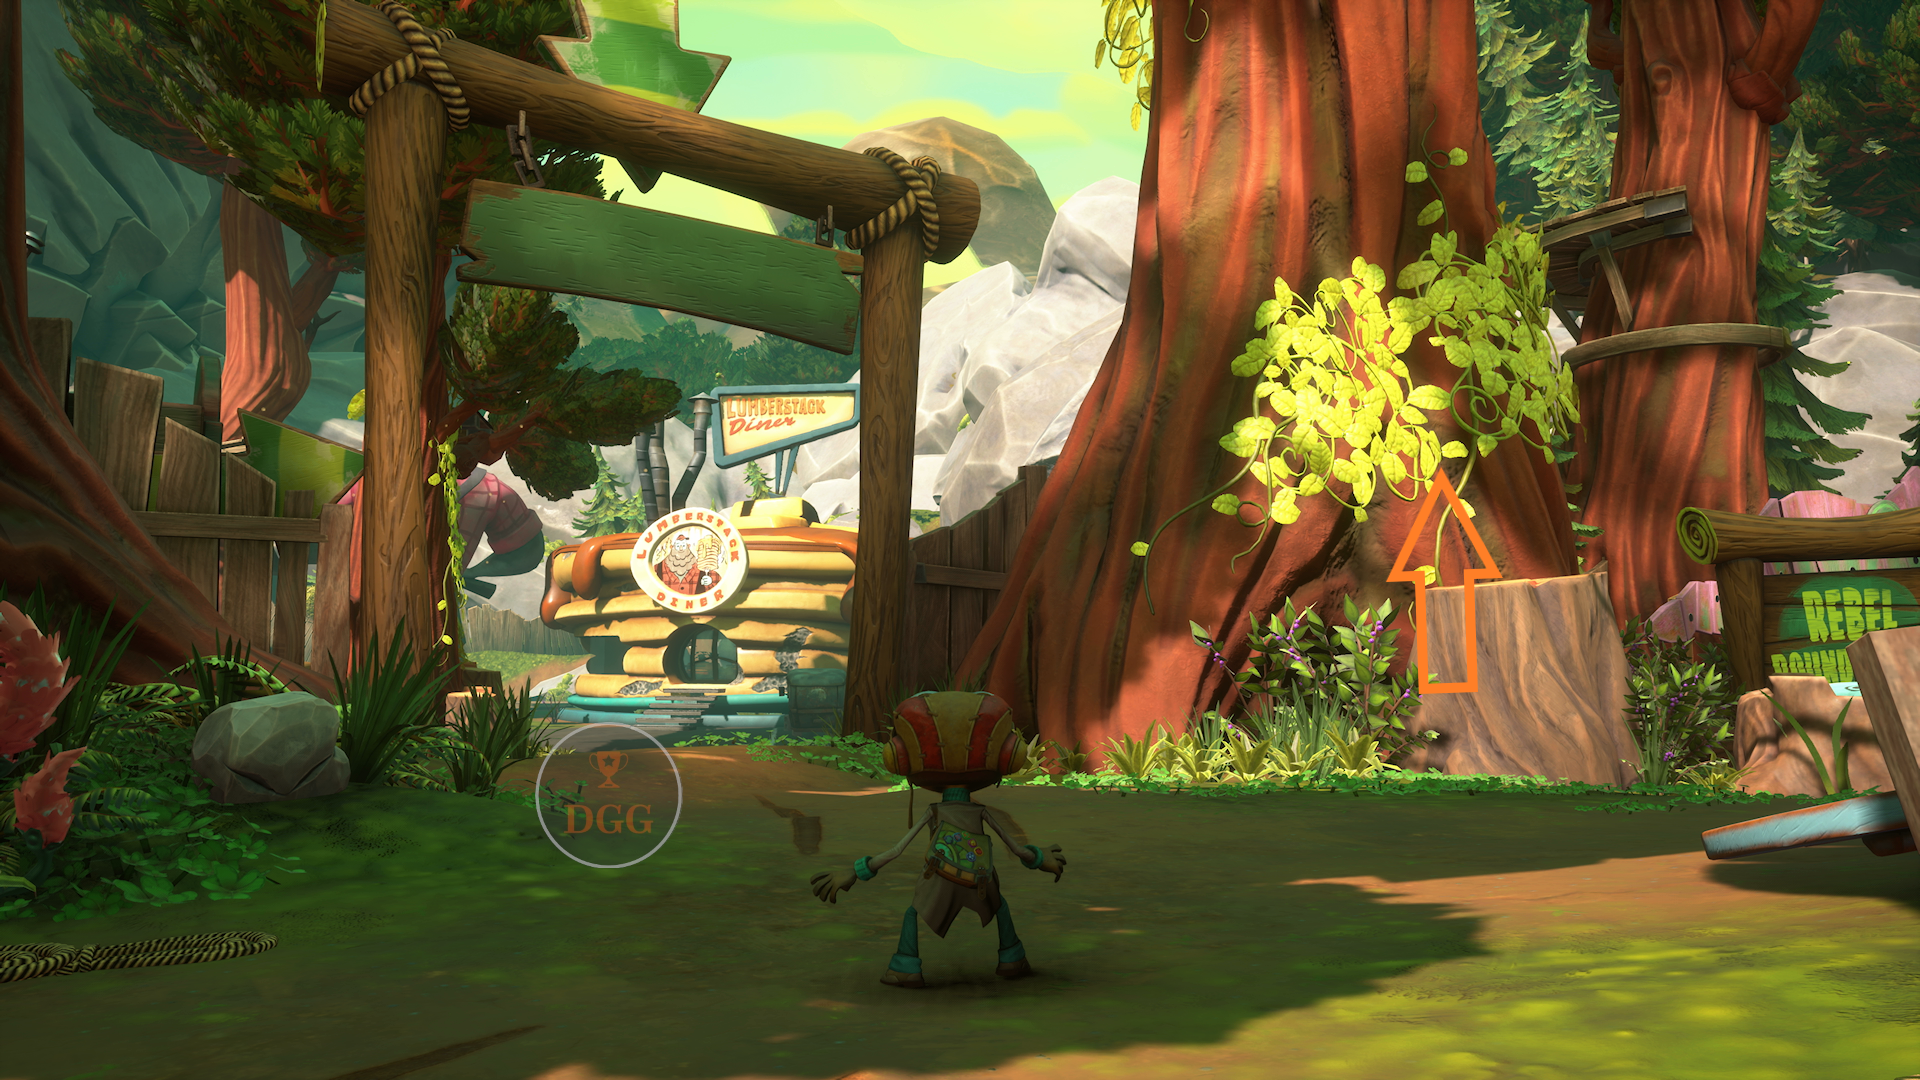
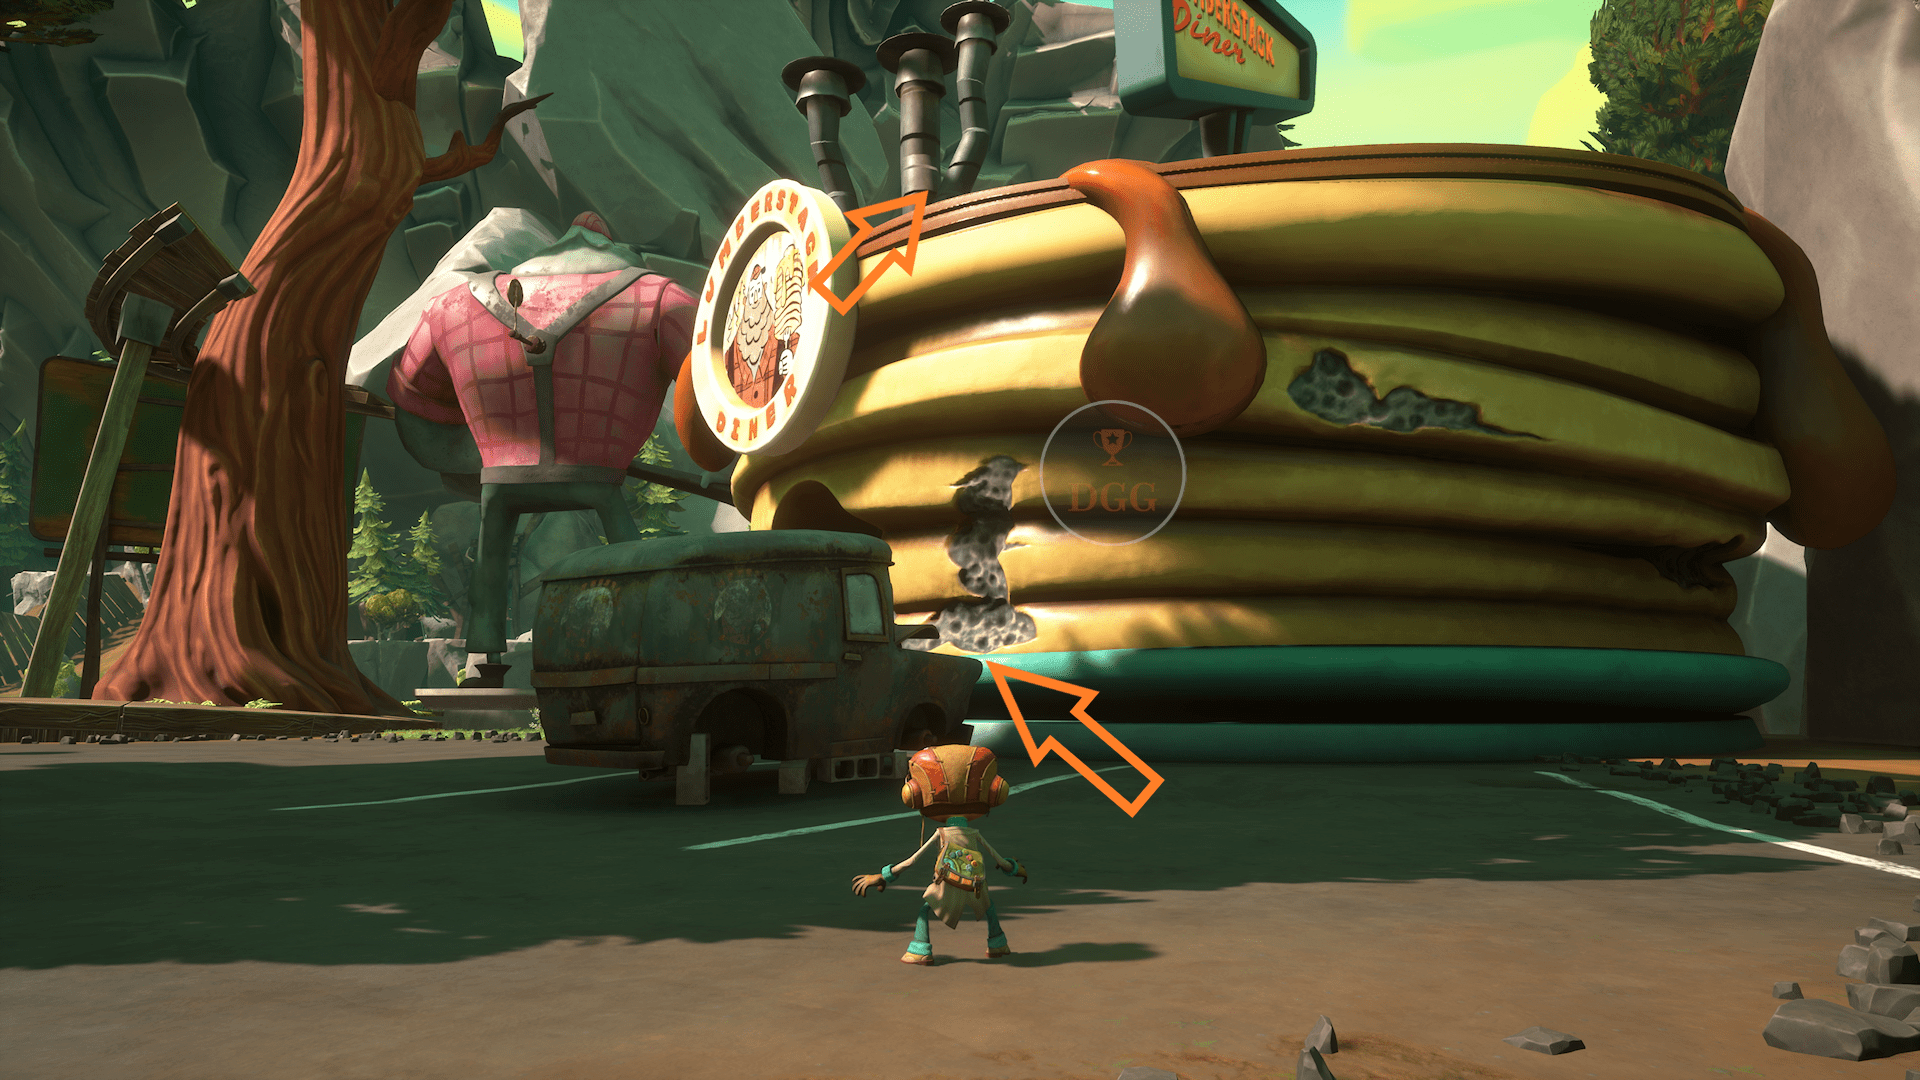
- The next location is on top of the Lumberjack Diner. This is in the parking lot where you exit the mine. Jump on to the hood of the truck to be bounced up to reach the roof of the diner.
- Go back to where you found Queepie in the Cave of the Sassclops in location 2. From the very same platform, jump across the wooden poles and tree branch to reach the tree. From the tree platform, jump up onto the rocks. Follow the path on the rocks to see Queepie on a platform just below you.


 Good Vibes Only
Complete Gisu’s Psychoseismometer Quest
Gisu is found in the Quarry up in the tree house. Go up the tree and inside the house to speak with Gisu to get this mission.

You’ll have to find and vent 3 Psychoseismometers. Each time you interact with them you’ll be taken to combat arenas. Return to Gisu to complete this after venting all 3 meters.
-
- Psychoseismometer 1 – This can be found in a cave right next to where your family is camped. Jump through an opening of trees next to 2 crates with blue logos on them. You’ll find a cave with the entrance blocked by rubble. Use your PSI Blast to destroy the rubble and go inside to find the first meter.


-
- Psychoseismometer 2 – This is found up in the trees directly above where your dad is practicing his psychic abilities in the Questionable Area. Climb the nearby ladder and follow the pathway up and across the trees. You’ll cross a rope and bounce from one tree to another. The final part of the path will have you using the Levitation ability in a jet stream in order to reach the meter.


-
- Psychoseismometer 3 – This meter is found in a cave next to the Abandoned Mine in the Quarry. You will need to blast the cave entrance with the Pyro ability to clear out the debris blocking the cave entrance. Enter the cave and follow the trail all the way to the back.

 A Fungus Among Us
Complete Lili’s Request
Lili is found in the Quarry near the entrance to the Motherlobe. Go to the side that the plane is parked on and jump up in the nearby tube to reach the next floor. From here, you can follow a path to platform across where you can find Lili sitting by herself. Speak to her to get this quest. You’re going to have to find a mushroom and bring it back to her.


The mushroom is found behind the waterfall at Far-Fetched Falls in the Questionable Area. You’ll need to use the Time Bubble ability on a log that is going up the waterfall and ride it. Keep using the Time Bubble ability on the log to keep it moving slow. As the log goes up, it’ll split the water of the waterfall enough for you to jump off and through to reveal a hidden cave behind the waterfall. Jump into the cave from a log to find this mushroom. Pick it up and take it back to Lili to complete this.


 Keep Your Shirt On
Scavenge all MISSION CRITICAL PSYCHONAUTS ASSETS
This is a side quest that will be given to you by Norma as part of the story.
You’ll be tasked with finding 16 different items hidden throughout all the various areas. Although you will be given this side mission early, you will not be able to finish this until after you’ve beaten the game.
After you’ve found everything, return to Norma in the Classroom area of the Motherlobe.
-
- Rotten Sushi – This is found on a counter in the Noodle Bowl Restaraunt in the Atrium of the Motherlobe.
-
Deck Of Cards – This is found in the Astral Lanes Bowling Alley in the Motherlobe. Use TK to throw the bowling ball down the lane into the pins 5 times. The cards will come out of the ball return after the 5th time.
-
- Psychonauts Name Plaque – Go into the Agents section of the Motherlobe and interact with a door to the left of Milla’s office next to a water cooler.
-
- Enemy Surveillance Drone – This is found in the Classroom area of the Motherlobe. Go into the Classroom area and you should see a door that says “Artifact Storage” to the right of the Think Tank. Go into the Artifact Storage door and burn the painting directly in front of you and jump through the newly created hole. After going through the hole, there will be a door to your immediate right. Use the Projection ability to open this door and retrieve the drone.
-
Astronaut Ice Cream – This is found in the Nerve Center in the Motherlobe. Go inside and you’ll notice computers that make a circle in the center of the room. Go up to the computer that has a green screen. Interact with it and then a different computer will now be green. Go interact with that one. Complete this pattern until you have interacted with all of the computers. The final computer will be outside of the circle marked by a green screen just like the previous ones.
-
Agent Orientation Laserdisc – This is found in Otto’s lab in the Quarry. Go past his desk and past the Otto-Matic vending machine. Take a right down the electrified hallway to find this at the end. Ride the levitation ball to get across the electricity.
- Psitanium Knife – This is found in a cave on the right side of the Quarry. Go the same way you went to get the side quest from Lili. Instead of following the stone path to go right toward Lili, go left instead. You’ll notice a cave on your right. Go inside to find this. This cave entrance is directly across from the plane that is parked.
-
Unexploded Bomb – This is found right outside of the Abandoned Mine entrance in the Quarry. It’s on the plank of wood being held up in the air by the crane. Use the Pryo ability on the camp fire to reach this with Levitation.
-
Novelty Mug – You will need the Projection ability in order to reach this. This is found inside of the Lumberstack Diner in the Questionable Area parking lot. Go inside and use Projection near the door to the left of the counter. Go inside the closet to grab this.
- Switchblade Hatchet – You will need the Time Bubble ability in order to reach this. This is found on a roof of a house that has water wheel moving very quickly in the Questionable Area. It’s to the left of the bridge you take to where your family is camped. Use Time Bubble on the wheel to slow it down. You can then use the slowed wheel to climb up to the roof.
-
Can of Corn – This is found up on a ledge inside of the Sassclops Cave near your family in the Questionable Area. Use Pyro to light the camp fire inside and use Levitation to reach this.
-
Human Skull – This is found on the Funicular ride in the Questionable Area. Use TK to pick up 3 gears nearby and throw them at the generator next to the ride to turn it on. Get on the ride and ride it up. The car on the left will have the skull. Just jump over to it.
-
Mini Murder Bug Bot – This is found in the Green Needle Gulch. Go to Nona’s River House. Go inside and then climb up the ladder. Use Pyro to burn the debris blocking the door. Go through the door and around the outside of the top level of the house to find this.
-
Viking Helmet – This is found in the Green Needle Gulch. Go to Helmut’s Stage to find his van parked under a roof with his guitar. Go behind the van to find the helmet.
-
Beehive Shaped Like My Phone – This is found in the Green Needle Gulch. Go to Cassie’s Hives. When you reach her house, go around to the back of it to find this phone. You can walk through the honey on the ground.
- Signed Copy of Mindswarm – This can only be acquired after completing Cassie’s Collection as part of the story. After that, go to Cassie’s Hives in Green Needle Gulch and speak with her. One of the dialogue options will be to ask her to sign your copy of Mindswarm.
 Associate Intern
Achieve Rank 2
See “Principal Intern” below for more details.
 Junior Intern
Achieve Rank 10
See “Principal Intern” below for more details.
 Senior Intern
Achieve Rank 50
See “Principal Intern” below for more details.
 Principal Intern
Achieve Rank 100
This is something that should come naturally as you play through the game. You will increase your rank by finding various collectibles, combining cards with cores at Otto-Matic vending machines and by finding PSI Challenge Cores.
You actually need to reach rank 102 in order to fully upgrade all of your badges. For that, you’re going to have to 100% the game. You will need to complete every side mission and collect every collectible in every area.
See “Figheaded” for more details.
 Extra Credit
Upgrade your first Badge
See “Unlimited Power!” below for more details.
 Power Play
Fully upgrade a Badge
See “Unlimited Power!” below for more details.
 Unlimited Power!
Acquire all Upgrades
Your upgrades can be viewed in your journal by pressing the Touchpad/View button.
As you rank up, you’ll be given Intern Credits which can then be used to buy upgrades in your journal. There are 9 different ability badges that need to be upgraded.
Certain upgrades will require you to be at certain levels as well. You will not be able to fully upgrade everything until you are at least level 102.
 Safecracker
Crack all Vaults
See “Figheaded” below for more details.
 Figheaded
Find all Figments
There are many collectibles to find in Psychonauts 2. There are a lot to find, but they are really not that difficult to track down. Most of them will be on your main path and the others just require some extra platforming to reach. Make sure to always look behind posters by burning them with Pyro and behind objects in the environment. The different areas are not really that complex, so as long as you’re thorough, you won’t have any issues finding them all.
You wont be able to fully collect them all until you have unlocked all of the abilities and have beaten the game.
Collectibles not needed for these specific Trophies/Achievements will be listed below as you will need almost everything in order to reach rank 102. All Cards and all PSI Challenge Markers will be required to reach 102.
None of the collectibles are missable.
-
- Figments – These look like sketches and are in each of the mental worlds. You just have to run through each of these to collect them. There are a lot, but collecting them all goes by surprisingly fast. They’re mostly on your main path and are fairly close together.
-
- Vaults – These are small safes that run around and look like pigs. You’ll need to chase them and melee them when you’re close enough in order to break them open.
-
- Emotional Baggage – These are literal pieces of baggage that need to be reunited with their tags. The Baggage tags are all found in the same area as the Baggage themselves. Once you find a tag that corresponds to a piece of Baggage, return to the Baggage and interact with it to put the tag on it.
Loboto’s Labyrinth
-
- 80 Figments
- 5 Emotional Baggage
- 2 Nuggets of Wisdom
Hollis’ Classroom
-
- 42 Figments
- 2 Emotional Baggage
- 1 Memory Vault
- 3 Nuggets of Wisdom
- 2 Half-A-Minds
Hollis’ Hot Streak
-
- 106 Figments
- 3 Emotional Baggage
- 1 Memory Vault
- 4 Nuggets of Wisdom
- 4 Half-A-Minds
Compton’s Cookoff
-
- 51 Figments
- 5 Emotional Baggage – Whether you beat the final cooking challenge in time or not does not matter. Come back here after beating the game and the locked box will be gone and the tag will be available.
- 2 Memory Vaults
- 2 Nuggets of Wisdom
- 2 Half-A-Minds
Ford’s Follicles
-
- 43 Figments
- 1 Emotional Baggage
- 1 Memory Vault
- 1 Nugget of Wisdom
- 1 Half-A-Mind
Strike City
-
- 52 Figments
- 2 Emotional Baggage
- 1 Memory Vault
- 1 Nugget of Wisdom
- 1 Half-A-Mind
PSI King’s Sensorium
-
- 263 Figments
- 5 Emotional Baggage
- 2 Memory Vaults
- 3 Nuggets of Wisdom
- 4 Half-A-Minds
Cruller’s Correspondence
-
- 47 Figments
- 1 Emotional Baggage
- 1 Memory Vault
- 1 Nugget of Wisdom
- 1 Half-A-Mind
Tomb of the Sharkophagus
-
- 20 Figments
- 1 Emotional Baggage
- 1 Memory Vault
- 1 Half-A-Mind
Bob’s Bottles
-
- 165 Figments
- 5 Emotional Baggage
- 2 Memory Vaults
- 2 Nuggets of Wisdom
- 2 Half-A-Minds
Cassie’s Collection
-
- 227 Figments
- 5 Emotional Baggage
- 2 Memory Vaults
- 4 Nuggets of Wisdom
- 2 Half-A-Minds
Lucrecia’s Lament
-
- 106 Figments – In the third section of Nona’s Quilts you should see 2 burned out campfires. These will be on the main path. Use TK on both of the campfires to reveal hidden tunnels. Interact with the tunnels to go through them to unveil 2 locations full of Figments.
- 5 Emotional Baggage
- 2 Memory Vaults
- 3 Nuggets of Wisdom
Fatherland Follies
-
- 98 Figments
- 5 Emotional Baggage
- 2 Memory Vault
- 3 Nuggets of Wisdom
- 2 Half-A-Minds
- 3 Gramaphones for “Make It Stop!.”
Motherlobe
-
- 27 PSI Challenge Cards
- 6 Supply Chests
- 6 Supply Chest Keys
- 8 PSI Challenge Markers
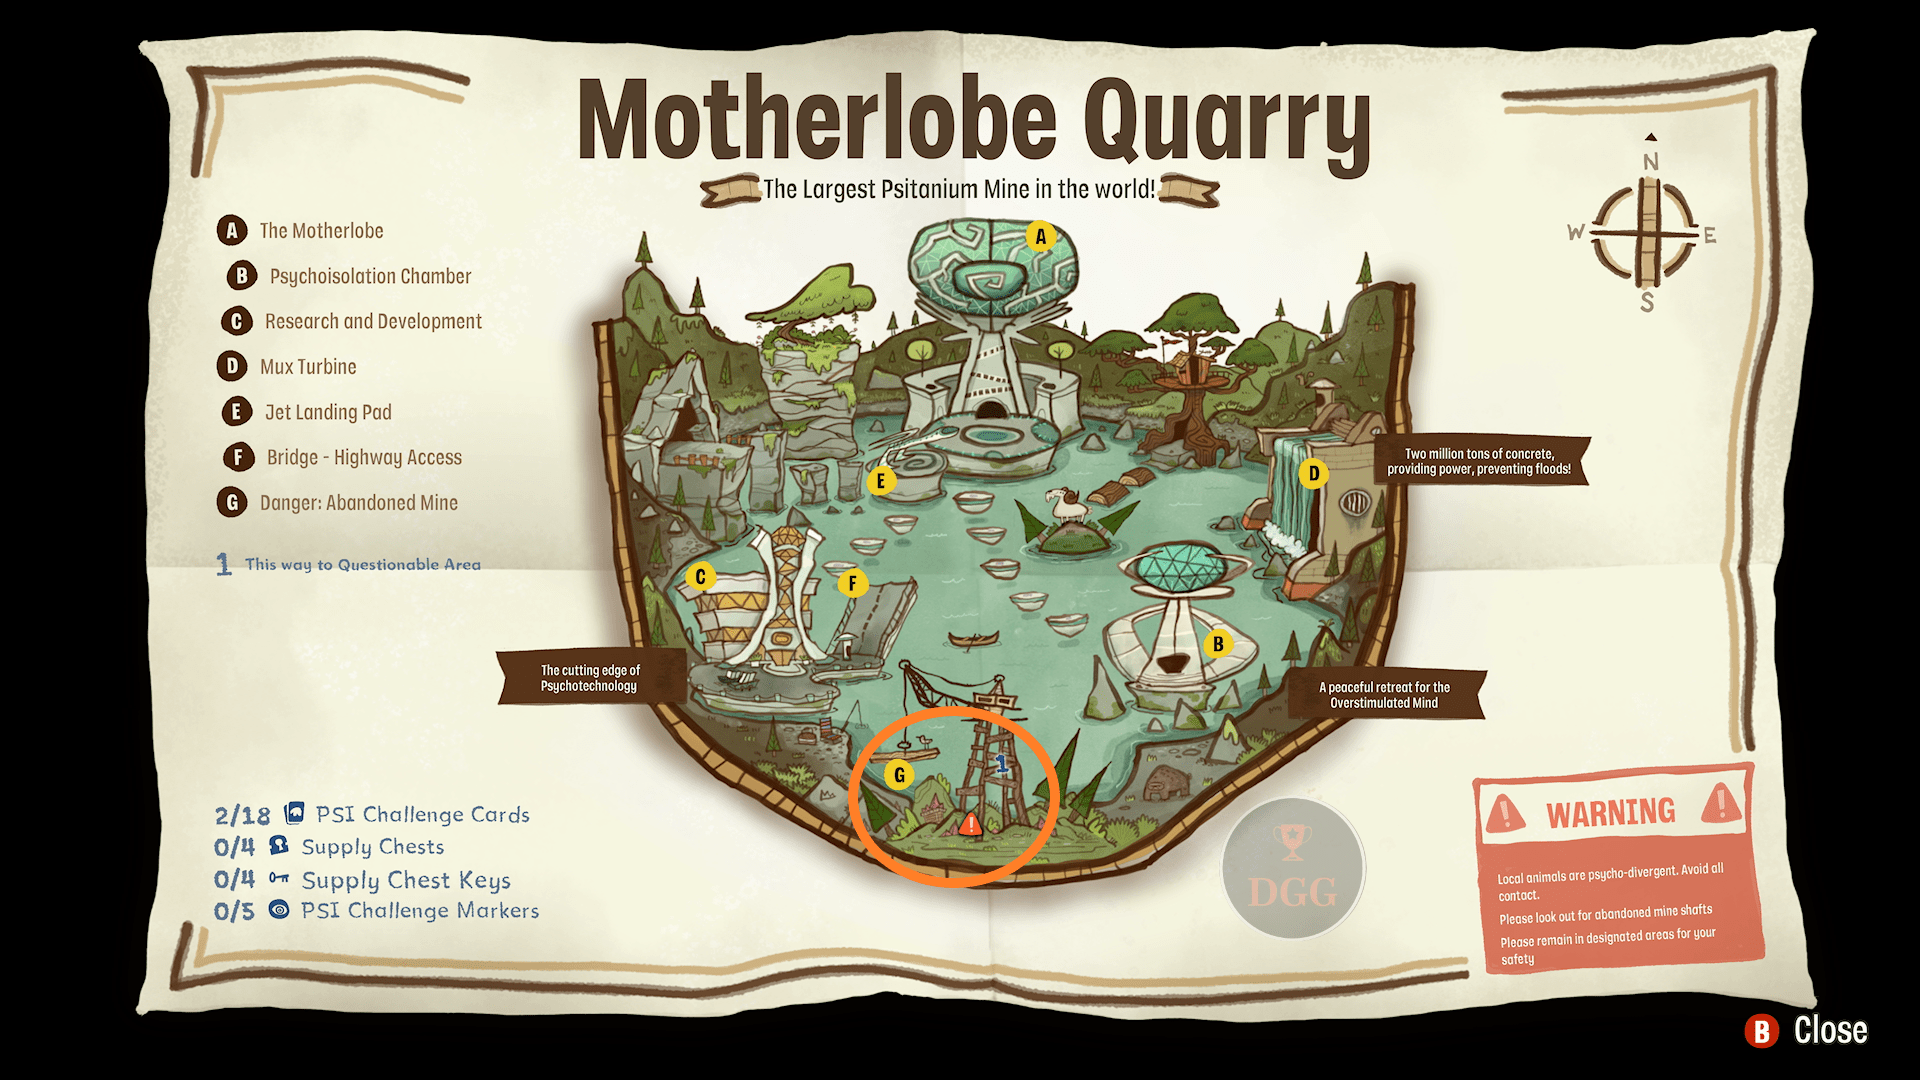
The Quarry
-
- 18 PSI Challenge Cards
- 4 Supply Chests
- 4 Supply Chest Keys
- 5 PSI Challenge Markers
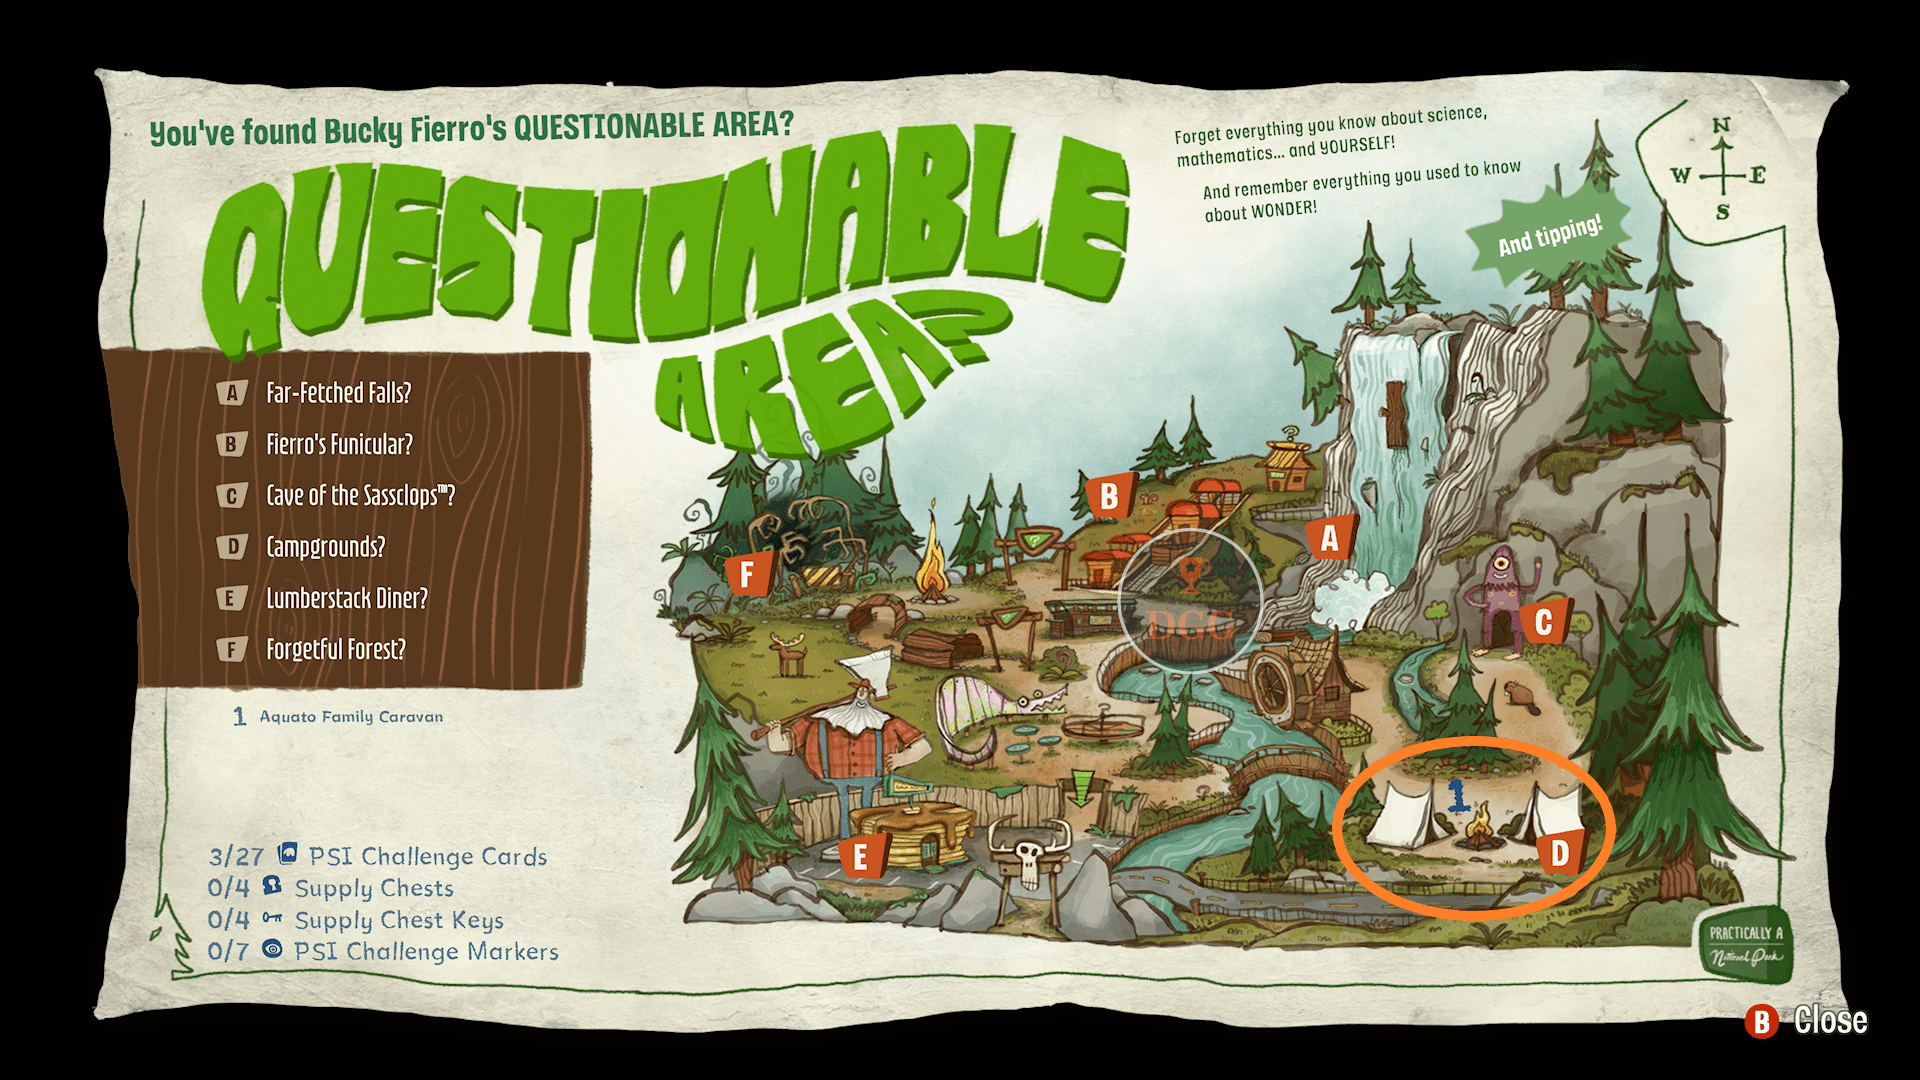
Questionable Area
-
- 27 PSI Challenge Cards
- 4 Supply Chests
- 4 Supply Chest Keys
- 7 PSI Challenge Markers
Green Needle Gulch
-
- 27 PSI Challenge Cards
- 2 Supply Chests
- 2 Supply Chest Keys – You will need to use Clairvoyance on a beaver in the animal pen in order to see 1 of the key’s hidden locations.
- 4 PSI Challenge Markers
 You’re it!
Tag all Emotional Baggage
See “Figheaded” above for more details.
 Pin Drop
Equip your first Pin
See “Kingpin” below for more details.
 Pinhead
Equip 3 Pins at once
See “Kingpin” below for more details.
 Kingpin
Purchase all Pins
There are 33 pins and they are bought from the Otto-Matic vending machines. All you have to do is buy them all.
They can get kind of expensive, so make sure to always collect as much of the purple Psitanium as you can.
When first starting out, buy the Psimultanium and VIP Discount pins. The Psimultanium pin will double the amount of money you pick up and the VIP Discount pin will give you a big discount on items in the Otto-Matic vending machine making the pins cheaper.
The pins you’ve purchased can be viewed by pressing the Touchpad/View, tab over with R1/RB to the “Pins” page.
When you have enough, have any 3 of them equipped at the same time and you’ll also pop “Pinhead.”

 Hiccup in the Giddyup
Recover your mental energy with a Dream Fluff
Dream Fluff are the pink and blue candies that are bought from Otto-Matic Vending machines.
In order to use these, you just need to have them. They will automatically revive you when you run out of health.
So, in order to get this, you’re going to have to take damage which means you cannot earn this with Invincibility turned on. The invincibility mode can be turned on or off at any point while playing the game.
 PSI Roller
Upgrade to the Astral Wallet
See “Nest Egg” below for more details.
 Fluff Nutter
Max out your Dream Fluff capacity
The Dream Fluff capacity upgrades are bought from the Otto-Matic vending machines under the “Items” section.
You will need to buy 2 Dream Fluff capacity upgrades in order to max it out.
-
- Fluff Pockets – 75 Psitanium or 37 Psitanium with the VIP Discount pin equipped.
- Jumbo Fluff Pouch – 750 Psitanium or 375 Psitanium with the VIP Discount pin equipped.
 King of Pop
Max out your PSI Pop capacity
The PS1 Pop capacity upgrades are bought from the Otto-Matic vending machines under the “Items” section.
You will need to buy 2 Psi Pop capacity upgrades in order to max it out.
-
- Mind’s Eyelets – 75 Psitanium or 37 Psitanium with the VIP Discount pin equipped.
- Expandolier – 750 Psitanium or 375 Psitanium with the VIP Discount pin equipped.
 You Otto be in Pictures
Purchase all Otto Shot Filters
After getting the Otto Shot from Otto in his lab, the filters will become available for purchase at Otto-Matic vending machines. Each one will cost 75 Psitanium. All you have to do is buy all 5 of them.
Be sure to have the VIP Discount pin equipped to get these cheaper.
 Shutterbug
Take a photo with the Otto Shot
The Otto Shot is acquired by speaking with Otto in his lab in the Quarry. Speak to him and ask him if he has any devices to lend out. He’ll then give you the Otto Shot.
Once you have the Otto Shot, hold Right on the D-Pad to equip it. When you’re in the camera view, press R1/RB to take a picture. All you need is one.
 Fine Tuning
Tune in to a Stray Thought
The Stray Thought Tuner is acquired by speaking with Otto in his lab in the Quarry. Speak to him and ask him if he has any devices to lend out. He’ll then give you the Stray Thought Tuner.
Once you have it, go to the Atrium and equip it. Hold Left on the D-Pad to equip the Tuner and hold R2/RT on the NPC.
Walk around holding R2/RT looking for a thought. When one gets picked up, the Tuner will direct you in the direction it was detected. The faster it starts to spin, the closer you are. When the light turns green, you’re getting very close. Keep following the signal until the stray thought is revealed.
 Nest Egg
Completely fill your Astral Wallet
In order to completely fill your wallet, you will need to have bought both of the upgrades for it from an Otto-Matic vending machine.
Psitanium is the currency in Psychonauts. It can be found by defeating enemies, breaking objects in the environment and found on the ground in the various environments.
You will need to buy 2 wallet capacity upgrades in order to reach the max limit.
You can speed this up a bit by buying the Psimultanium pin from the Otto-Matic vending machine. This doubles the amount of money that is dropped.
-
- Psifold Wallet – 75 Psitanium or 37 Psitanium with the VIP Discount pin equipped.
- Astral Wallet – 750 Psitanium or Psitanium with the VIP Discount pin equipped.
After you have the capacity upgrades, you will also need to have 5,000 Psitanium on you. This is not an accumulative Trophy/Achievement. You will need to save up 5,000.
 Take a Lickin’
Consume a PSI Pop to restore some mental energy
Shortly after the beginning of the game you’ll be introduced to a PSI Pop when defeating an enemy. This is a lollipop that you can pick up that will restore mental energy when used. Press Down on the D-Pad to use it after collecting it.

 Core Strength
Combine PSI Cards with a PSI Core at the Otto-Matic
PSI Cards can be found around the Motherlobe. You will need at least 9 of them before you can combine them with a PSI Core. The Cores can be found in all of the various areas and purchased from the Otto-Matic vending machines.
In fact, the first time you interact with a Otto-Matic machine, you’ll be taken through a tutorial explaining all of the mechanics of the machine which will include combining items. You’ll even be able to buy a Core for free.
Choose the left option in the Otto-Matic machine named “Combine.” All you have to do then is combine your cards with a core.
 Objection!
Throw a Judge’s gavel back at him
This can be earned against the very first judge that you will fight in Compton’s mind. All you have to do is hold down whatever button you have Telekinesis assigned to in order to take the gavel from him. Aim at the judge while holding the gavel and throw it right back at him.

 TK-O
TK-O
TK throw an object to stun an enemy
This can actually be earned against the very first censor that you will face. Hold down whatever button you have Telekinesis assigned to in order to use TK to pick up an object and then throw it at an enemy.
 Duck, Duck, Goose
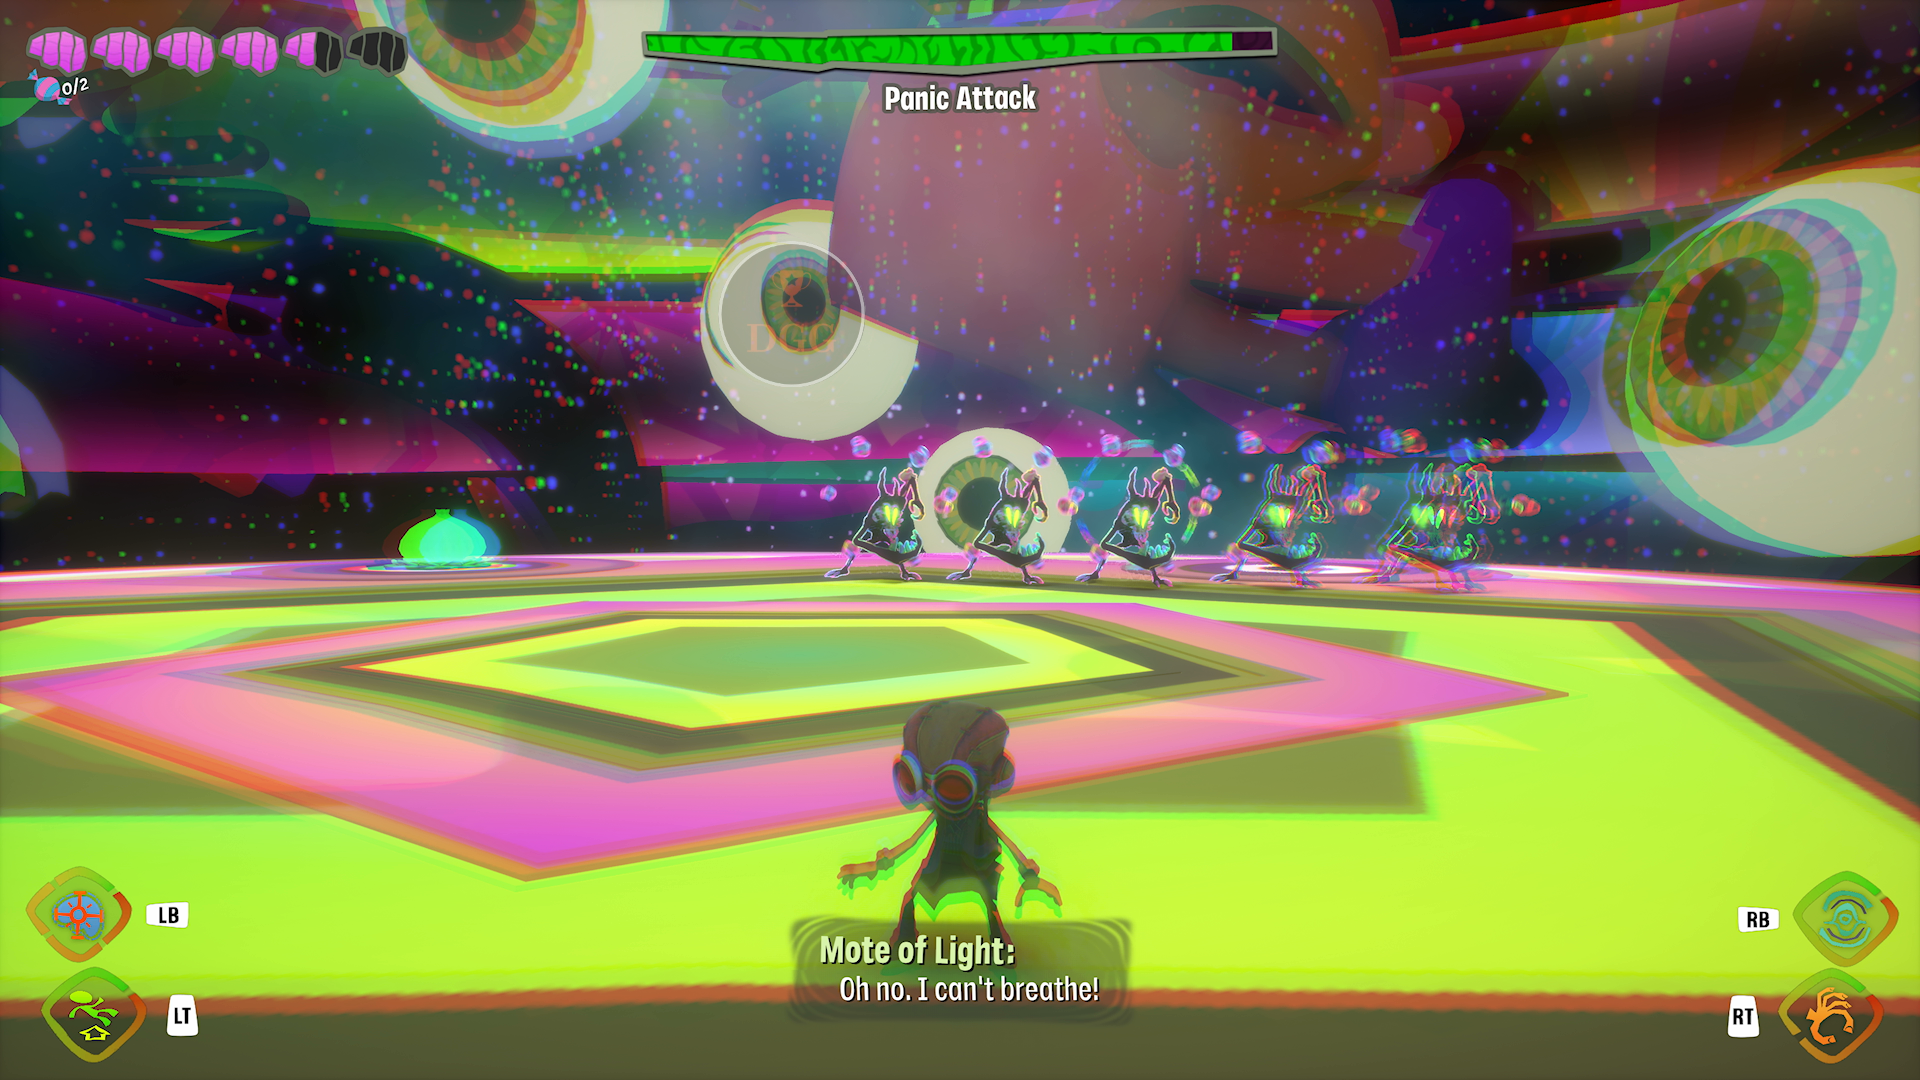
Find the real Panic Attack during his Phantom attack
Missable
This is earned during the “PSI King’s Sensorium” mission. This takes place inside of Nick’s head after you get a replacement brain for him.
As soon as you enter his mind, you’ll be in a boss fight with the required enemy type. This first fight will be on a short timer, but there is enough time to knock this out here.
When it splits into 5 copies, all you have to do is shoot the real one with your PSI Blast attack. If you shoot a fake, it’ll disappear. If you shoot the real one, all the copies disappear. All you have to do is shoot the real one while there are copies active.
It won’t stay split forever. If you’re having trouble getting this done before the copies go away, you’ll end up getting an ability called “Time Bubble” later on in this mission. This ability will slow down time giving you more time to shoot the real enemy.
If you don’t get this done at the first boss fight, don’t worry. There will be another encounter with this boss during this mission. This enemy type will show back up afterwards, but this Trophy/Achievement will not count on them. This has to be done during the boss fight version of this enemy during this mission.
 Shared Regret
Throw a Regret’s anvil at another enemy
This can also be earned during your very first encounter with the Regret enemy type. Hold down whatever button you have Telekinesis assigned to while aiming at the anvil that the Regret is carrying to take it from them. Then, aim at a different enemy and throw the anvil at them.

 Pyromania
Pyro 3 enemies at once
Shortly after the beginning of the game you’ll be introduced to the Pyro ability. All you have to do is hold down whatever button you have Pyro assigned to in order to charge up Pyro. Hold it while grouping up the enemies. When 3 enemies group up near you they will be outlined in yellow meaning that that will all be in range of the Pyro attack. Once you see all 3 outlined in yellow, release the attack to set them all on fire. If you’re having trouble with this at first, you can upgrade the Pyro’s radius.
 I’m always here for you, darling!
Talk to Milla in her Office
Missable
This is missable as Milla will not be in her office later in the game. Get this as soon as you get to the Motherlobe for the first time.
The story will take you to the Motherlobe after finishing Loboto’s Labyrinth where you will be given an intern card. After getting the card and entering the Motherlobe, knock this out immediately. Go through the doorway with the “Agents” sign above it and follow the hallway. There are only two doors. Milla’s office is the one on the left. Enter it and go speak to her by pressing Triangle/Y.


 Forgot My Keys
Revisit a brain through the Collective Unconscious
This is almost story related. When you return to the Motherlobe after completing the mission at the casino, Sasha will talk with you about manipulating other people’s thoughts. When this scene ends, you’ll be standing at the Collective Unconscious in Sasha’s office.
The Collective Unconscious is basically a hub world of all the other locations that you’ve been to. Using this will allow you to revisit any of the previous locations. In order to earn this, go through any door and revisit any previous location.
This is where you’ll be going to find any remaining collectibles you may have missed.
 Make It Stop!
Break all 3 Gramaphones in Fatherland Follies
You won’t be able to earn this until you’ve reached Fatherland Follies which is much later in the game.
There are 3 Gramaphones playing music throughout the area that you need to destroy.
The Gramaphones are listed below in the order that they appear.
-
- Gramaphone 1 – Right behind where the seat stops for the first time. Interact with the door to open it and enter to find this.

-
- Gramaphone 2 – This near the seat after the second stop on the ride. It’s the same room where you have to change the scenery of the family’s story.

-
- Gramaphone 3 – This is behind a closed door in the tree tunnel right before dropping down to get back in the seat. This is obtainable after the third stop.


 Making Peace
Return to where it all started
Go to Green Needle Gulch after beating the story and go to Nona’s River House. It will be labeled as “A” on the Green Needle Gulch map.
Go to the River House and enter. Speak to Nona once inside and this will pop after the conversation. If this doesn’t pop after the conversation, speak to her again.