Welcome to the Banishers: Ghosts of New Eden collectible guide! This guide will detail the location of every Trophy/Achievement related collectible. You will not be able to collect everything right away. Some areas will be locked until you have acquired all of the abilities. Nothing here is missable up until the point of no return. The game will tell you when you’re about to reach that point. For the purpose of this guide, everything was collected at the point of no return as well as all Haunting Cases completed. So, if there is something you cannot get, you’ll need to come back later in your playthrough once you’re able.
Some of the gear is bought from merchants. If you kill a character, their goods will be available through a different merchant. Do not worry about the “Round Figure” Trophy/Achievement. It is accumulative. You do not need to have all 10,000 Pieces of Eight on you at once. So it is okay to spend it.
Rare crafting material locations will be listed here as well. These are rewards for completing Elite Enemies, Nests, Void Breaches and Scourges.
The shelters are not listed here, but you will be taken by all of them while combing the map for collectibles with the guide below.
Bibles
You cannot sacrifice Hugh at the end of The Schoolteacher Haunting Case.
In order to begin his quest, you will need to interact with the signboard in The Harrows. You’ll then be given the “Bible Studies” activity.
Cursed Chests
Before you can open a Cursed Chest, you will need to speak with Seeker. After finding one, return to Seeker and choose the dialogue option, “We found a cursed item.” This will actually be an Activity. Seeker will then give you the location of where you can learn a ritual to clear the curse. It will be marked on your map. Go to the cabin behind a wall that you can use Outburst on. Enter the cabin and interact with the item on the table to learn the ritual.
Banishers: Ghosts of New Eden Trophy Guide and Roadmap
The Dark Woods
- Collectible – The Origin of Banishers – After waking up on the beach and meeting Seeker, this book will be on the table to your right.


- Scourge – Marooned Rage – This is found on the beach after meeting Seeker. You’ll need to come back for this later.


- Soul Grabber #1 – Cross under the rock formation after the previous Scourge and turn around to find this Soul Grabber up against the back of the rock formation. You will need to come back to this once you have a gun.


- Soul Grabber #2 – This is found above the top of the waterfall. You will need to come back to this once you have a gun.


- Locked Chest 1 / Occultist’s Equipment / Spiritual Necklace – After the first rest area in the cave, follow the path left to the objective marker. Here, you’ll be introduced to switching between characters. Switch to Antea and look in the corner next to the path to see webs. Interact with them to clear them and you’ll receive the Occultist’s Key.


Continue through the cave until you come to a fork in the path. Go right. Drop down off the ledge and kill the enemies. Afterwards, climb up the wall in the back of the area where the enemies were to find this chest at the top.

- Soul Grabber #3 – After exiting the first cave you go through, this will be up in the trees. It can be a little hard to see. You will need to come back to this once you have a gun.


- Collectible – Blaming the Living – This can be first earned during The Ends of the Earth main quest when Red asks if people will be able to see Antea. Just up the path on the right will be a tent. This book is laying on the ground in the tent.


- Collectible – Sacred Geometry – First, you will need to have the Ensare ability before you can reach this collectible. Once you do, enter the area and to the wreckage of the cart on the right. Switch to Antea and use her to reveal the collectible.


- Scourge – Bone Crushing Harvester – This is found in the same area as the previous collectible.
- Collectible – Voices in the Mist – Progress through the chapter until you are on Jacob’s investigation. Follow the quest markers to the area covered in quick mist. Slide down the rope into the quick mist and then switch to Antea. Go down to the stream of water and follow right to find this collectible in a satchel on the right side of the river.


- Soul Grabber #4 – This is found underneath the destroyed bridge after crossing the gap.


- Nest 1 – Complete Jacob’s haunting and then progress through the area until you reach a gap that you cannot cross. You’ll be forced to take a side path. At bottom of the side path will be a group of enemies as well as this nest. Interact with the highlighted spot on the ground and use the Make Manifest ritual. Kill the enemies that spawn to complete the nest.


- Soul Grabber #5 – This is found on your left after using Antea to fly up from the lower area to the top ledge. It is behind a cart.


- Collectible – To Bring Closure – During the story, you’ll be caught in a snare trap. After the fight, go behind the cabin to find this in a satchel.


- Lost Chest – Wristband of Harmony – From the previous collectible, go inside of the cabin to find this chest.


- Collectible – What is a Ghost Made Of? – Progress until you meet Kate. After speaking with her, head to the objective marker to find your shelter. This will be on the floor in a satchel on the right side.


- Bible #1 – This is found on the bookshelf to the left of the fire inside of the shelter at Hunter’s Camp.

- Locked Chest / Trapper Reserves – Aureola – First, you will need to find the key. It is in a bag on the table in your shelter where the previous collectible was found.

Once you have the key, exit your shelter and back track down to the stair case that goes up two flights of stairs to a cabin. Go to the left side of the cabin at the top to find this chest next to a tree growing through the platform.


- Soul Grabber #6 – Cross the two short bridges to the northeast of Hunter’s Camp. After the second bridge, go right to a small graveyard. This can be found up a climbable ledge in graveyard.


- Treasure Map – Mysterious Cache – Look at your map for the trader icon. It’ll be a bag. If it’s not there, go over to the right side of town and he should spawn. Speak to him and buy the map. The treasure location is in the Mire Marshes. Buy the map now, and we will solve the map later in this guide when we get to the Mire Marshes.


- Marauder Armor – Bought from Nellie/Arther at Hunter’s Camp after her haunting case.
- Aegean Echo – Bought from Nellie/Arther at Hunter’s Camp after her haunting case.
- Banisher Tea – Bought from Nellie/Arther at Hunter’s Camp after her haunting case.


- Ivory Riposte – Complete the Iron Shortage activity for Nellie/Arther after finishing The Heaytons Haunting Case. Buy Iron from Fort Jericho and bring it to Nellie/Arther for her to make the weapon.
- Soul Grabber #7 – Take the southeast exit from the Hunter’s Camp and go to the southwest area at the end of the path.

Squeeze through the gap in the wall next to the cabin.

Once through, go right and squeeze through the next gap.

From there, go left to the back wall and look up to find this Soul Grabber.

- Soul Grabber #8 – From the cabin by the wall you slid through for the previous Soul Grabber, go behind the cabin and climb up the ledge.

Follow the path across the log and up the hill to another half destroyed cabin. Go around to the backside of that second cabin to find this Soul Grabber.


- Cursed Chest – The Hunter – The Bridge of Artemis – Go through the cave near the previous two Soul Grabbers. At the exit there will be a wall that you can use Outburst on. Knock it down and enter the small cave.


Push the cart on the tracks all the way to the wooden platform and use it to climb up and grab the key.

Then, drop down and climb up the wall on the opposite side of the room. Follow the path at the top until you come a pile of rocks on the right. Use Outburst on the rocks and crouch under the stone. Pick up the second key after crouching through.

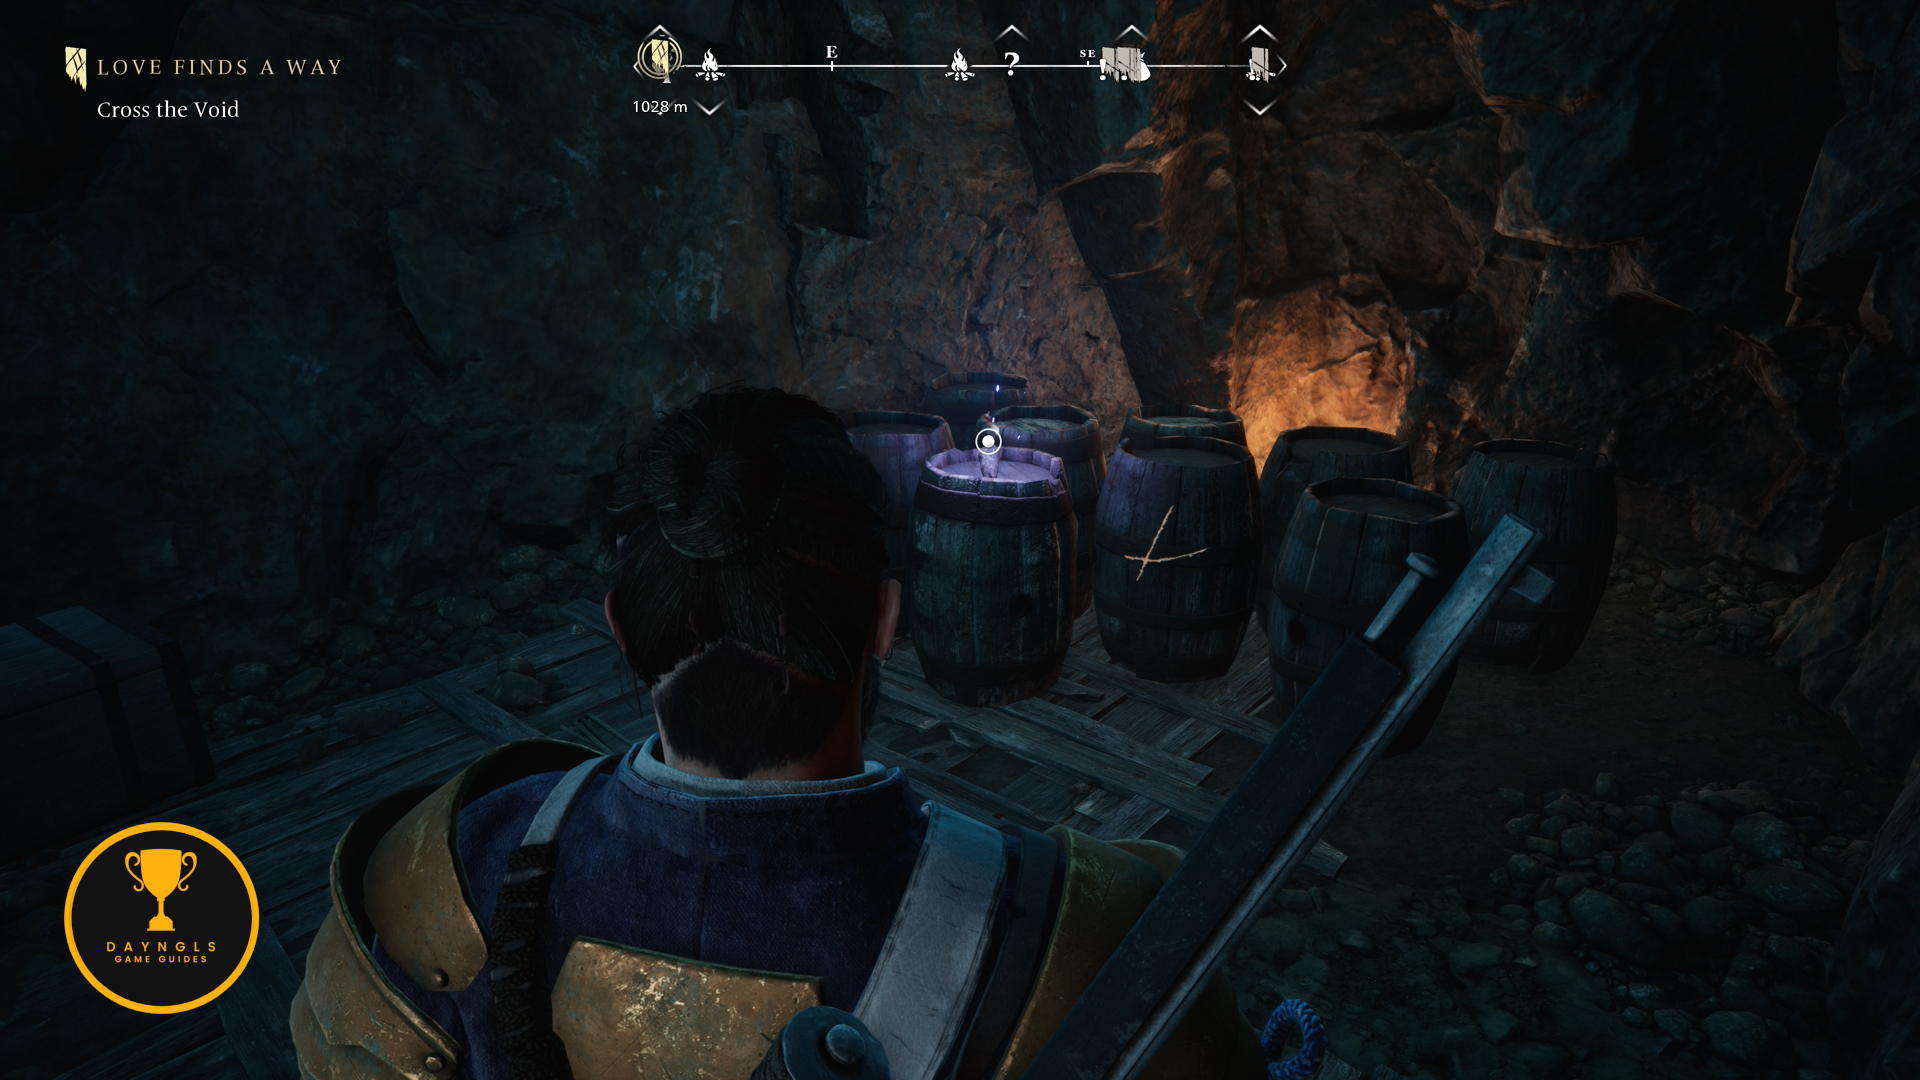
After picking up the second key, look out over the ledge shoot the two hanging barrels. One will drop a third key and the other will drop the bridge.

Backtrack to the bottom of this cave, cross the bridge and pick up the third key. Interact with the chest and then turn around. Use the Unbounding ritual to open the chest.
- Soul Grabber #9 – Climb up the ledge inside of the same cave as the previous collectible. Instead of crouching under the stone from earlier, exit the cave. This Soul Grabber will be on your right as you exit through the cave entrance.


- Soul Grabber #10 -Make your way down to the dock from the previous collectible. This one is found near the dock on some rocks in the water.


- Soul Grabber #11 – From the previous collectible, head north and take a side path on the right to find this by standing on a ledge overlooking the river.


From the previous collectible, head south. We’ll need to go south in order to circle around the area due to the style of map traversal in Banishers. If you’ve already been through here, you’ll already have the shortcuts unlocked. You can reach the area below by backtracking through the cave with the last Cursed Chest we opened. Take the exit at the top of that cave and go through the cave with the shelter.
- Bible #2 – From Kate’s Bivouac shelter fire, take the path that you crouch under and follow the path. The bible will be ahead of you on a box on the right.

- Soul Grabber #12 – Go through Kate’s Bivouac shelter. Exit Kate’s Bivouac shelter and follow the path right. Go right at the lit torch. Follow this path through a cave until you come outside. Once outside, follow the path down to the water to find this above a tree trunk in the water.


- Elite Enemy – Tenacious Huntsman – This is found on the opposite side of the lake from the previous collectible. Use the Make Manifest Ritual.


- Collectible – In the Beginning Was the Word – Backtrack through the path you just came down and head toward Exit Kate’s Bivouac shelter. When you get to the torch you turned at, go right and follow this path down to the bottom level. This is next to the Altar.


- Soul Grabber #13 – From the previous collectibles, jump over the nearby bridge. As soon as you land on the other side, turn around to find this under the bridge.


- Soul Grabber #14 – Continue west and either make your way through the next area by using Antea to fly across or use the shortcut rope if you’ve been through here already. This is on the western most wall next to a fallen tree.


- Soul Grabber #15 – Follow the path from the previous collectible north until you come to a ledge near a cabin. Before dropping down, look above the cabin to see this Soul Grabber.


- Locked Chest – Abandoned Belongings – Gunner Battlegear – Drop down the ledge from the previous collectible and head south to the destroyed bridge. Interact with the satchel on the ground next to a body to pick up the key to this chest.


After picking up the key, go back to the cabin you just passed. Hop over the log on the left of the cabin. Destroy the barrels and then destroy the back door to enter the cabin and find the chest.


- Collectible – On the Nature of Specters – This is in the same cabin as the previous chest. It is on the desk opposite of the chest. Use Antea to uncover it.

- Treasure Map – Outlaw’s Cache – From the previous collectible, follow the path north and then west until you come to a fork. At the fork, go left to climb up a ledge. Follow this path to high ledge where you can drop a shortcut rope. Drop it and slide down. To the right of the rope at the bottom is a cave you can crouch into where the map is found in a chest. The treasure location is in the Harrows. Pick up the map now, and we will solve the map later in this guide when we get to the Harrows.


- Bible #3 – Return to the fork in the road from the previous collectible and continue heading north This is found on a box next to the Wolf Den shelter.


- Soul Grabber #16 – Continue on the path going north until you get to a cave entrance. Drop into the cave and follow the path until you drop down a shorter ledge. As soon as you drop down the ledge, look to your right to see this Soul Grabber.


- Soul Grabber #17 – From the previous collectible, head deeper into the cave. Use the wooden platform to drop the rope nearby and slide down it. Jump across the river and follow the path down where you’ll see water on your left. Go to the water and look back the way you came toward the waterfall to see this Soul Grabber.

After the previous collectible, fast travel back to the Hunter’s Camp.
- Soul Grabber #18 – From the Hunter’s Camp, take the northwest exit out of the camp. Follow this path north and then slightly west as it curves. Look up on the right when the path goes between two large stones with a cabin on top. This is on the right side hanging just under the cabin up top.


- Soul Grabber #19 – Continue following the same path as the previous collectible northwest. When you reach the fork in the road, go left. Climb up the stone wall, hop over the log and then go to the right of the small cave entrance to climb another stone wall. At the top, turn around to see this directly across from you.


- Cursed Chest – The Poacher – Soul Catcher – First, backtrack to the area where we got Soul Grabber #18. Go to the east side of that area where there is a big crevice. Look down into the crevice and to the right to see the first key. You can climb down next to a smoldering torch.


Pick up the first key and then climb back up the way you came down. At the top, head northwest to the fork again. This time, go right. Follow this path to a small ledge that you can climb up. Climb up and you’ll see the second key straight ahead.


From the second key, look to the left to see a gap in the wall you can squeeze through. Squeeze through it and follow the path to a log bridge. Cross the log and continue straight until you come to a cabin. Go to the left side of the cabin and squeeze through between the cabin and wooden fence.
From the back of the cabin, switch to Antea and fly across the gap. Here you will find the third key next to the Cursed Chest. Pick up the key and open the chest.


- Soul Grabber #20 – From the previous chest, use Antea to fly over the gap back to the cabin. Squeeze through the side of the cabin again and then use the nearby shortcut rope and slide down. At the bottom, go toward the log bridge overhead and stop at the log. At the log, go right. Follow this path until you come to a fork. Go right. Jump over the gap and keep going until you come to two trees next to each other on the right. Stop at those trees and turn around to see this Grabber up on the stone wall.


- Soul Grabber #21 – From the previous collectible, backtrack the way you came a bit. Jump over the gap in the small bridge and then go right at the fork. Climb up the small ledge and head for the small cave at the top you can crouch through. Continue down this path until you reach a shortcut rope you can slide down. Slide down and then go right to find corrupted ivy. Clear it by shooting the three targets and this Soul Grabber will be where the heart of the corrupted ivy was.


- Soul Grabber #22 – From the previous collectible, backtrack all the way back to the fork in the road near Soul Grabber #18. This time, go left and then west at the fork to hop over the fallen log. Follow the path across the bridge and then take the left path at the next fork. You’ll see this Grabber hanging from a tree ahead of you.


- Soul Grabber #23 – From the previous collectible, follow the path south toward a cabin. Go past the cabin to a ledge and look out toward the water on the right to see this hanging from a tree.


- Locked Chest – Fisherman’s Stockpile / Expiation Garment – Backtrack to the cabin you just passed. Go by it again and go left to drop down a short ledge. This will take you down to the water. Go to the left to find a bag next to a body and fishing equipment. Interact with the bag to pick up the Fisherman’s Stockpile Key.


Return to the cabin once again. Go around to the backside of the cabin to find corrupted ivy. The targets are below you on the cliff side and up on the chimney. Once you’ve cleared the ivy, shoot the lock on the door by aiming through the window. Enter the cabin and open the chest.

- Nest #2 – From the cabin, head back down to the water to find this nest across from where the Fisherman’s Key was.


- Lost Chest – Second Wind – This chest is found in the Waterfall shelter southwest from the previous nest.


- Treasure Map – Hanged Man’s Cache – Head back to the previous nest. Follow the path east to climb up a ledge. At the top of that ledge, go northeast. Follow that to a split and then go left to head north. Climb over the log and then head for the bridge to Boston. At the bridge, turn left to go southwest. Follow that path until you come to a logging area. Shoot down the hanging body across from the suspended log and the map will fall down with the body. The treasure location is in the Dark Woods further ahead. Pick up the map now, and we will solve the map later in this guide when we get to the solution location.


- Bible #4 – From the previous collectible, look north and go that way. Go to the back wall where there are papers hanging and look left to see an entrance you can squeeze through. Squeeze through to find this bible on your immediate left on a shelf as soon as you enter.


- Soul Grabber #24 – From the previous bible, make your way through the mine and cross the gap under the bridge to Boston. Once on the main path, head north and then take the left turn at the fork. After squeezing through the rock gap, go to the cliff ledge to the right of a climbable wall to find this Soul Grabber.


This chest can be in two different places. Both locations will be listed here.
- Cursed Chest – The Warden – Old Leech – Return to the split in the road from the previous collectible and head north. Stop when you reach the ledge that leads up to the shelter. The first key will be just to the left of that ledge.


From the key, go left and follow the path northwest until you come to a log bridge. Cross it and the second key will be on the ground ahead of you.


Go behind the previous key and squeeze through the stone gap. The third key will be in the following cave after squeezing through.

Exit the cave the same way you entered it. When you ‘re back outside, follow the path south to end and use Antea to fly over to the chest location where you can then open it.


OTHER LOCATION
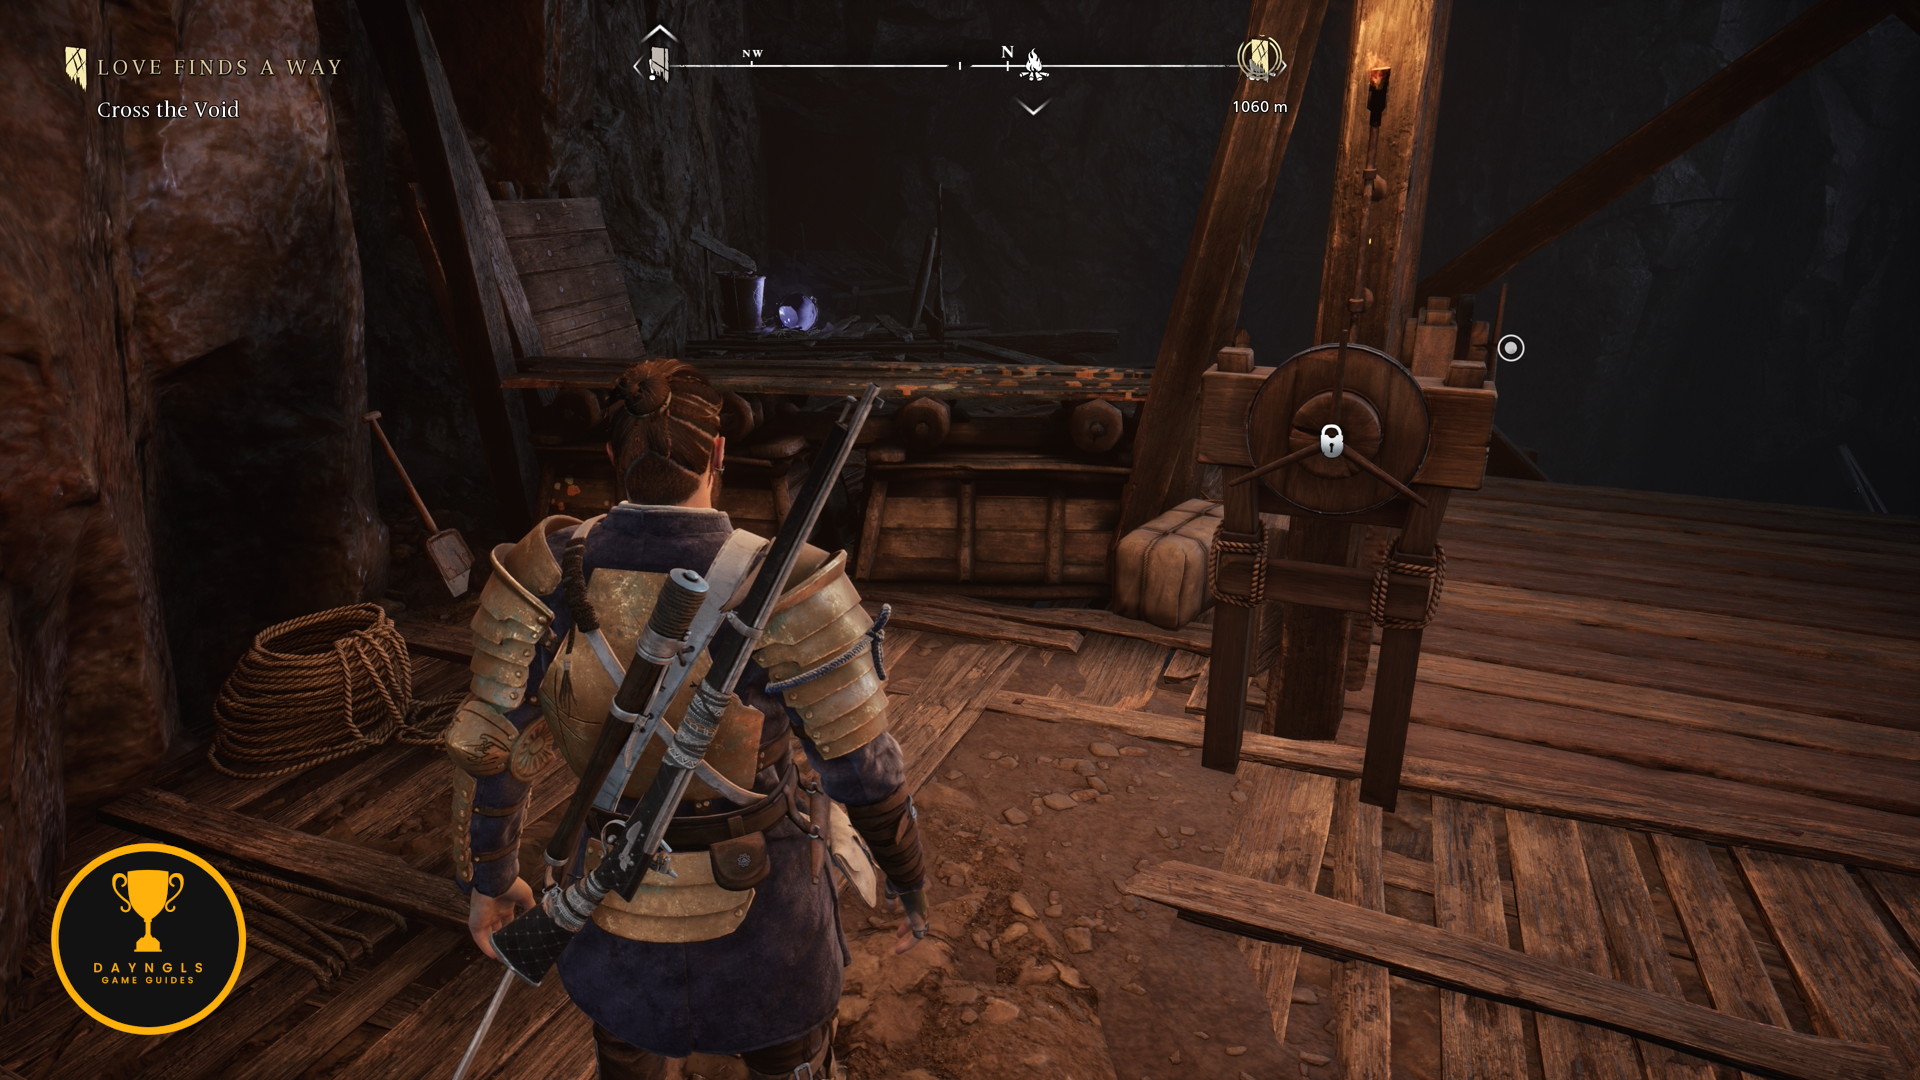
Start at the Old Watchtower shelter and take the eastern exit. Follow the path to the broken bridge and shimmy across the rock wall. Ride the elevator down and the first key will be right in front of you.


From there, go right across the wooden bridge. The second key will be on your right on a barrel.

Next, take the elevator on the left and ride it down. At the bottom, go left. Follow the path to a rope shortcut and slide down the rope. Follow this path down and you’ll come to some breakable objects. Destroy them and the third key will be behind.

Backtrack to where the second key was found. Take the other elevator and ride it up. The chest will be on your right shortly after getting off the elevator.

- Soul Grabber #25 – Drop back down to where the second cursed chest key was by the two elevators and look southeast to see this in the distance.


- Treasure Map – Hanged Man’s Cache Solution – From the previous Soul Grabber location, ride the elevator on the left down. At the bottom, go left and climb up the climbable wall. At the top, go right until you get to a cart that you can push. Push the cart inside. Destroy the debris wall inside with Outburst and then clear the corrupted ivy behind it. When the ivy is clear, pull the second cart out to the end. Use the cart to climb up to the ledge. Follow this trail until you drop down and then go right. Interact with the rock on the ground to find the treasure.


- Soul Grabber #26 – Backtrack to the climbable wall you used to climb up to the treasure map solution path after you rode the elevator down earlier. Just to the left of that wall is more corrupted ivy. Clear it to reveal a gap and then go through it. Make your way through the cave until you come to an area where you can see three climbable ledges straight ahead. This is on some vines on the back wall.


- Nest – From the previous collectible, look to your right at the first climbable ledge and head southwest a few steps to find this nest.

- Soul Grabber #27 – Fast travel back to the Old Watchtower shelter and exit through the back door. There is a Soul Grabber up above on the rocks just outside of the shelter. This one is hard to see, so aim your gun at it and look for the reticle to turn red and shoot it.


Return to the Hunter’s Camp.
- Soul Grabber #28 – From the Hunter’s Camp, take the western exit. Climb up the first ledge on your path and look up southwest to see this half way up a tree.


- Collectible – There is Kindness in Banishing a Spirit – From the previous collectible, head west until you reach a cave like entrance with a tree on the left of it. Go inside of that and use Antea to find the collectible.


- Soul Grabber #29 – Turn around from the previous collectible and climb the climbable wall on the right. At the top, go left and then climb another wall on the right. Climb a third wall and then one more that leads into the mountain. This can be found up above inside the short cave that leads to the broken bridge.


- Soul Grabber #30 – Backtrack the way you came and you’ll see this ahead of you before dropping down a ledge.


- Cursed Chest – The Tracker – Double Fangs – Drop down the ledge ahead of you from the previous collectible and go right. Follow this path to a fork. At the fork, go right and climb down the wall. The first key will be next to the cabin ahead of you.


Slide down the rope shortcut behind the first key. At the bottom, head west. At the fork, climb up the ledge on the right. The second key will be straight ahead of you on a tree stump.


Make your way over to the western side of the area. Use the climbable rock walls along the southern path. You’ll eventually come to a destroyed bridge. Jump across and then look down to the left and you’ll see the third key.


After picking up the third key, squeeze through the rocks near where the key was. Drop down the ledge ahead of you and then go south to a big climbable wall and climb up. At the top, go left. Climb up the wall at the end and then take the first left to find the chest.


- Elite Enemy – Shot Deserter – From the previous collectible, head west. Climb down and go northwest.


- Soul Grabber #31 – Use the southern path and wrap around to the western most section of the area. This will be out on a rock in the water.


- Void Breach / Sweeper – From the previous collectible, turn around and head west toward the log laying in the path. Hop over it and head south west. Jump over the gap and then go right inside of the cave ahead. Follow this straight to the Void Breach. Complete the breach and there will be a chest ahead of you with the gear in it.


- Soul Grabber #32 – After opening the previous chest, look to the opposite side of the area from the chest to see this along the left wall. This area can only be reached by completing the previous Void Breach.

- Treasure Map – Mysterious Cache Step 2 – Fast travel to Red’s Sickbed shelter. Exit the shelter and follow the beach until you squeeze through the rock. After doing that, go slightly right to find this rock on the ground near a stream of water.


Return to the Hunter’s Camp.
- Bible #5 – Take the northwest exit from Hunter’s Camp. After crossing the bridge, go into the cabin on the left to find this on a barrel inside.


- Elite Enemy – Vindictive Trapper – Follow the path east and then head southeast.


- Soul Grabber #33 – Backtrack out of the previous elite area and then look west to see a cabin. This will be above the front door.


- Cursed Chest – The Lumberjack – Soldier of Fortune – Go through the cabin from the previous collectible and go southwest. When you get to a thick tree in front of a fallen log, look left and climb up the ledge. The first key will be on your left on a tree stump after climbing up.


Next, go inside of the cabin to find the second key in the fireplace.

After that, knock down the debris blocking the backdoor of the cabin and go through to find the third key behind the cabin.

Exit the cabin through the front door to find the chest outside.

- Treasure Map – Makeshift Camp Cache – This map is found right next to the fire at the High Cave shelter. The solution is at the Hunter’s Camp. We’ll grab that a little later.


- Nest – Exit the shelter from the previous collectible and head north to find this nest nearby.


- Soul Grabber #34 – Turnaround and head northeast and then north at the fork. Drop down the ledge and look left to see this on a rock out in the water.


- Soul Grabber #35 – Backtrack around by the previous nest. Continue northwest and then north to see this in a tree straight ahead.


- Soul Grabber #36 – Use Antea to fly across the gap to the nearby the previous collectible and enter the cave in the back by climbing the climbable wall. Go forward, drop down a ledge and jump across a bridge gap. Look at the big golden tree to find this down by the water.


- Void Breach – Veil Shock – From the previous collectible, go right and climb up the nearby ledge. Follow this brief path to the end and then switch to Antea. Fly across to the platform with the big golden tree to find this breach. Complete the breach and there will be a chest ahead of you with the gear in it.


- Scourge – Trapped Rage – Climb down to the ground level in the same cave as the previous collectible to find this Scourge location.

- Lost Chest – Fuil Fhuar – Exit the cave from the previous two collectibles and get down to the bottom level near the water. Jump across the gap in the southeast corner of the area. Look to the right as you go up the path to see a fence you can knock down to reveal the chest.


- Haunted Grounds – Corrupt Canyon – Triple Resilience – The Haunted Grounds are traversal puzzles. You will be rewarded with gear when you open the chest at the end of the puzzle.

- Soul Grabber #37 – Head southeast from the haunted ground to find this up against a stone wall next to a destroyed bridge.


- Scourge – Envious Harvester – Look left from the previous collectible and climb up the ledge. Follow the path north and then go right to climb up another ledge. Then, look left to see a gap you can squeeze through to find this Scourge.


- Locked Chest – Secret Cache – Golden Retribution – After defeating the previous Scourge, look over at the destroyed wooden elevator shaft. The key is on the ground in that shaft.

Exit the Scourge area the way you entered. After squeezing out, go left and squeeze through another gap in the wall. Follow the path up to a cabin. Go behind the cabin, destroy the debris and shoot the lock on the door. Enter the cabin to find the chest.


- Collectible – The Void is No Hell – This is inside of the same cabin as the previous collectible.

- Treasure Map – Makeshift Camp Cache Solution – Return to the Hunter’s Camp. Exit the shelter cabin and go right. Drop down the ledge and go straight to the water’s edge to find this rock.


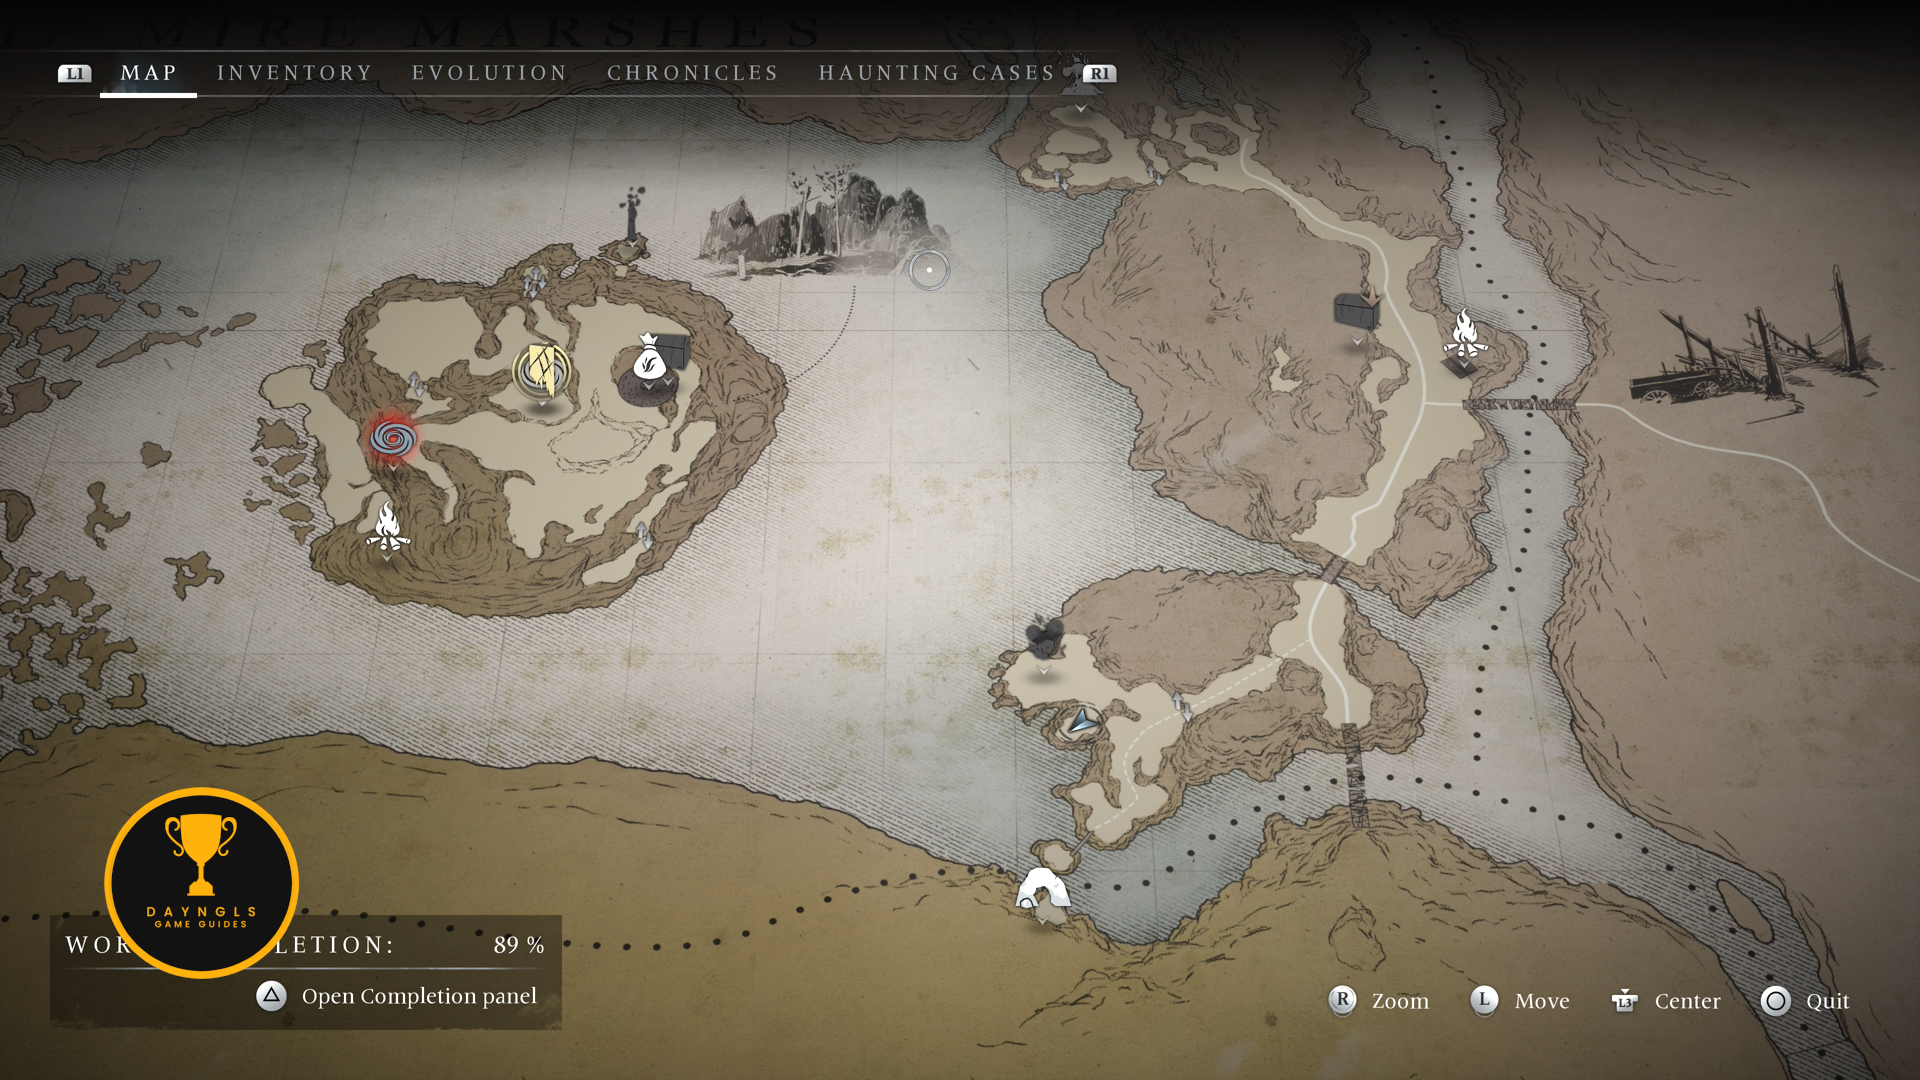
The Mire Marshes
- Soul Grabber #38 – Starting in the northwest section of the Mire Marshes, follow the path down from the cave until you drop down a ledge. As soon as you land, look to your left to see this on a rock wall.


- Locked Chest / Soldier Ashtone’s Pack / Born of Trees – First, get to the Mossy Watchtower shelter. The key for the chest is found on the table directly next to the fire.


After you grab the key, back track toward the previous collectible location and stop when you get to a wall that you can use Outburst on.


Knock it down and follow that path to a log bridge. Cross the log, climb the ledge and you’ll be at the chest.


- Soul Grabber #39 – Use the rope shortcut behind the Mossy Watchtower shelter and go east through the big wooden doorway. Follow this path east until you come to a ledge that you have slide against the wall across. Once you get to the other side, head for the log that you have to crouch under. Before crouching under it, look to your right to see this Soul Grabber.


- Nest – From the previous collectible, crouch under the log and then drop down a ledge. From there, go right to cross over a log and you’ll come to this nest.


- Soul Grabber #40 – From the previous nest, head southeast to a pile of rocks that you can use Outburst on. After that, slide against the rock wall and head forward. Follow the path on the right up to some Corrupted Ivy. clear the ivy and then drop down the ledge next to where the heart was. There will be a crevice on the rock to the south of you that you can squeeze through. Squeeze through and this will be ahead of you up in a tree.


- Locked Chest / Smuggler’s Loot / Grand Behourt – Backtrack to where you jumped down from the ivy heart and you should see a ledge to reach a wooden building. Shoot down the body that is hanging from the tree in front of the wooden building to find the key.


Once you have the key, backtrack to the previous nest and look north to see a path that leads behind a waterfall. Go behind it. Follow the path behind the waterfall to this chest.


- Soul Grabber #41 – This can be found in a dead tree just outside of the big wooden fortress walls near the Old Marsh Encampment shelter.


- Elite Enemy – Stabbed Officer – This is found in the same area the previous collectible.

- Treasure Map – Marsh’s Cache Note and Sketch – This is found in a box on the table across from Old Marsh Encampment shelter fire.


- Soul Grabber #42 – Exit the Old Marsh Encampment shelter fire through the open door and go through the closed door directly across. Climb up the debris on the right. At the top, look in the distance south to see this hanging from a tree.


- Collectible – The Things Which Were Never Human – From the previous collectible, slide down the rope right in front of you and head southwest to the corner of the camp. Jump over a gap and this collectible can be found in a satchel on a pile of debris.


- Soul Grabber #43 – From the previous collectible, jump back over the gap you just crossed and then drop down the nearby ledge. Follow the traail east to another ledge you can climb down. At the bottom, head south to a log blocking the way. Hop over the log and keep going south and then south east to find this up in a tree.


- Soul Grabber #44 – From the log you just hopped over, jump back over it and then make your way over to the eastern exit of the destroyed camp. This can be found to the left of the eastern exit.


- Soul Grabber #45 – From the previous collectible, take the north exit. It has a log that you can hop over. Keep going north until you come to a wall you can squeeze through. Squeeze through and climb up the climbable wall. Climb up the next one and then go to the end of the wooden building to see this above a rock out in the water.


- Void Breach / Star Cluster – This is found inside of the wooden building right next to the previous collectible. The chest will be in front of you after completing and exiting the breach.


- Locked Chest / Hummingbird’s Pillage / White Crow – Backtrack through the same northern entrance you used for the previous two collectibles. This time, go to the wooden structure on the left. Climb on the cart behind it and then climb up on top of the structure. The key is on top of a barrel on top of the structure.


From there, return through the same exit to the destroyed camp. Once you’re back, head straight across to a ledge next to a cart with a hummingbird on it. Climb up the ledge and then slide over on the left next to the cabin. After sliding over, crouch through the hole in the side of the cabin and go left to find this chest.


- Cursed Chest / The Soldier / Wind Chimes – From the previous collectible, go into the cabin you crouched through, but go through the opposite door to find the first key.


Exit the cabin through the same hole in the wall you entered and drop down the ledge on the left. Head northwest straight across the area to find the second key. It is to the left of the northern exit we have been using.


Go back to the ledge you used to climb up for the first key. Instead of going left, go right across the bridge, hop over the log and then climb up the ledge. Go to the house on your right at the top of the ledge. Use your gun and shoot the debris inside of the house through an opening in the wall. Go around and enter where the debris was to find the third key.


Exit the house the way you entered and go left toward the log you hopped over earlier. Use Outburst on the debris blocking the door of the house to the right of the log and enter to find the chest.


- Collectible – Strange Times to Come – Fast travel to Siridean’s Island. Take the southeast tunnel from the shelter fire. After jumping over the gap, switch to Antea and reveal the collectible right in front of you.


- Collectible – Void and Timeless – From the previous collectible, continue down the same tunnel and exit the cave by squeezing through the wall. After squeezing through, head over to the left next to some trees to find this in a satchel on the ground.


- Soul Grabber #46 – From the previous collectible, turn around and squeeze back through the hole you just came through. Inside, go left and exit. Continue in that direction until you come to a climbable wall. Climb it and then look left at the top to see this.


- Soul Grabber #47 – Return to the campfire in the cave. From the fire, look northwest and squeeze through the gap in the wall. This will be hanging from a tree in the water ahead.


- Soul Grabber #48 – Starting where you enter the void, look to the north where you can crouch under an obstacle. Go that way.


Follow this path to corrupted ivy. Clear the ivy and keep going. Climb up two climbable walls and then look right to see this.


- Soul Grabber #49 – Get to the hut where you spoke with the witch during the story. This is found hanging on the northeast side of the round hut in a tree.


- Lost Chest – Equilibrium – Enter the witch’s hut and look to your right to see a box on a table. This is in the box.


- Spiritual Parasite – Purchased from Seeker. Can sell resources if you need money.
- Salomon’s Pin – Purchased from Seeker. Can sell resources if you need money.
- Exiler Attire – Purchased from Seeker. Can sell resources if you need money.

- Void Breach – Heartwood – Return to the campfire in the cave. From the fire, look northwest and squeeze through the gap in the wall. Jump over the gap outside and follow the path. It’ll wrap down and around leading you right to this breach. The chest will be right in front of after completing and exiting the breach.


- Collectible – The Incarnate and the Invisible – This is found in a satchel on the floor of the Broken Bridge shelter.


- Lost Chest – Swift Shot – This is found across from the Broken Bridge shelter. Exit the shelter and go slight left and then right up the hill ahead of you. Squeeze through the gap in the wall at the top to find this chest.


- Soul Grabber #50 – From the previous collectible, look west and you’ll see an opening you can crouch through. Go through that and follow the path around briefly where you can find this above the entrance to another cave.


If you’ve been following this guide and shot all 50 listed here, you will now earn “The Good Hunter” Trophy/Achievement.
- Elite Enemy – Despaired Poet – From the entrance to the Broken Bridge shelter, head north. After hopping over the log, go west and squeeze through a gap in the wall. You’ll need to clear the fog first, but the elite is in the northwest corner.


- Treasure Map – Marsh’s Cache Note and Sketch Solution – Backtrack to the northern path we used to get to this area. Once you’re back on that path, go northwest to climb up a ledge and then use Antea to fly across the big gap. When you land, go left and drop down a ledge. Follow this path to the end to find the rock.


- Nest – From the entrance to the Broken Bridge shelter, head south. After crossing the bridge, go southwest. Drop down and look west to see rocks you can use Outburst on. Clear them and the nest will be ahead.


The following cursed chest was saved for last because of steps and traveling involved.
- Cursed Chest – The Sentry – Mirror of Venus – Before we can get this chest, we’re going to have to find two maps first. Both of them are found in the same location. They are found in a cave that you have to crouch into outside of the Old Marsh Encampment shelter. They are in a satchel on the ground next to the chest itself.


First, we’re gonna solve the Pond Sentry Map. Fast travel to Hunter’s Camp in The Dark Woods. Exit the shelter and take the northeast exit out of town. Follow that path until you climb up a wall to a more open area. This is found shortly ahead on the right by a small waterfall.


Next, travel to Fort Jericho shelter in Mount Pleasant. Exit the fort and you can use nearby lift to take you right to this treasure. The treasure is at the base of a flag pole just outside of the building the lift takes you to.


From there, travel to The Harrows shelter. From the shelter fire, head to the lift in the southwest side of town and ride it down.


At the bottom, exit the lift and go to the climbable wall on the right. Climb up to find this treasure at the end of the path.


Now you can return to the Mire Marshes and unlock the chest. It is right next to where we picked up the first two maps in step 1 here.
For the most part, The Hallows are pretty straight forward and easy to navigate.
The Harrows
- Treasure Map – Outlaw’s Cache Solution – If you’ve been following this guide, we picked up the Outlaw Cache map over in The Dark Woods. Head over to the west corner of the region. There is a ledge you can drop down to the left of a locked house. This will be over by the water across from the scaffolding used to climb into the locked house.


- Locked Chest – Iris Constance’s Package – Quivering Veil – The key can be found on the other side of the river from where you found the previous treasure.


The chest is found inside of the locked house above the previous treasure location. Climb up the scaffolding and squeeze through the wall to enter the house to find the chest.


- Scourge – Wild Rage – This is found by exiting the previous house, going southwest and then south.


- Collectible – The New Eden Curse – The Dearth – This is found just to the west of the Hills Old House shelter near a cave entrance. It is in a satchel next to a body.


- Cursed Chest – The Shepherd – Safeguard – The first key is found right next to the previous collectible on the same body.
From the first key, head northwest and climb up the ledge. From there, head east and turn left after the wooden fence to head up the hill. The second key will be straight ahead.


From the second key location, head southwest for just a few steps until the path on the right goes north. Follow that path north and crouch under the rock ahead. After crouching through, go right to find the third key.


Backtrack to the farm with the round wooden fence we passed earlier. Go through the farm building to find this chest.


- Locked Chest – Gibb’s Reserves – Truelove Knot – Head toward where the map of the Harrows starts to go south. The key for this chest is found in the back of a cart on the path. It will be hidden by breakable objects. Clear them to find the key.


Follow the path south and then climb up the climbable wall on your right shortly after the cart with the key. Follow this path north until you come to a house. The chest is inside.


- Bible #6 – This is found on a shelf next to the previous chest.

- Elite Enemy – Drowned Boatswain – Drop down the climbable wall we used to reach the previous collectibles. Go southeast to find this Elite location.


- Lost Chest – Amulet of Akelarre – This chest is found at the top of the big windmill building next to the Mill’s House shelter.


- Collectible – Breeding Breaches – Take the elevator at the bottom of the same windmill building as the previous chest down into a cave.

At the bottom, follow the path north until it wraps around to another elevator. Ride that one down as well.

Follow the path and squeeze through the wall. From there, go slightly right up a small set of stairs to find this collectible in a satchel on a box.

- Cursed Chest – The Miller – Smiling Death – Head southwest from the windmill. Follow the path around until you come to a big log on your left. Use Outburst to blow a hole in the log and go through to see the first key.


From the first key, get back on the path and go east and then follow it as it starts to turn northeast. Take a right instead of climbing the ledge. Jump across the gap to find the second key.


From the second key, look to the east to see the third key below. Use Outburst on the rocks and then pick up the key. The ward is off to the right behind two planks of wood on the side of the mountain across from the shortcut rope.


Hop back over the ledge after getting the third key and go left. Climb down the wall near the shortcut rope. At the bottom, head west and squeeze through the wall to find this chest.


- Nest – Follow the path that leads west and this nest will be on your left before the Boat Hold shelter.


- Haunted Grounds – The Shipwreck – Voyageur – This is found all the way west. Solve the traversal puzzle and reach the end of the puzzle to get the chest.

- Collectible – Beyond the Great Below – Back track east and enter the cave just north of the Boat Hold shelter. Follow the path in the cave northeast and climb up the ledge ahead of you. At the top, keep going northeast and climb up a second ledge. Take a few more steps northeast and this will be on a rock near some candles.


- Nest – Backtrack to the cave entrance. From the entrance, go north in the cave and squeeze through the wall. You’ll come out near the nest.

- Treasure Map – Two Rock’s Cache – Travel to The Harrows shelter. Go outside and speak to Phoebe or Ismail to buy this map.


Travel to the Hills old House. Exit and then head northeast and then east. When you reach the next path, go north. Keep going until you see the two rock formations on your right. The solution is at the top in-between the two rocks formation.


- Haunted Grounds – Forsaken Farm – Halcyon Days – This is found on the western side of the northern most point of the region. Solve the traversal puzzle and reach the end of the puzzle to get the chest.

- Void Breach – Hur Attire – Head northeast from the previous Haunted Ground to find this breach. The chest will be ahead of you after completing and exiting the breach.


- Locked Chest – Atherton’s Cache – Bitter Purge – From where the previous void breach exit takes you, go southeast until you find a broken down cart. The key is in the back of the cart.


From the key, head west until you have to jump a small gap. The chest will be on the island after jumping the gap.


- Nest – Backtrack to where the key for the previous chest was found and head northeast. Go right when the path opens up and it’ll wrap around to the nest.


- Cursed Chest – The Farmer – Protective Charm – Head north from the previous collectible. The first key is found in God’s Acre cemetery.


Exit God’s Acre and go right. The path will rap around to the next key.


From key 2, head south and slide across the wall. From there, head into the house. Destroy the objects outside of the house and crouch into it.


Exit the house and go southwest/south. The path will wrap up to the chest.


- Collectible – The Second Settlement of New Eden – This is found in a small cave behind a wall that you can use outburst on north of God’s Acre and east of Abandoned Farm shelter.


- Nest – This is found just south of the Abandoned Farm shelter.


- Elite Enemy – Murdered Traveler – Head northwest from the Abandoned Farm shelter.


- Scourge – Infectious Harvester – This is just west of the Small Cave shelter.


- Scourge – Bereft Rage – This is found on the east corner below the cave that leads to the Mire Marshes.


- Collectible – Foundation of New Eden – This is found just southwest of the cave that leads to the Mire Marshes in the east corner of the region. It is in the back of a cart.


- Lost Chest – Healing Shot – This is found in the cave that connects the Mire Marshes to The Hallows. It is in a wooden structure in the cave near the lift to The Hallows.


- Locked Chest – Farmer’s Case – Opportunist – Backtrack to the Small Cave shelter. Take the exit by squeezing through the gap in the wall. Follow the path until you come to a bigger house. Use the cart to climb up into the top floor of the house. Go through the top floor and drop off the opposite to be behind the house. Use another cart to climb up to the stone ledge. Squeeze through the wall to find the key in a satchel on a crate.


The chest is found inside of the big house you used to climb through. It is on the bottom floor.

- Bible #7 – The bible is found inside of the same house as the previous chest. Its to the left of the chest on a shelf.

- Void Breach – Third Eye – Follow the path south from the previous collectibles and you’ll come up to this on your left.


- Elite Enemy – Angry Fisherman – This is found west of of the previous Void Breach.


- Collectible – The New Eden Curse – A Long Winter – This is found inside of The Harrows shelter on a small crate.


- Bible #8 – This is found inside of The Harrows shelter.

- Locked Chest – Deceased Inhabitant’s Personal Belongings – Banisher Garment – The key is found inside of The Harrows shelter.

The chest is found in town in a house to the southwest of The Harrows shelter. It is next to the fireplace in the house.


- Bible #9 – This is found in the same building as the previous Locked Chest.

- Orpheus’ Tear – Speak to Phoebe or Ismail to buy this map.
- Lucky Star – Speak to Phoebe or Ismail to buy this map.
- Carrica’s Stone – Speak to Phoebe or Ismail to buy this map.

- Bible #10 – This is found in the church southwest of The Harrows shelter.


- Lost Chest – As Above So Below – This is found in the Collapsed House shelter. If you haven’t been there yet, you can reach it by entering the cave southwest of The Harrows shelter. Ride the elevator on the southwest part of town to ride down in order to reach the cave.


- Collectible – Inside the Pandora Box – This is found inside of the Collapsed House shelter on a bookshelf near the fire.

- Cursed Chest – The Dowser – Death’s Head – Starting inside of the Collapsed House shelter, take the southwest exit. Crouch under the planks of wood and the first key will be on the left.

Use the fire in the Collapsed House shelter and fast travel to the Groundwater Source shelter. This shelter is in the same cave as Collapsed House. It’s near the entrance of the cave. From the Groundwater Source fire, take the path southeast. Hop over the rock blocking your path and then look to your immediate right to see a stone you can walk on. Drop down and follow the path east to another rock to hop over. Hop over it and go northwest. Drop down another ledge and keep going until you see a ledge you can climb up on your right. Climb up and follow this path under the big rock and jump over the water gap. Head straight and crouch under the rock ahead. Shoot the ward above the pile of rocks you can use Outburst on. Go through the opening where the rock pile was and then climb up the next wall to find the second key laying there.

From the second key, backtrack to where you jumped over the water gap under the big stone. Instead of jumping over the water gap again, go northwest and squeeze through the gap ahead. Climb up and jump over to reach the third key.

From the third key, backtrack to the water gap under the stone. Jump across and then drop down the next ledge. Go left, climb up the ledge and then hop over the obstacle. After hopping over, go left. Climb up the wall and then climb up the next ledge ahead on the left. Jump over the next gap and this chest will be on the right.

- Cursed Chest – The Sower – Apotheosis – The first key for this is found on the far east side of the region.


From the first key, head southeast to a farm. The key will be on the side of a boat next to the farmhouse.


From the second key, head west and drop down the nearby ledge. At the bottom, go left to find the third key.


Turn around and follow the path west as it heads south and it’ll wrap around to the chest.


- Nest – This is found in the eastern most section of the region near a cave entrance.


- Treasure Map – Stele’s Cache – Location – This is found in the cave in the eastern most section of the region. Enter the double wooden doors. Go inside and climb up the first ledge on the right. Climb up the next one and follow this path up until you see a table and crate ahead of you. The map is on the table in a satchel.


- Treasure Map – Stele’s Cache – Step 2 – Head back to God’s Acre. Enter and go over to the right side of the area.


- Treasure Map – Stele’s Cache – Step 3 – Climb up the ledge on the north side of the cemetery and go east to a dead end to find the treasure.


- Treasure Map – Mysterious Cache Step 3 – The Mysterious Cache map and step 2 were completed in The Dark Woods. Step 3 takes place in The Harrows. It is found in the southern section of the region just south east from a nest. Squeeze through the wall to find the location.


Mount Pleasant
- Lost Chest – Savage River – Enter the cave north of Broken Bridge shelter in The Harrows. Ride the elevator up and this chest will be right in front of you at the top.


- Elite Enemy – Frozen Onlooker – Exit the cave from the previous collectible and head north.


- Collectible – An Old Sickmouth – This is found in one of the buildings used for riding the lift over the mountains. It is upstairs on a desk.


- Cursed Chest – The Explorer – Ursa Major – The first key is found on the well outside of the same lift building as the previous collectible.

From the first key, go down the stairs to the right of the well and then follow the path southwest/west. Jump over the gap and the second key will be ahead of you on the left.


Backtrack just a bit to a climbable wall that was ahead of you when jumped over. Climb it and follow the path to the rope shortcut at the end. Slide down the rope and climb down another wall. Destroy the debris ahead to find the ward. After taking that out, use Outburst on the rocks blocking the third key.


Backtrack to where the second key was found and squeeze through the gap in the wall. The chest is on the other side.


- Void Breach – Silver Executioner – From the previous chest, backtrack into the cave you were just in and this will be on your left.


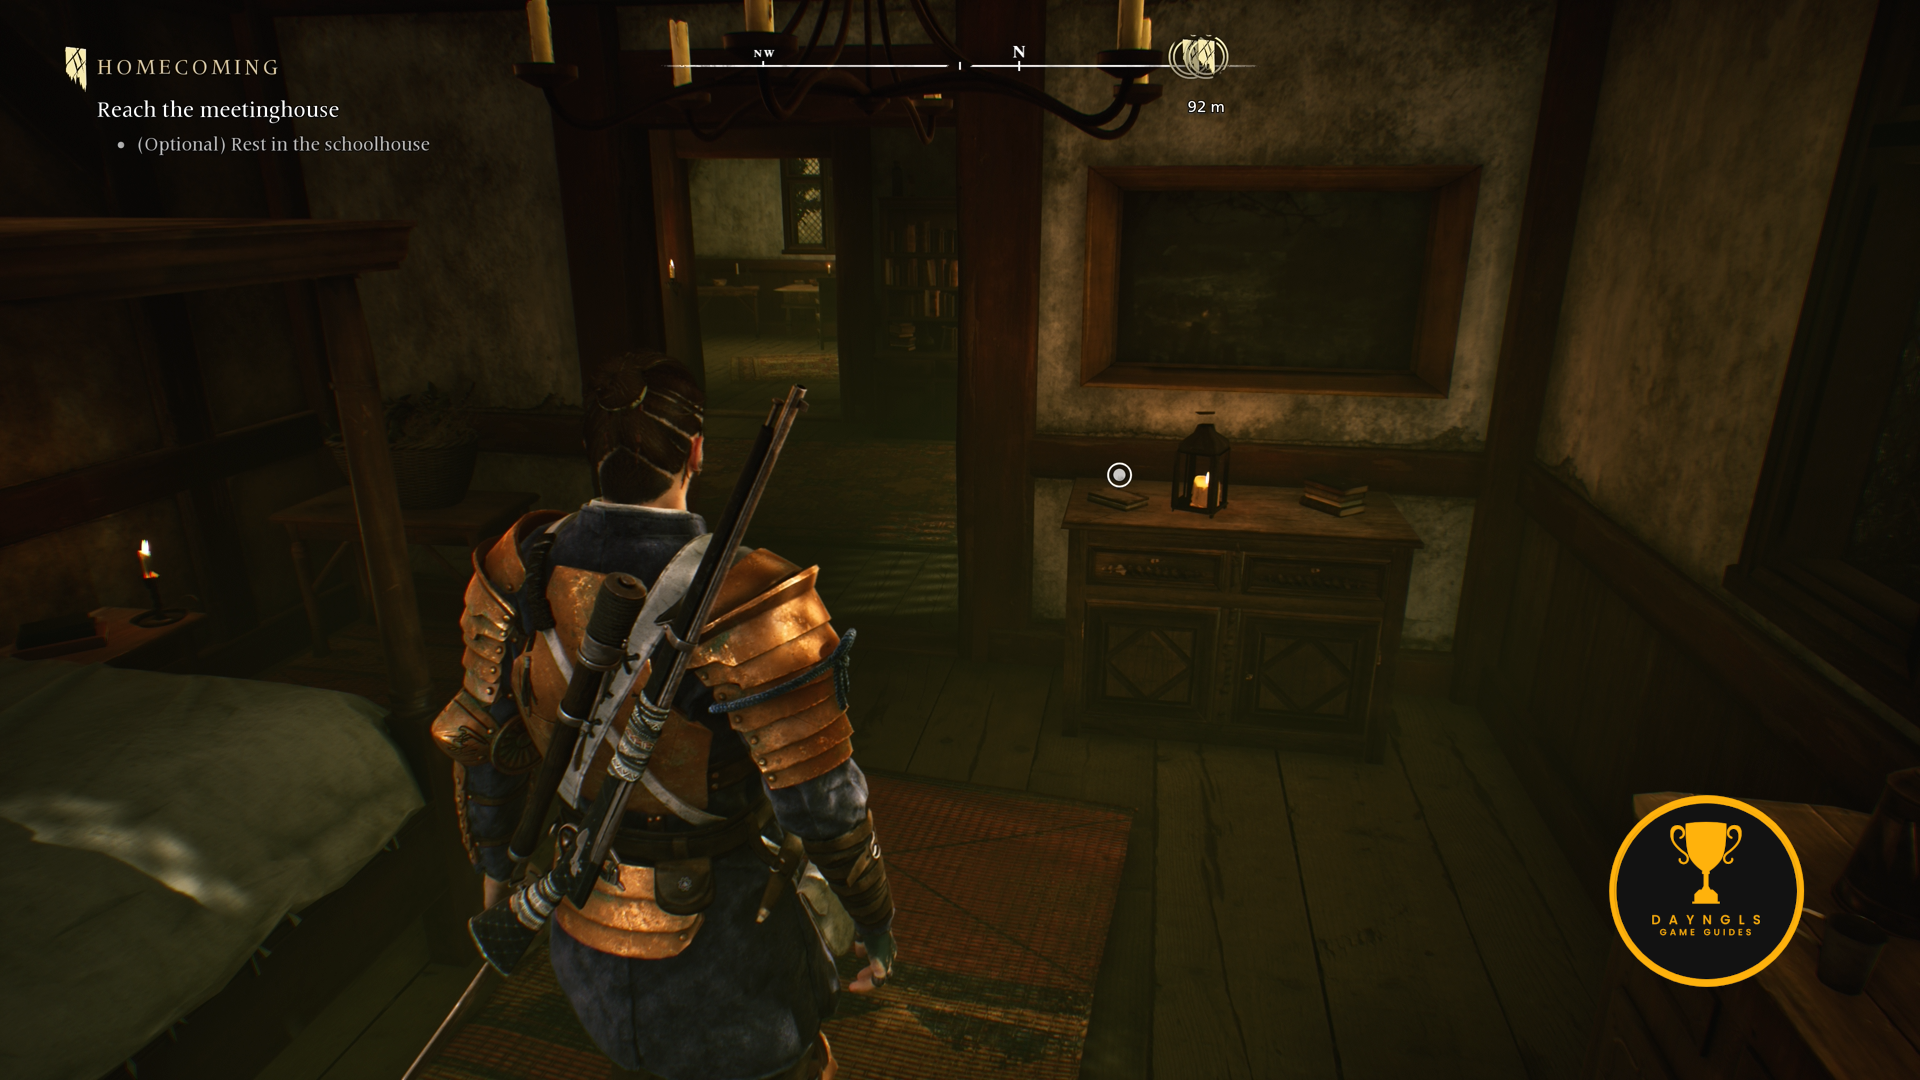
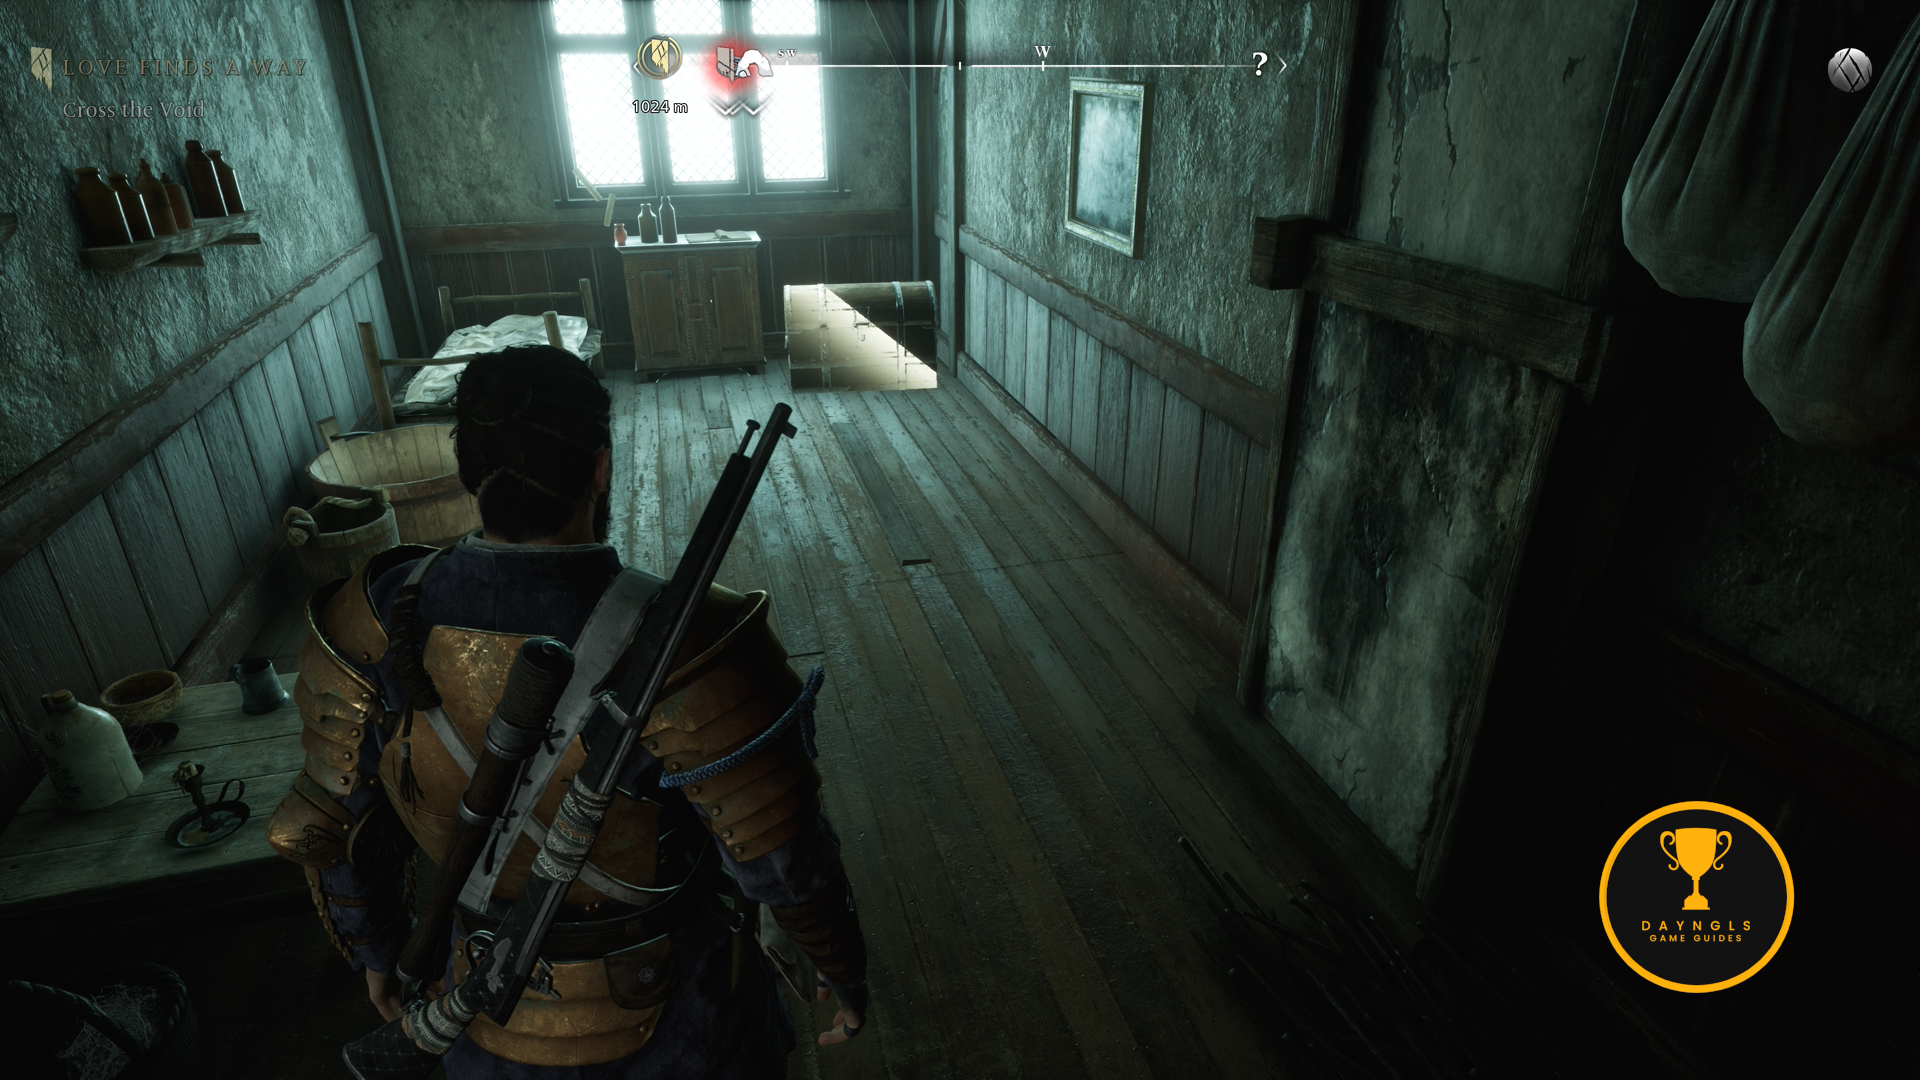
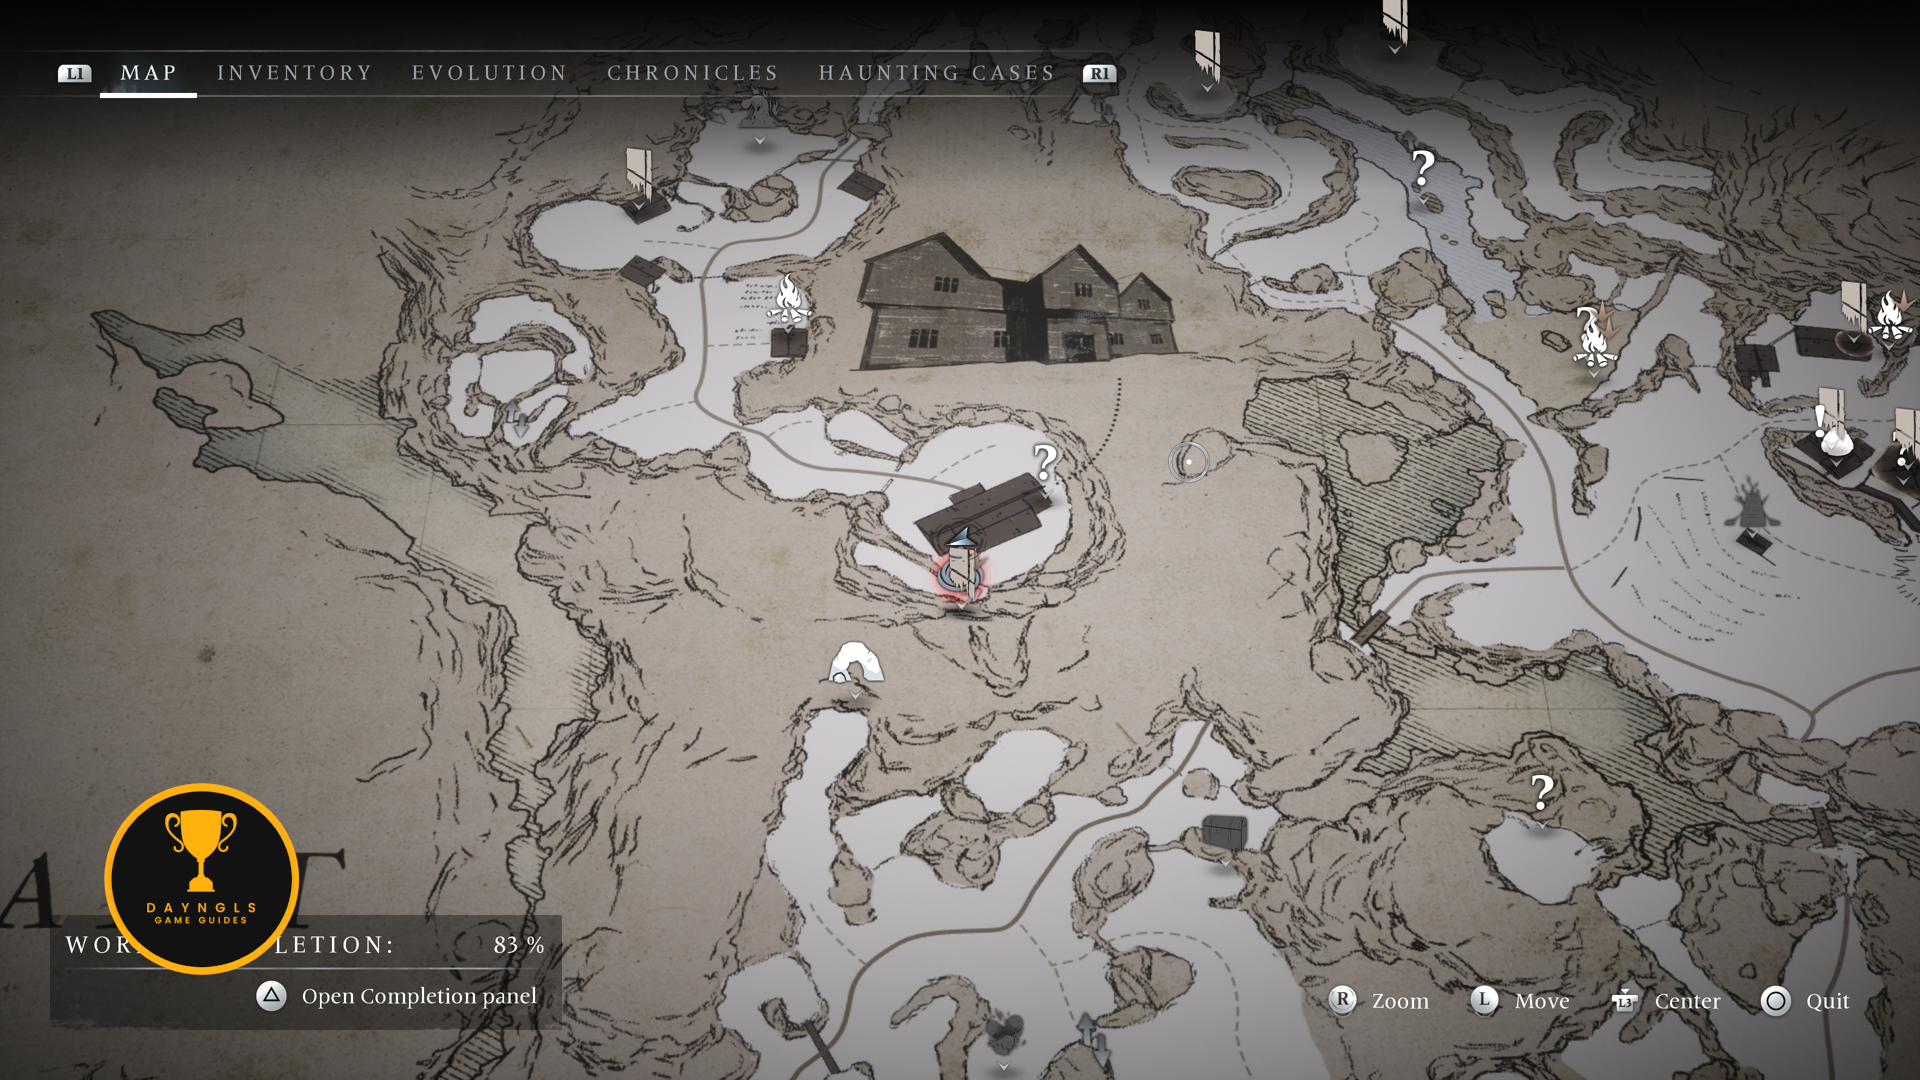
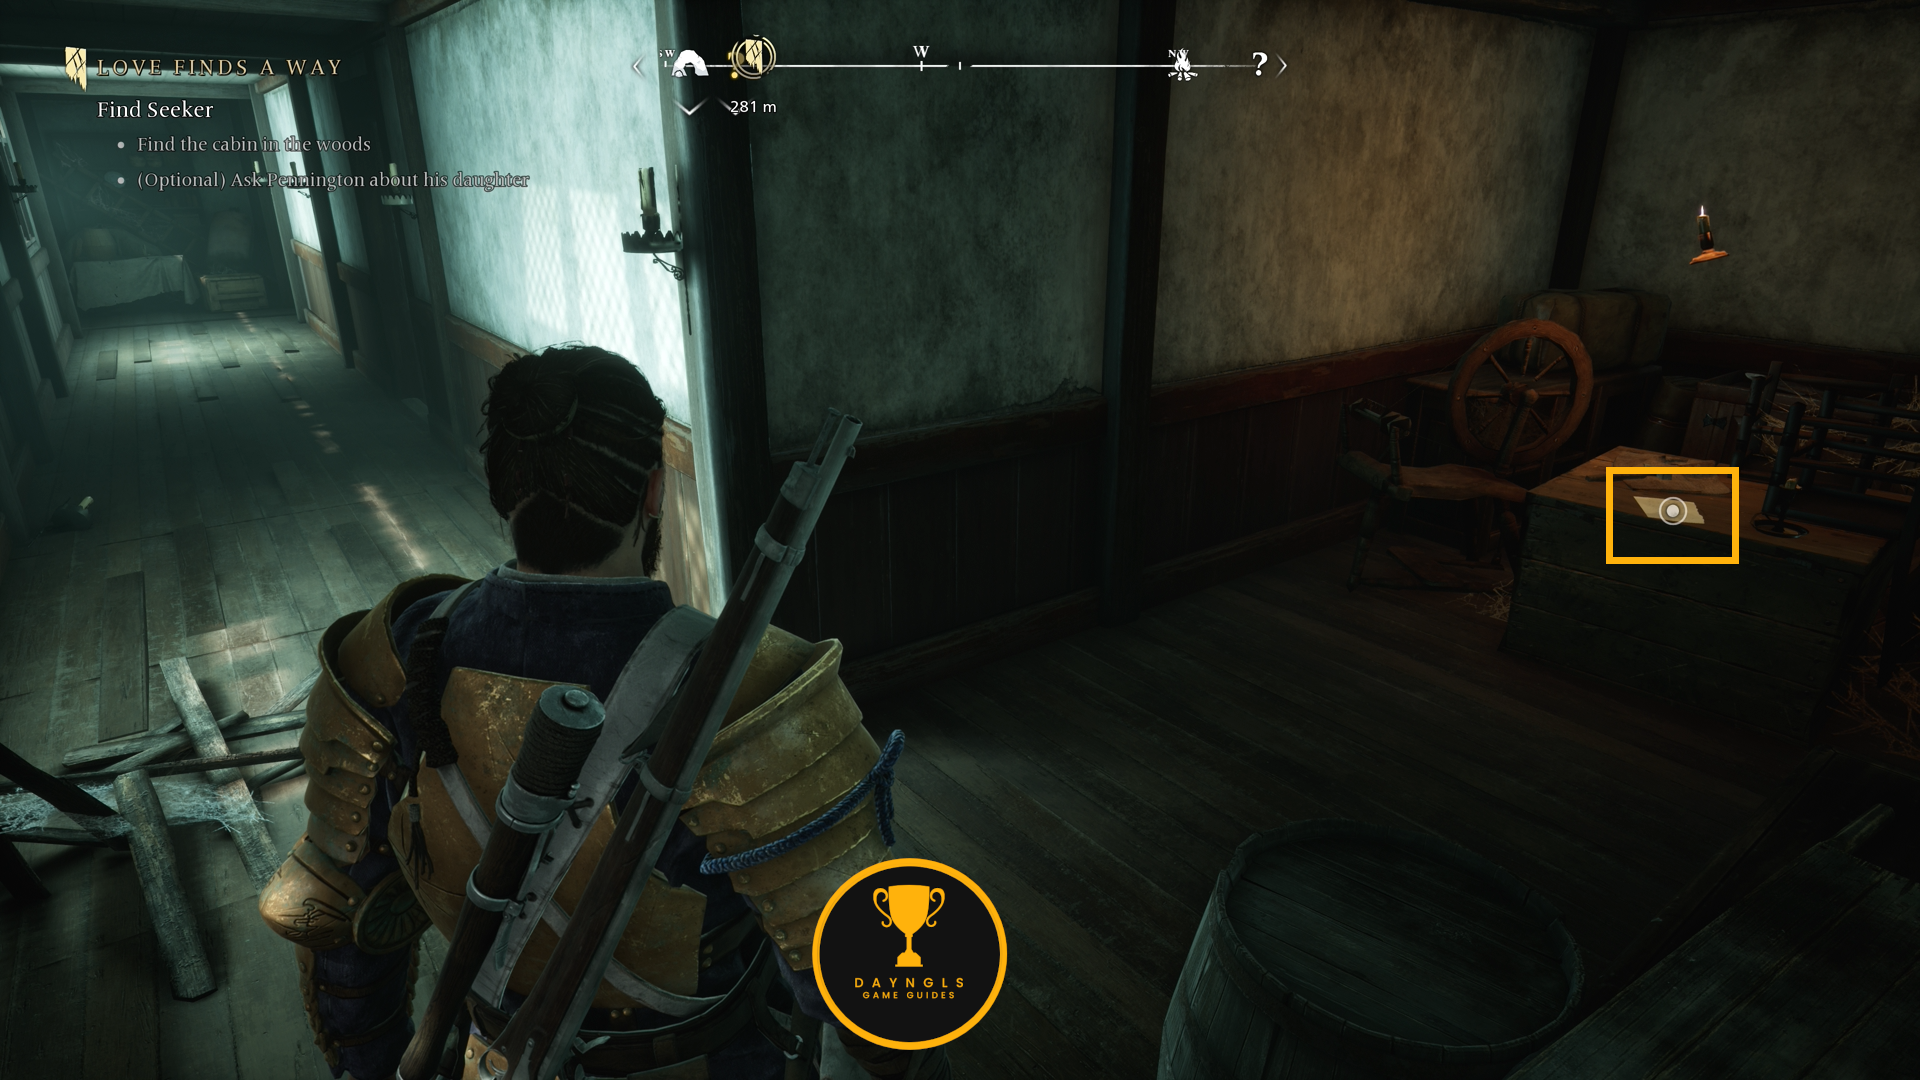
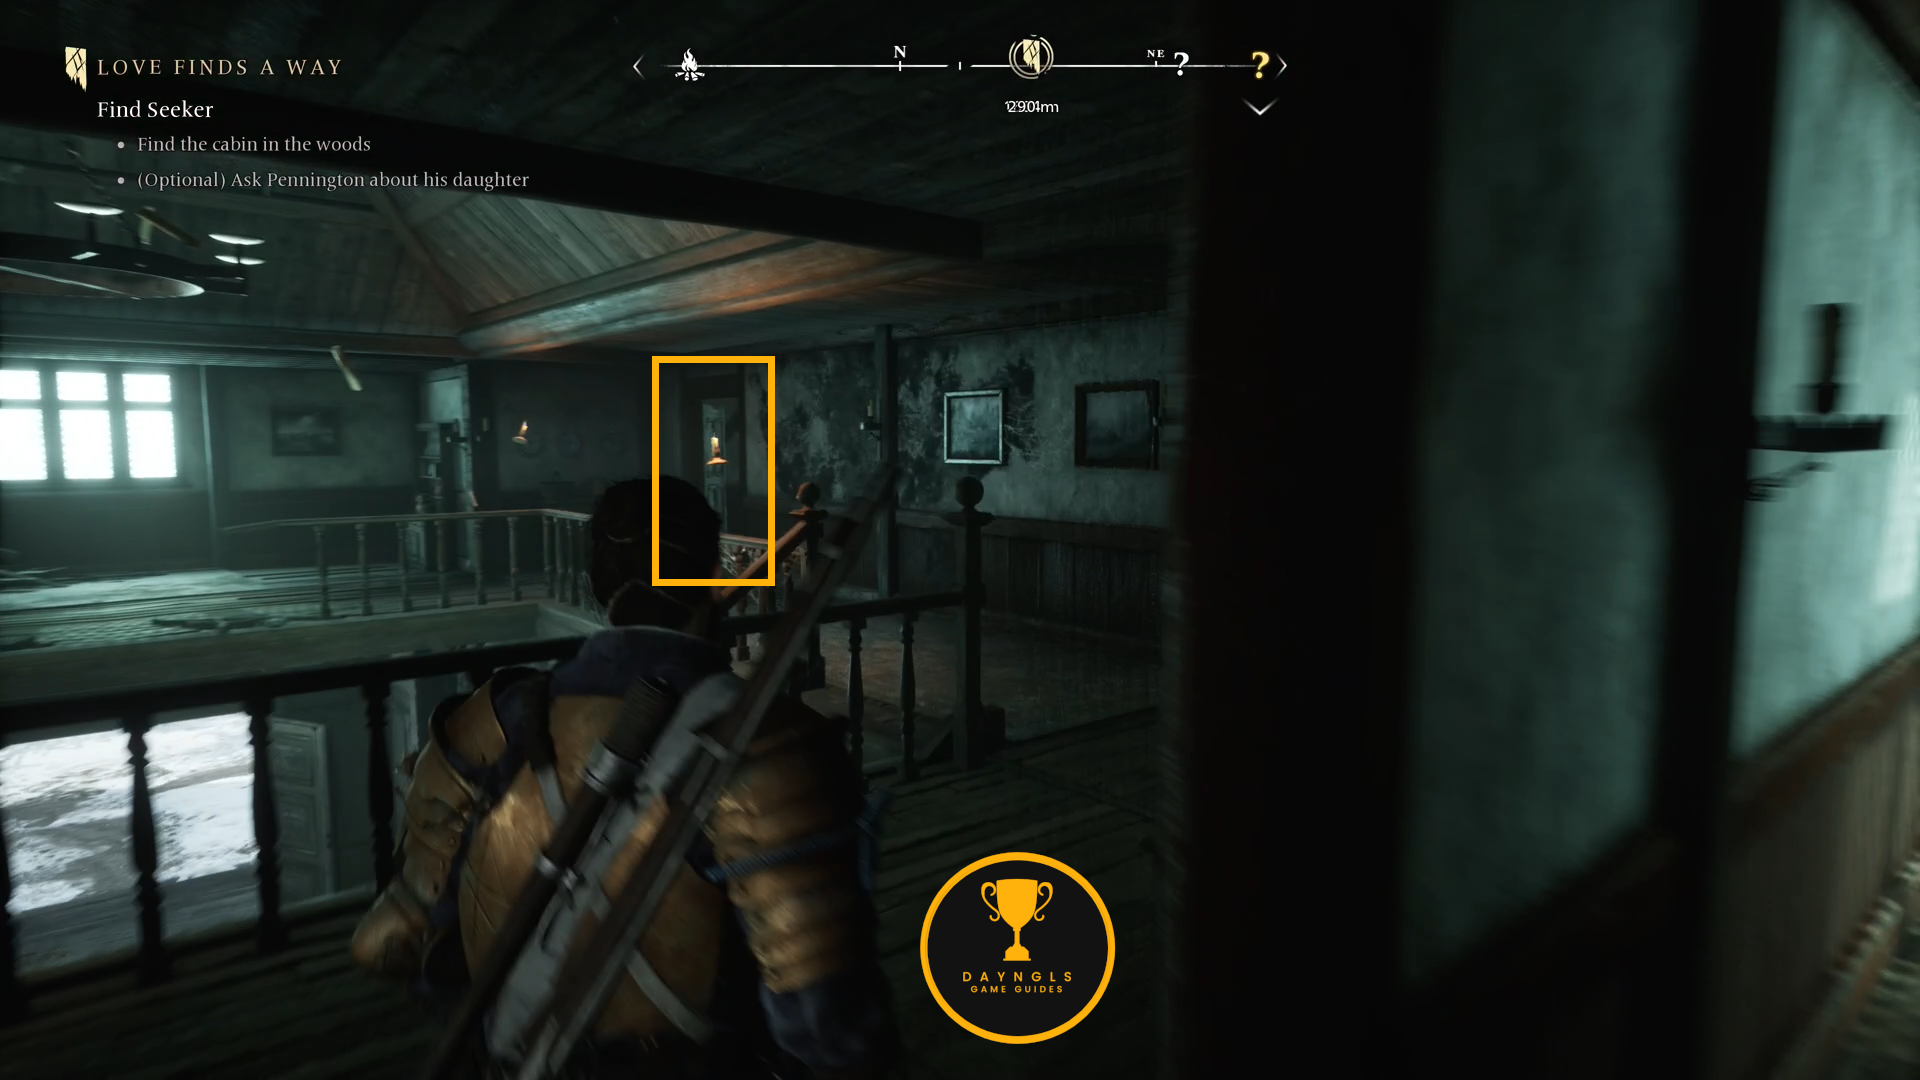
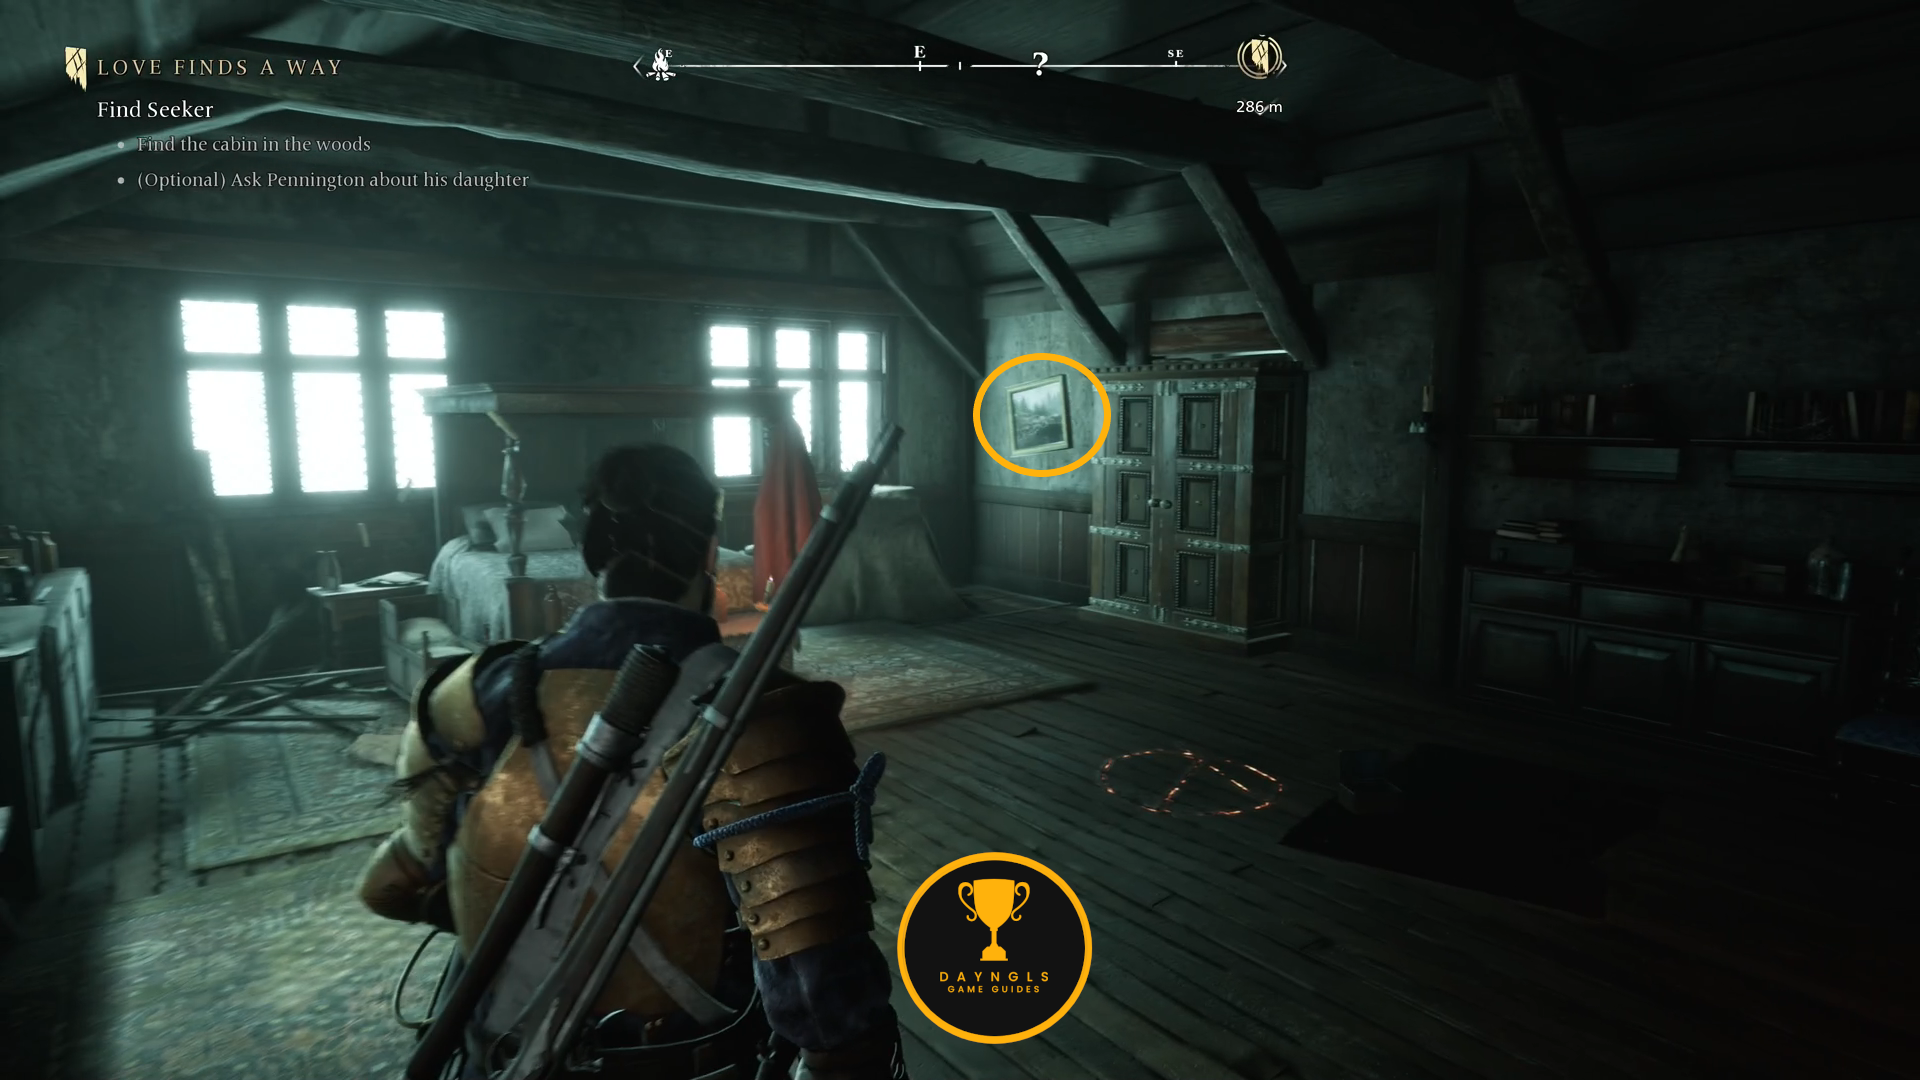
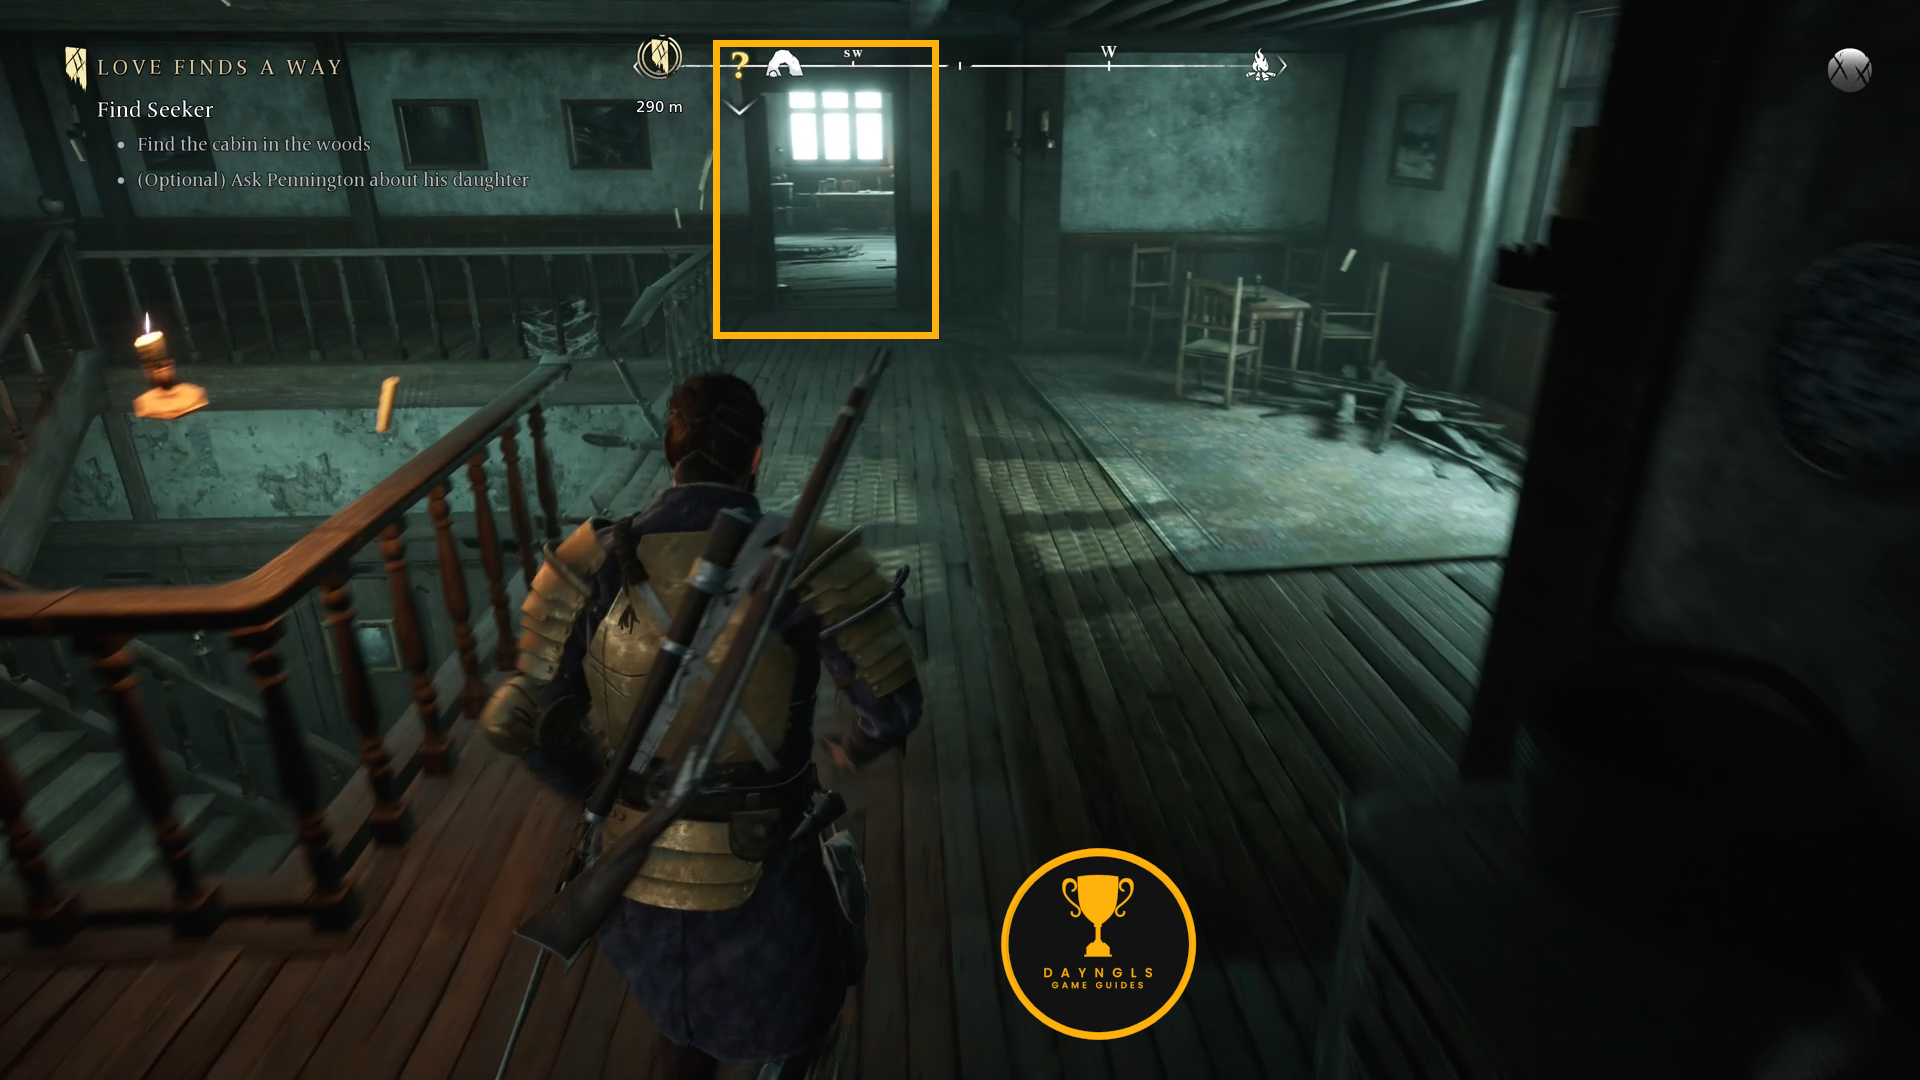
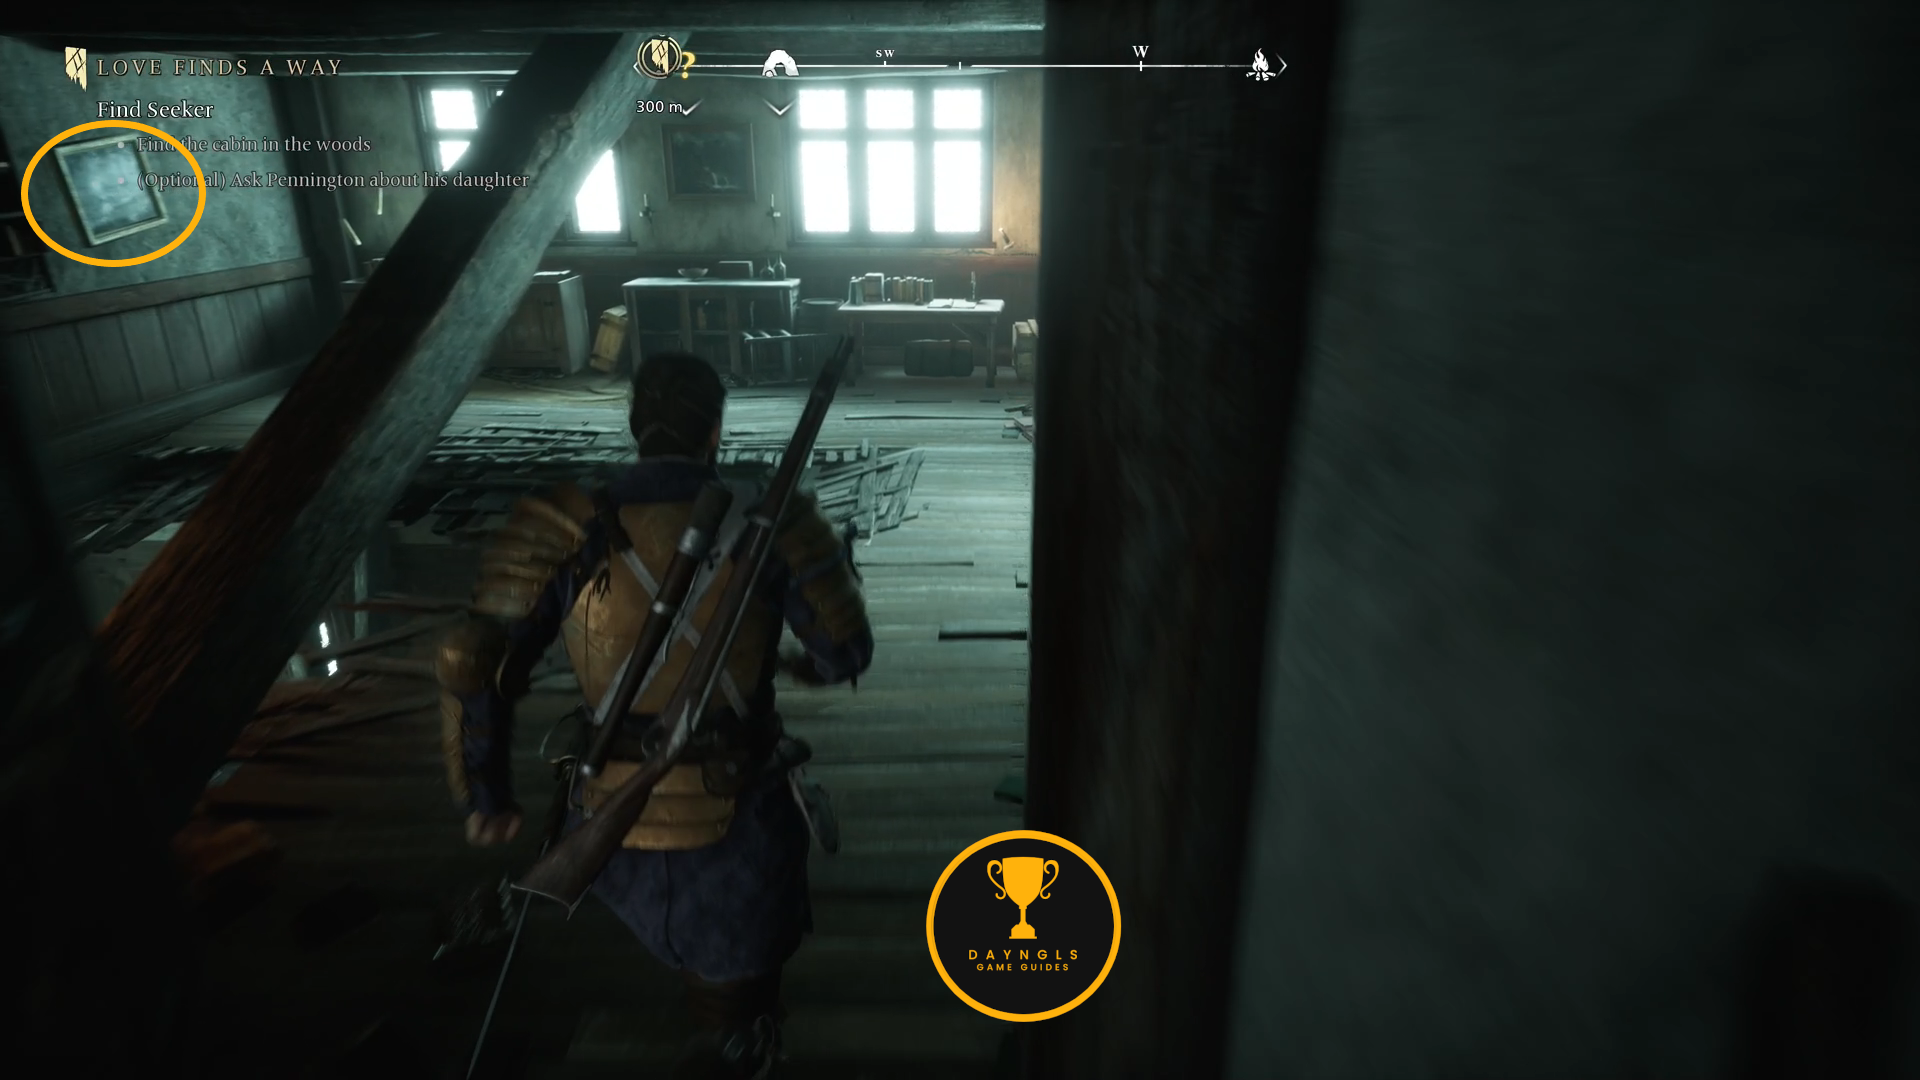
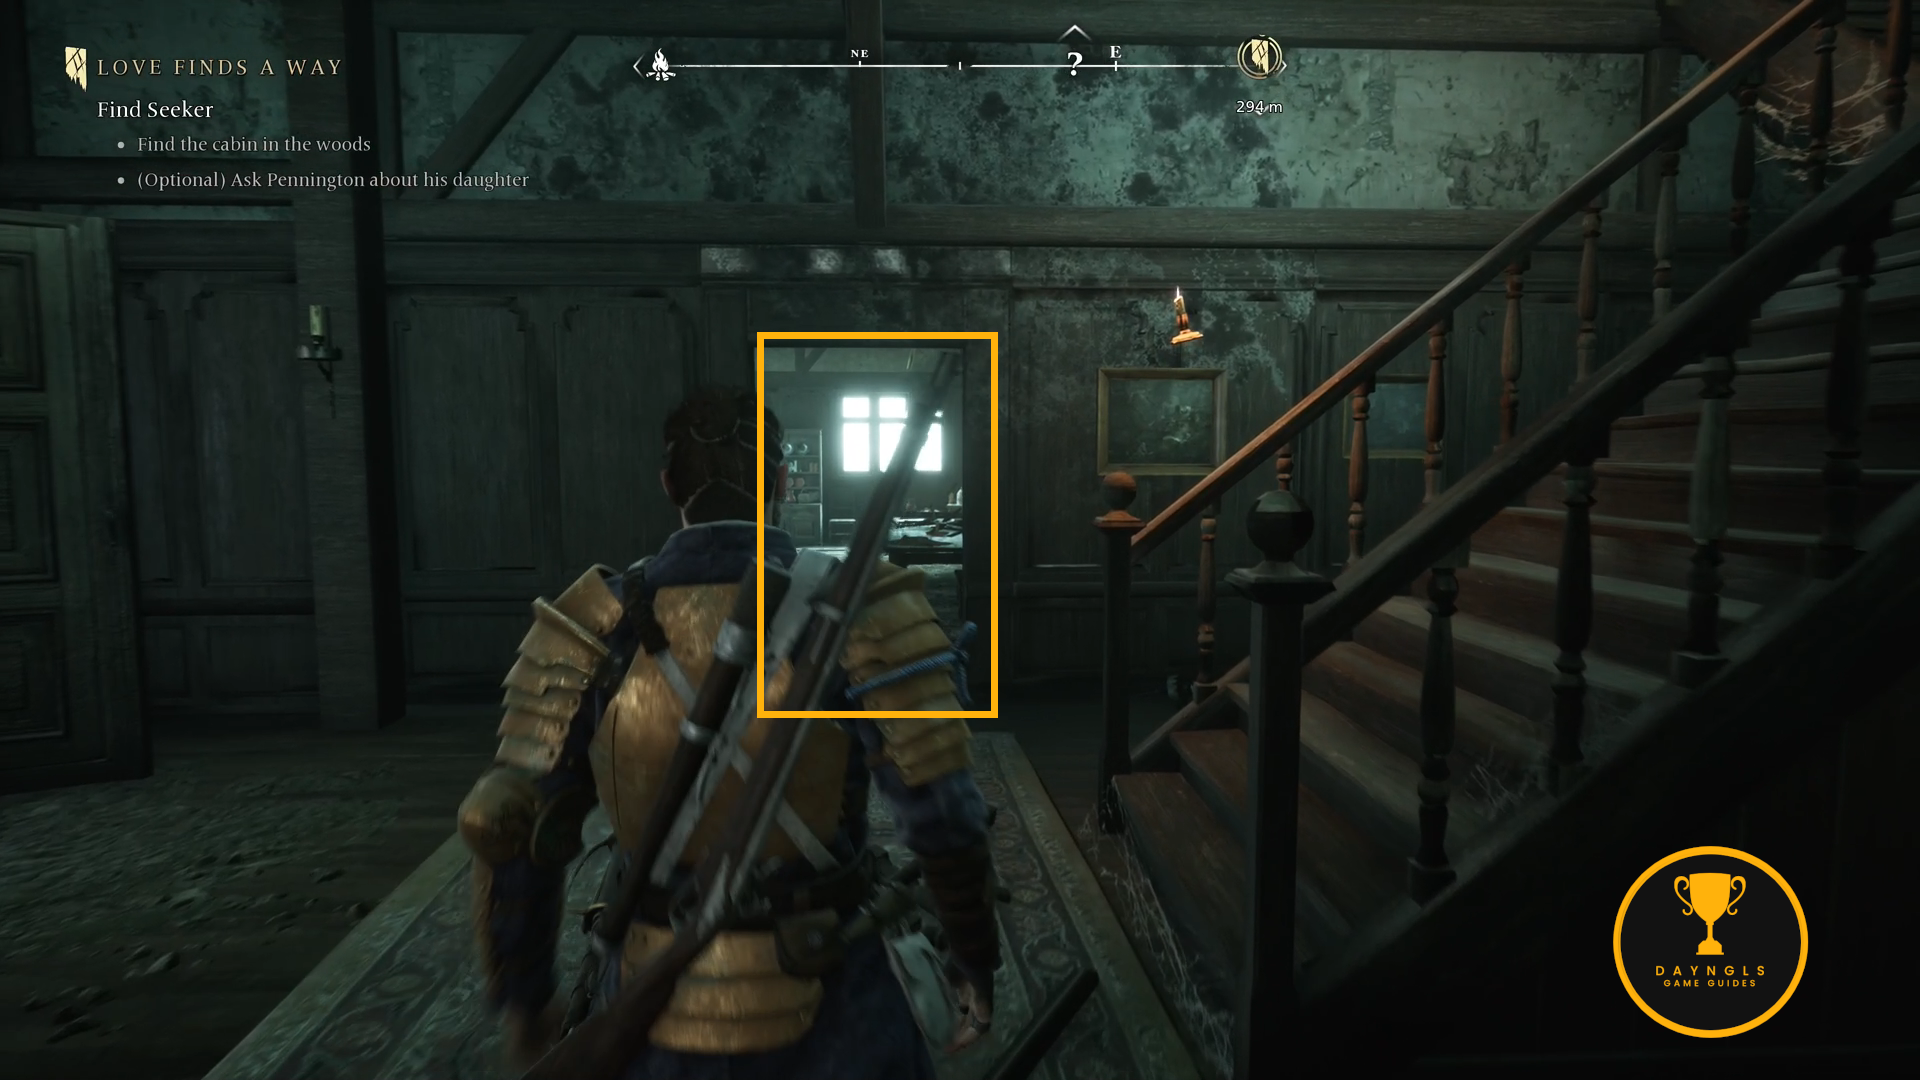
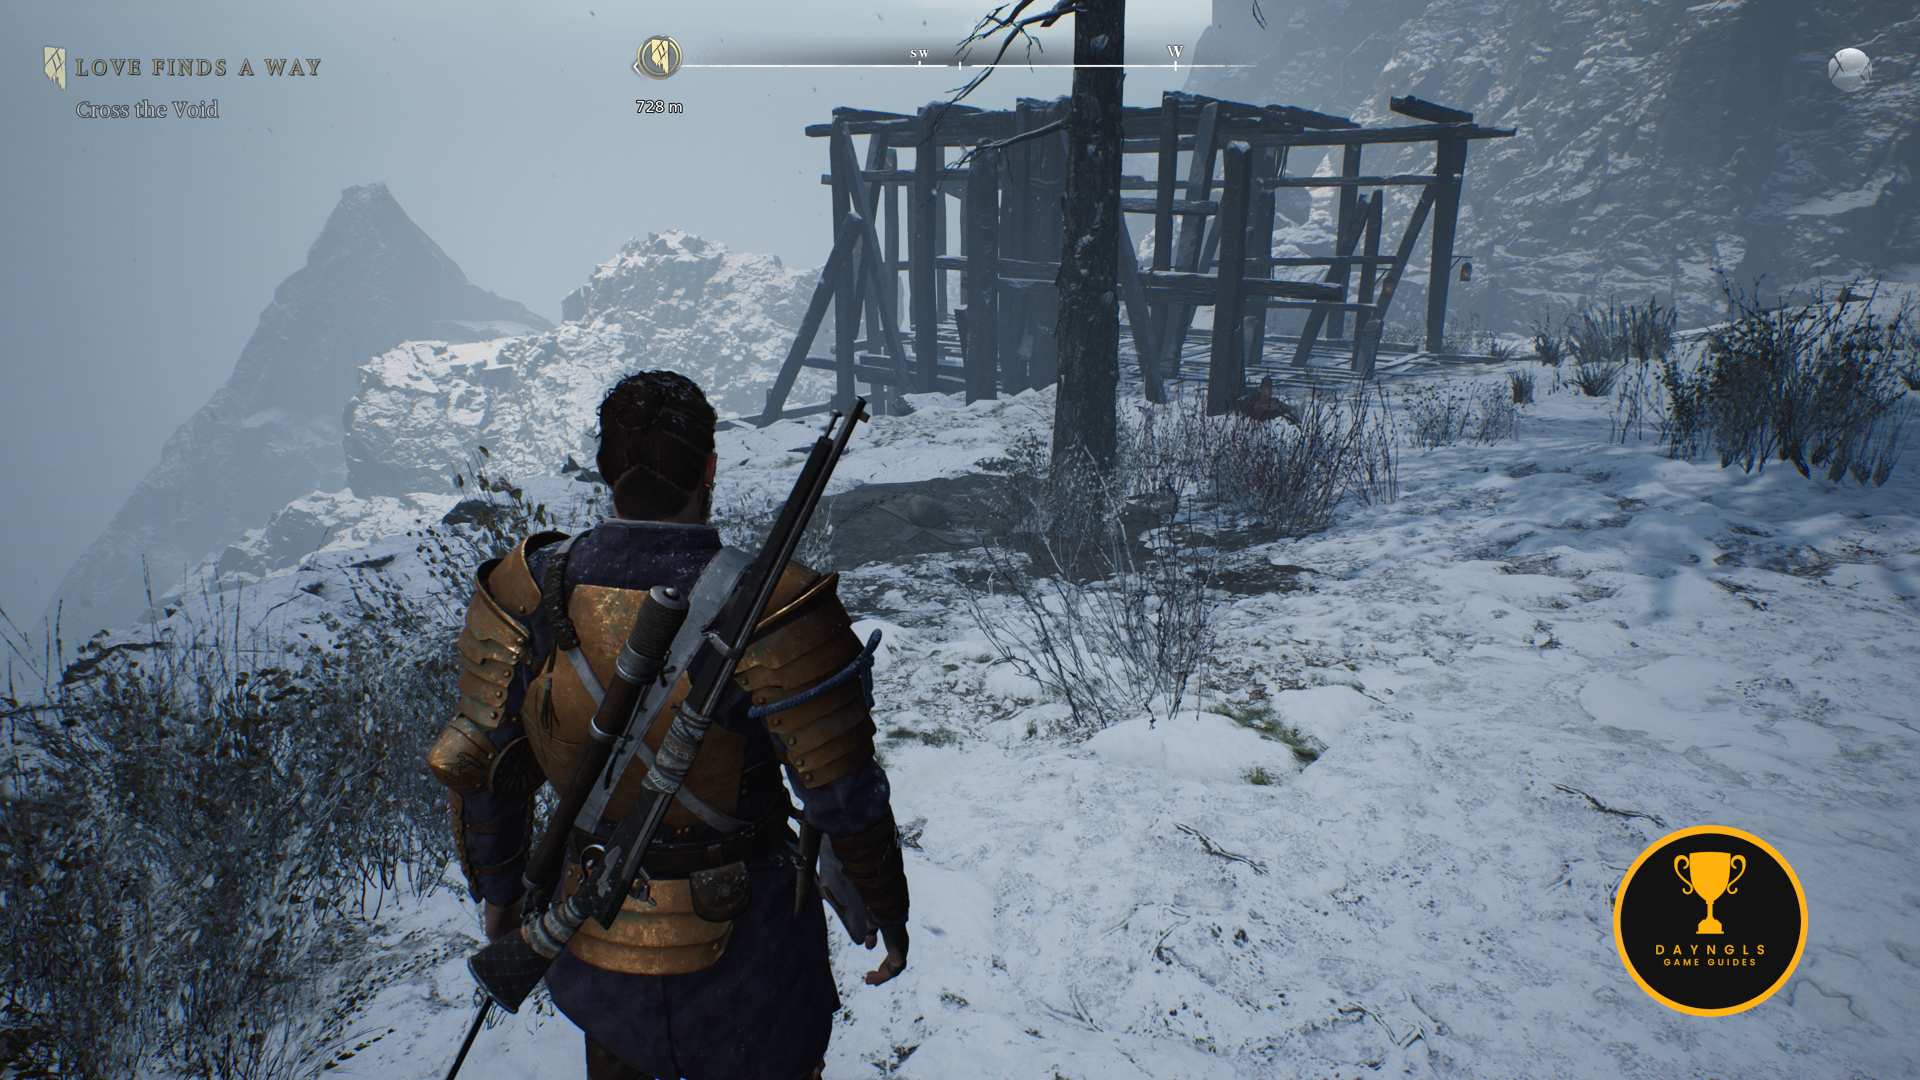
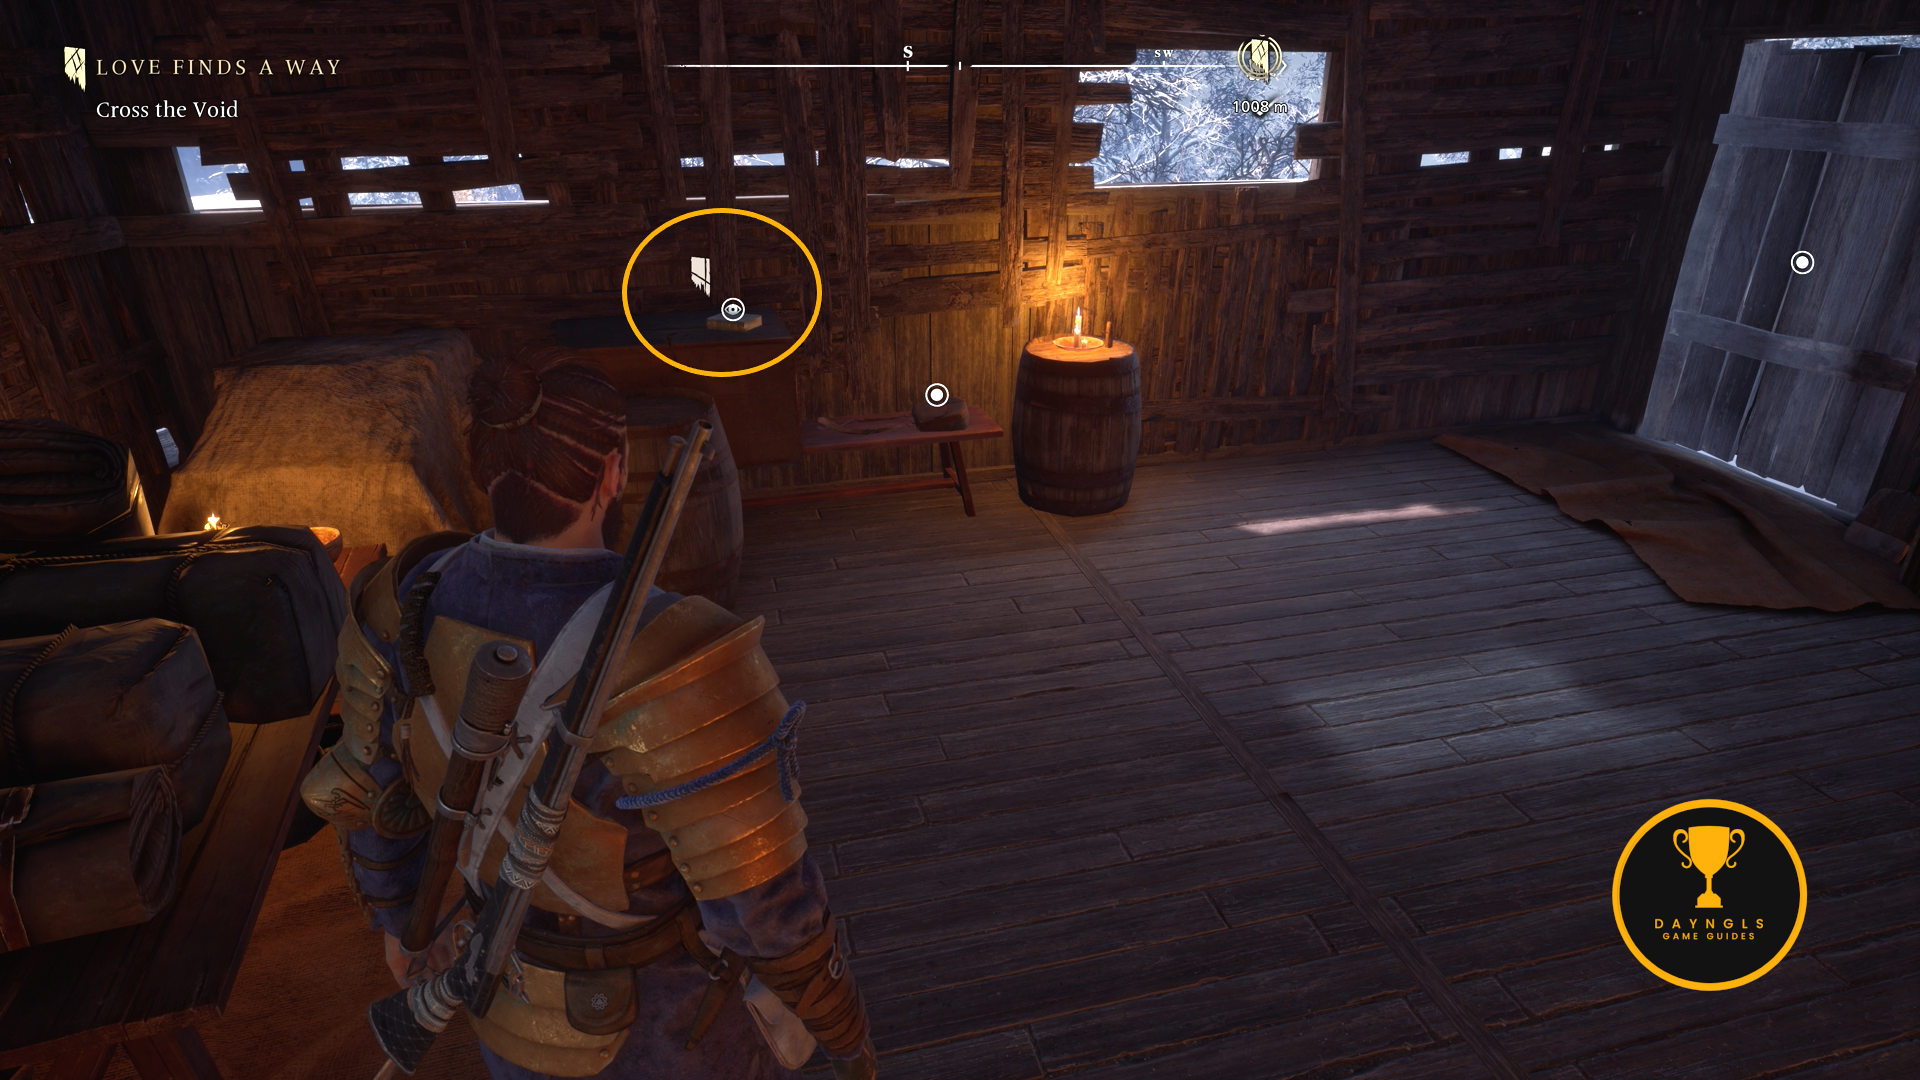
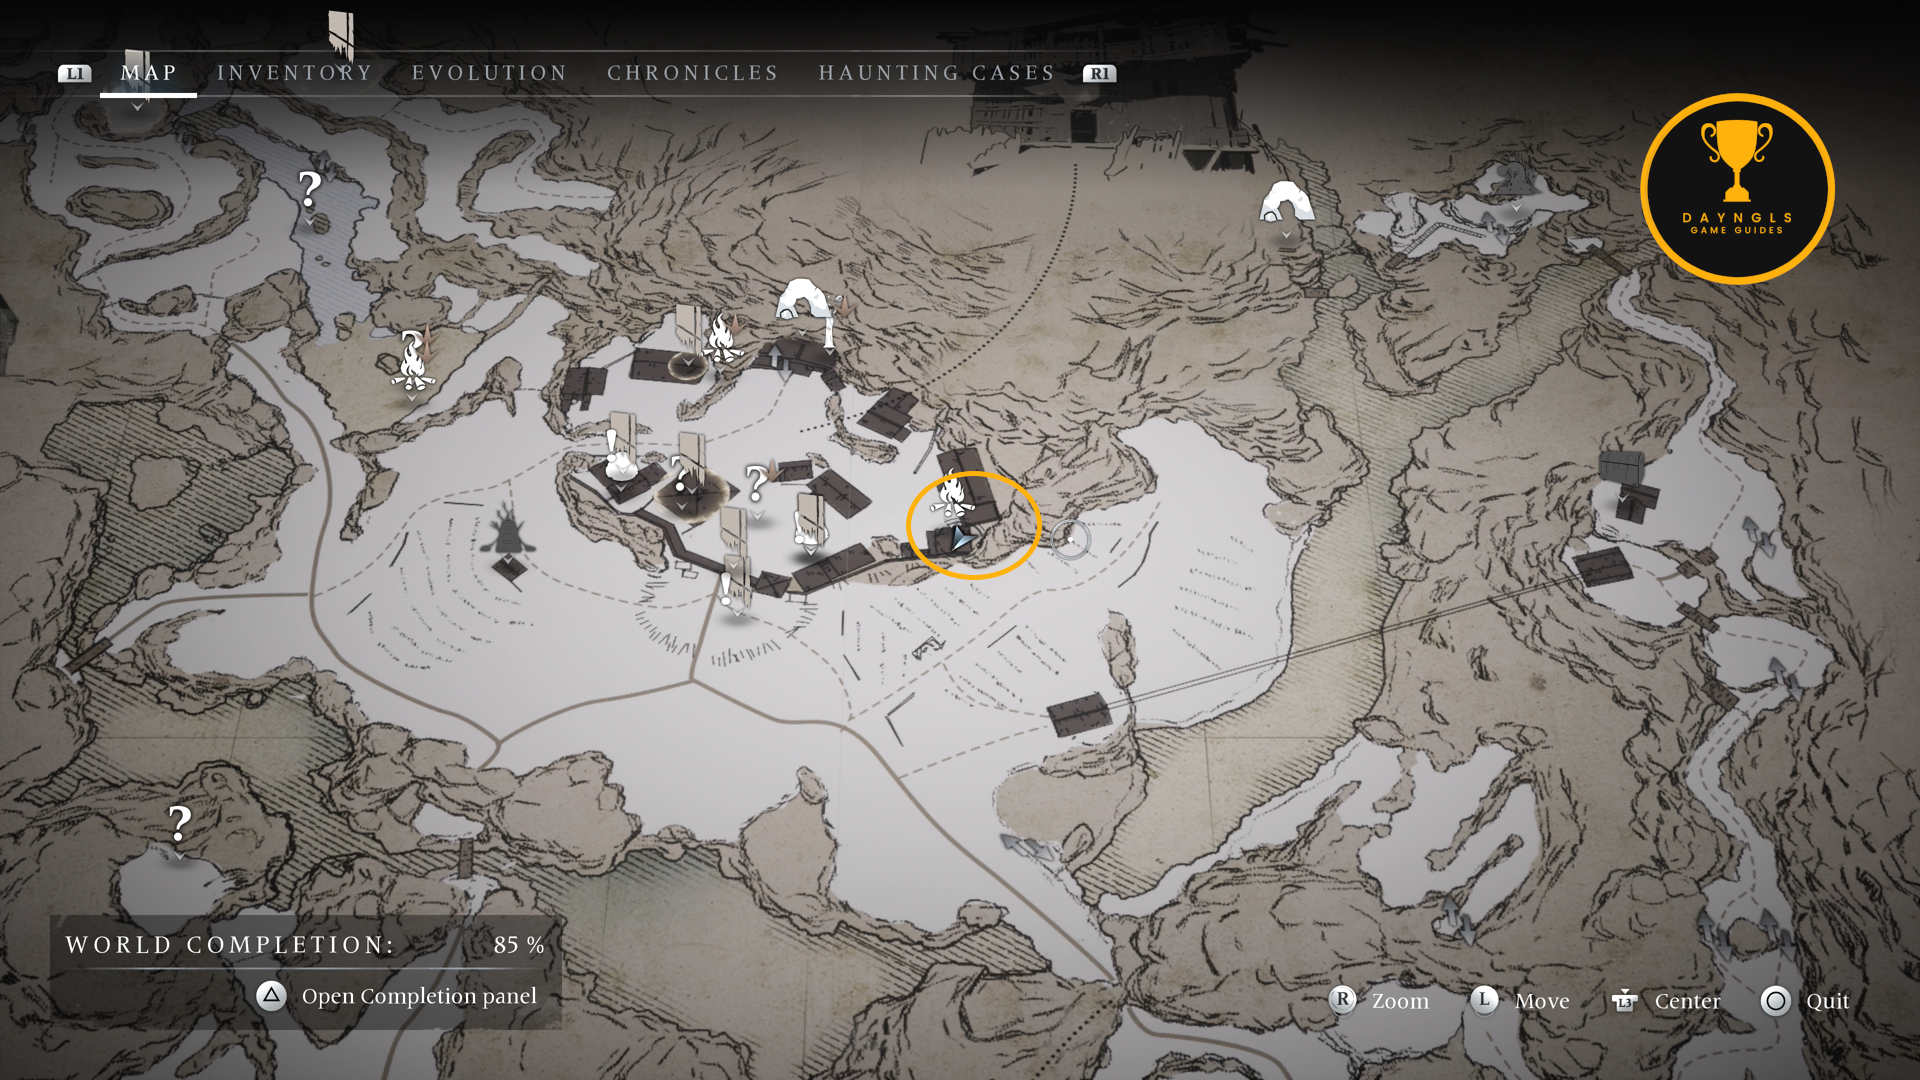
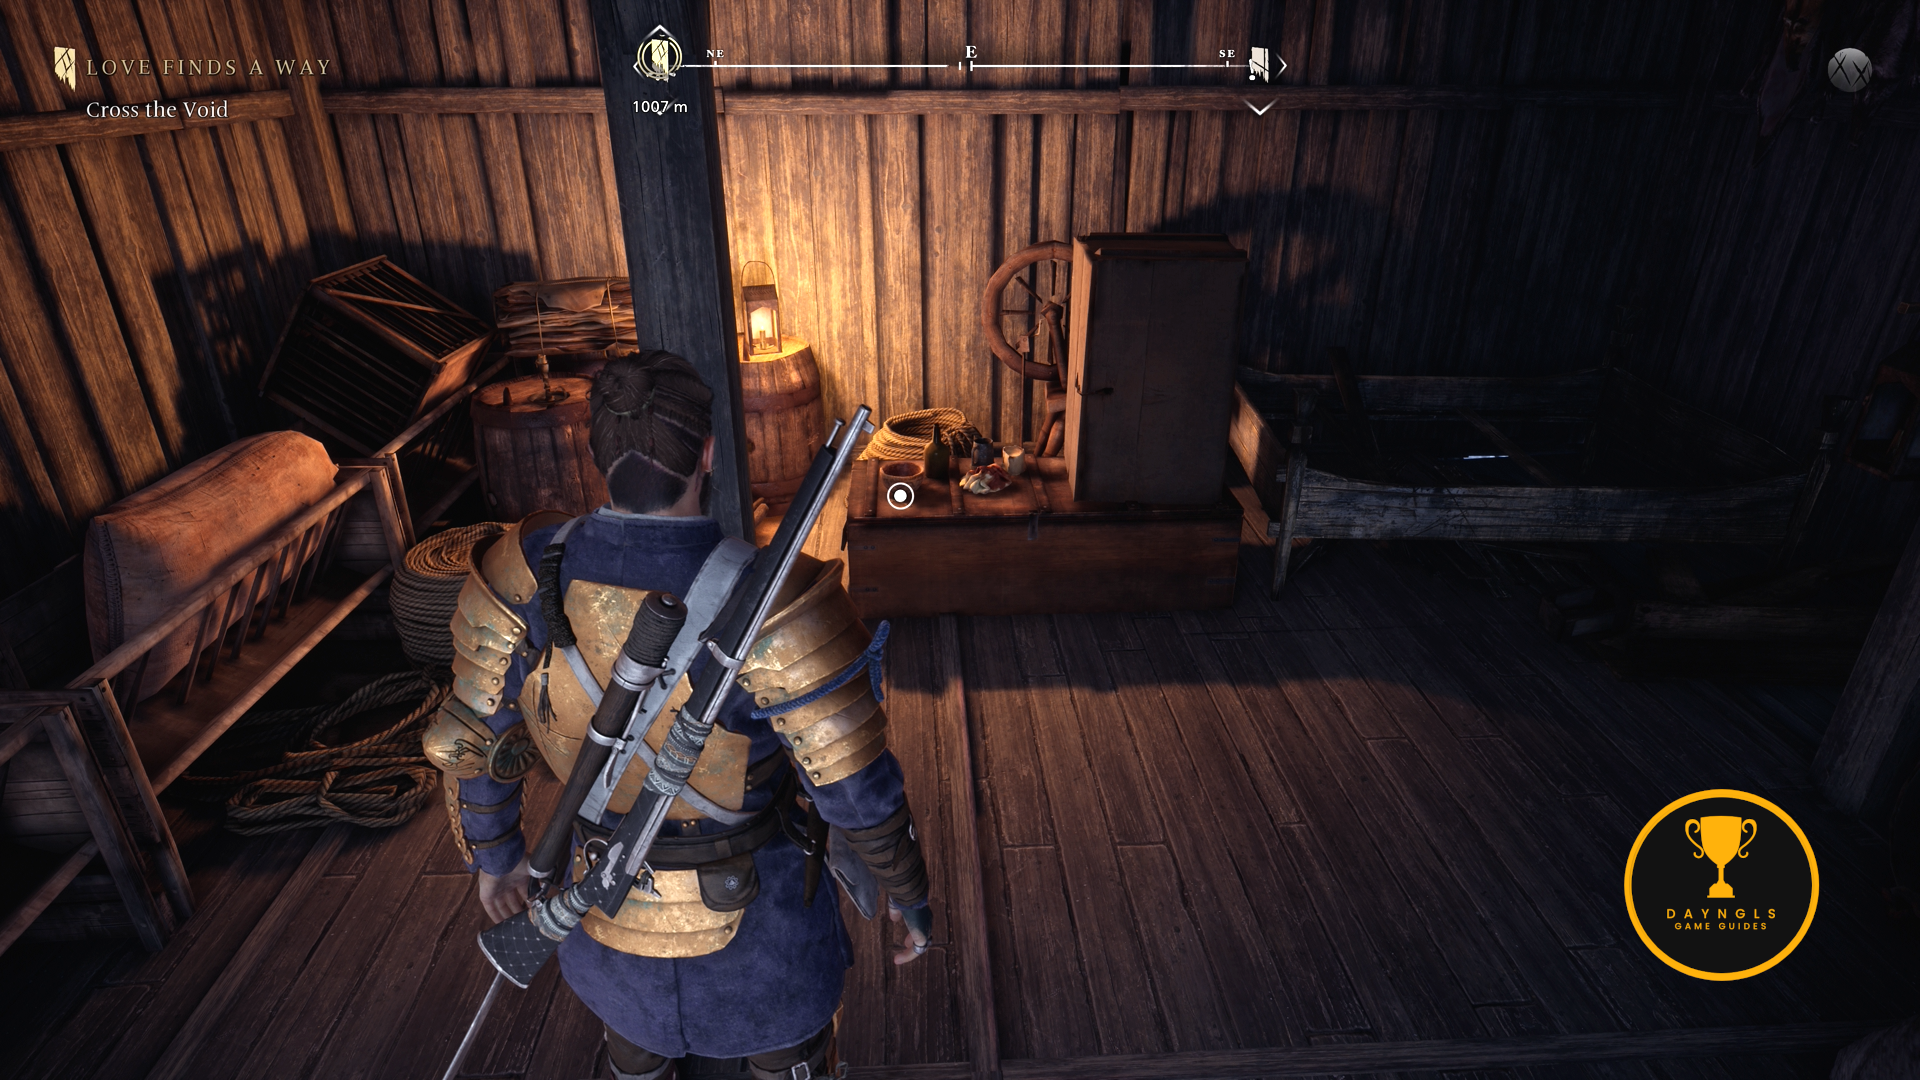
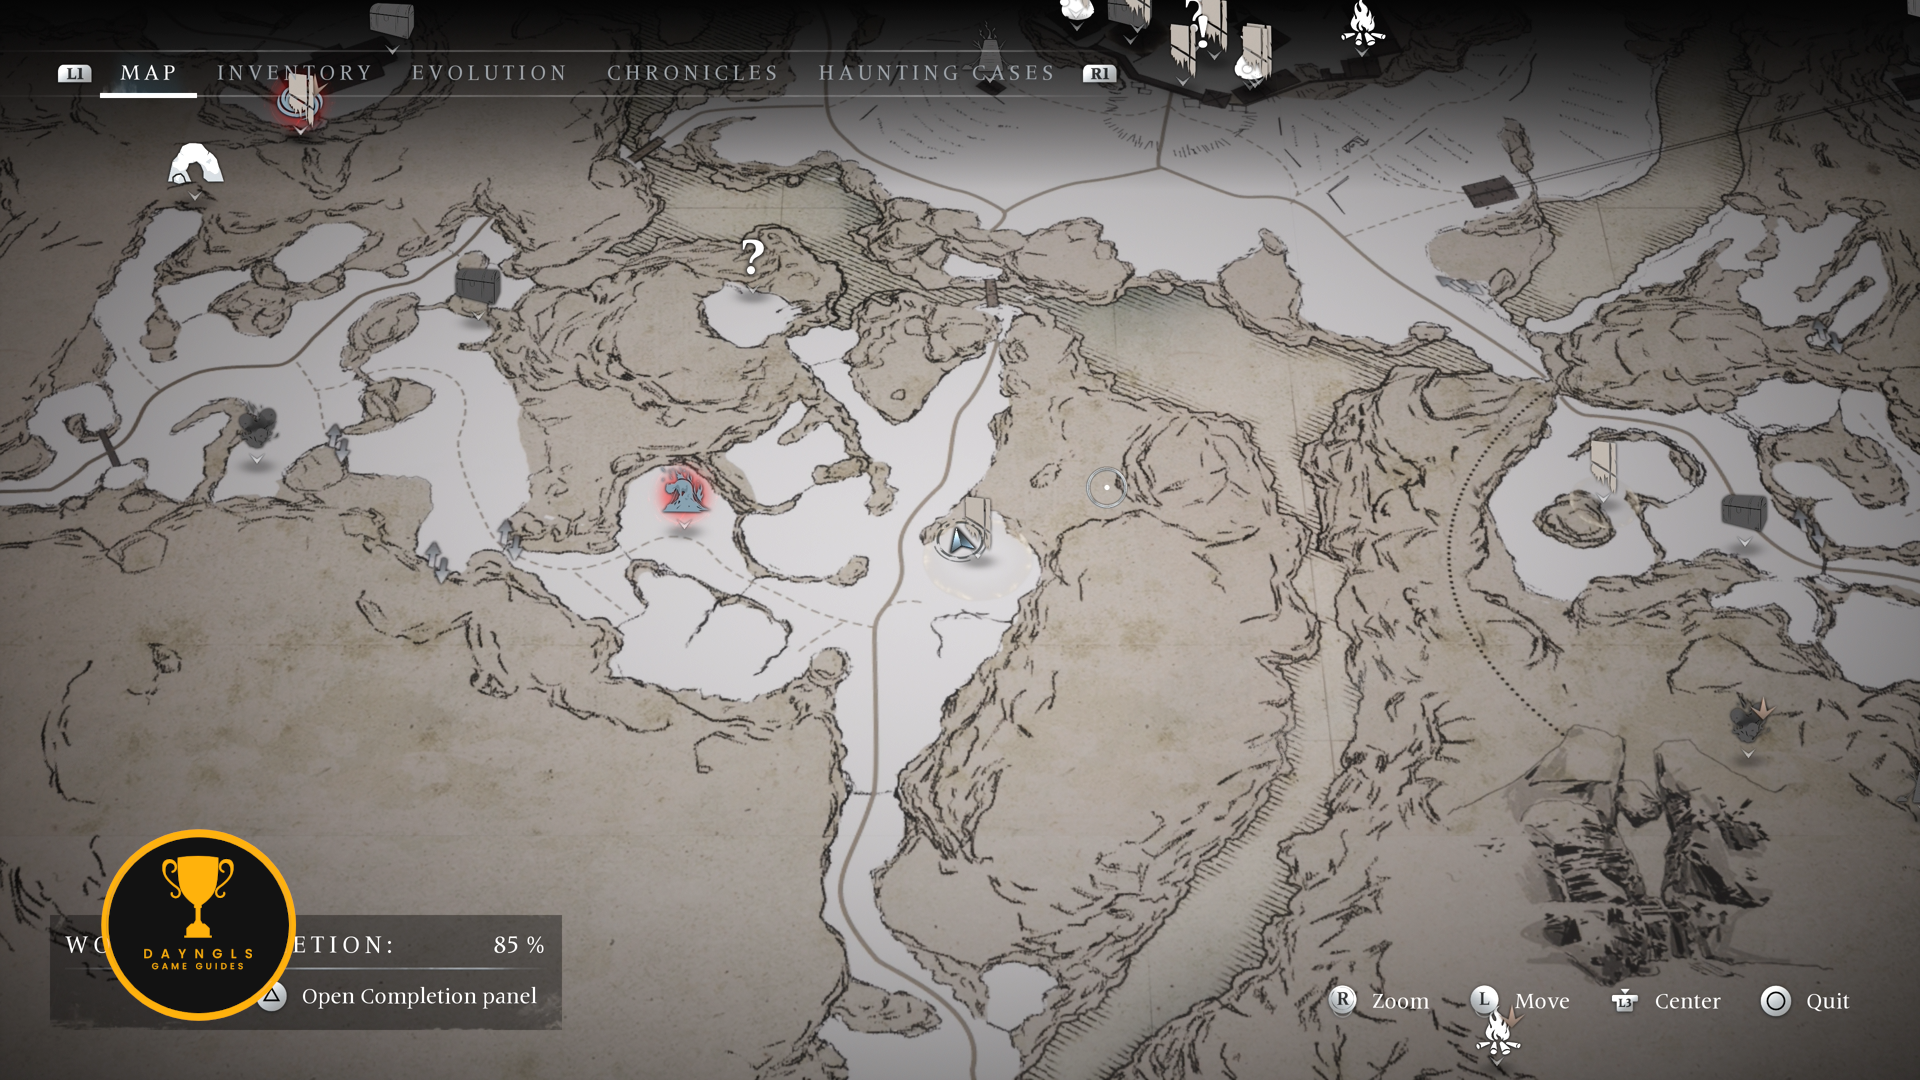
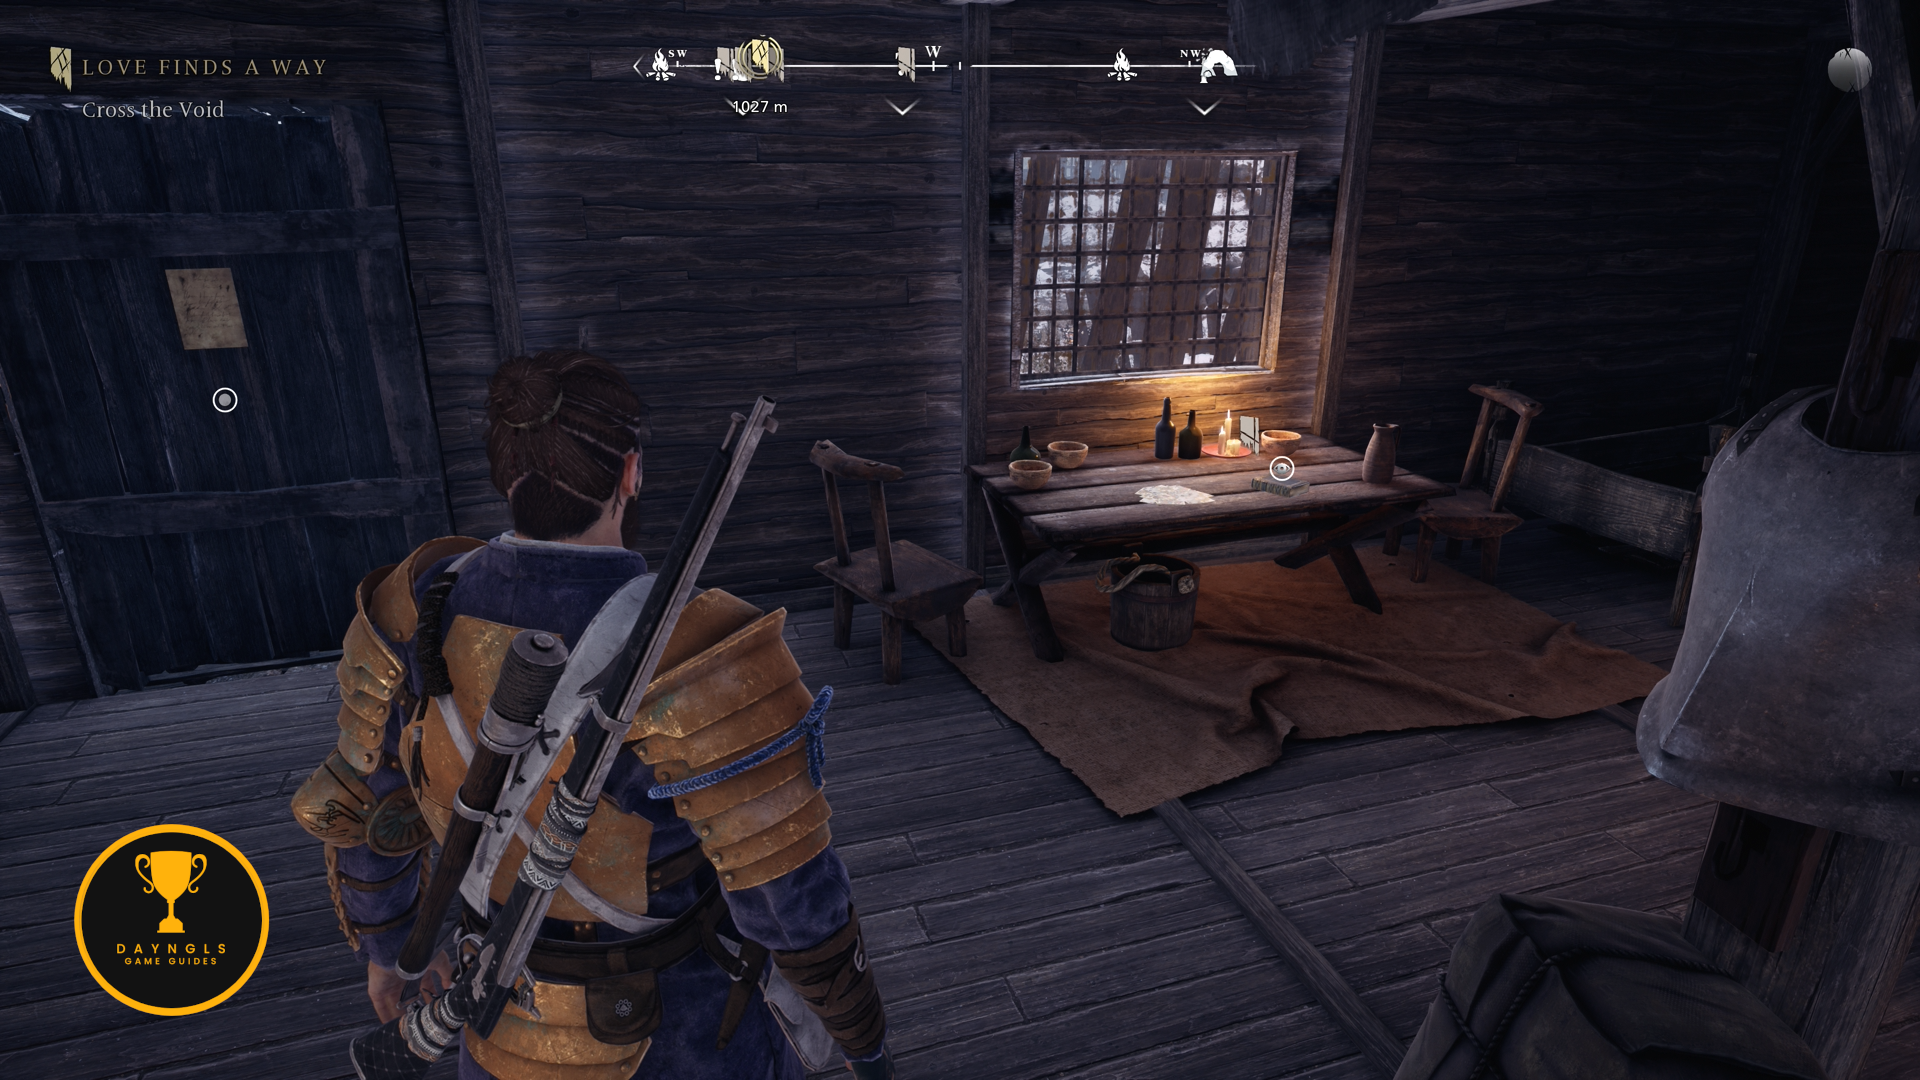
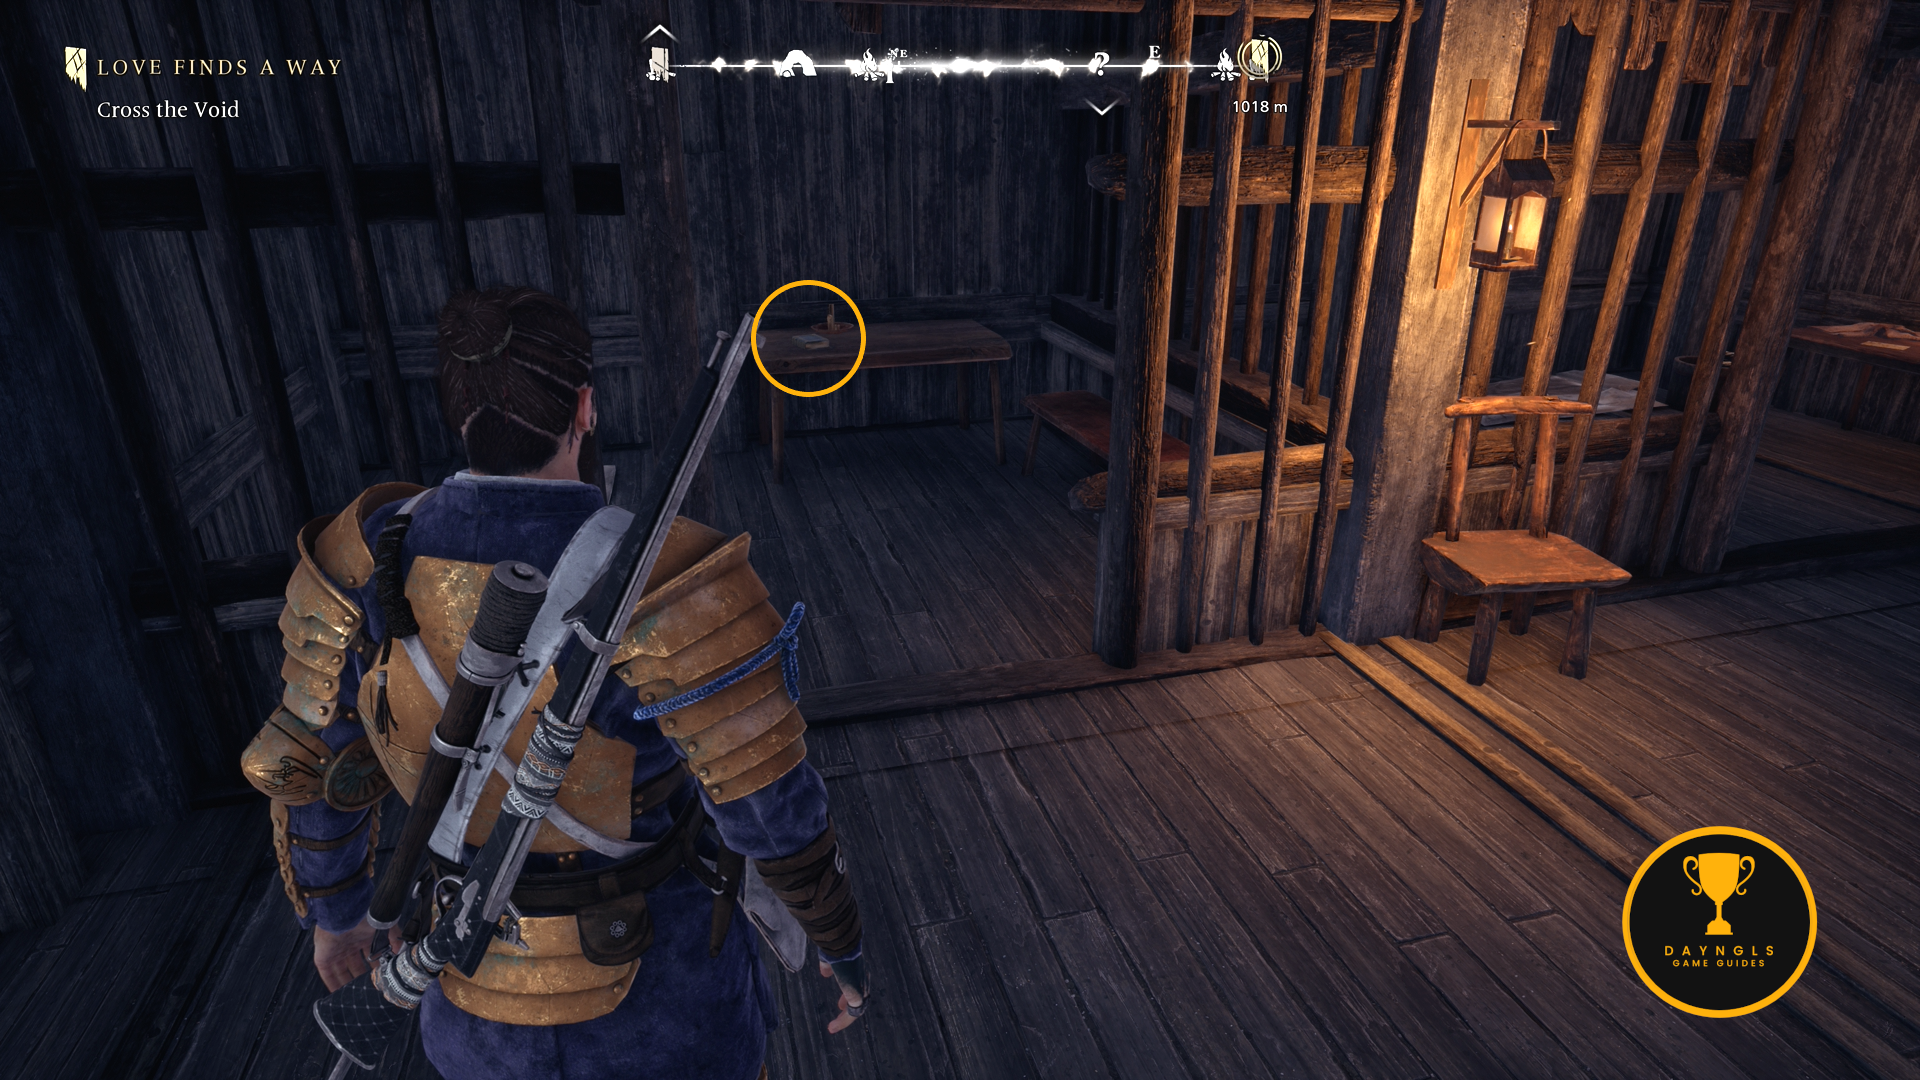
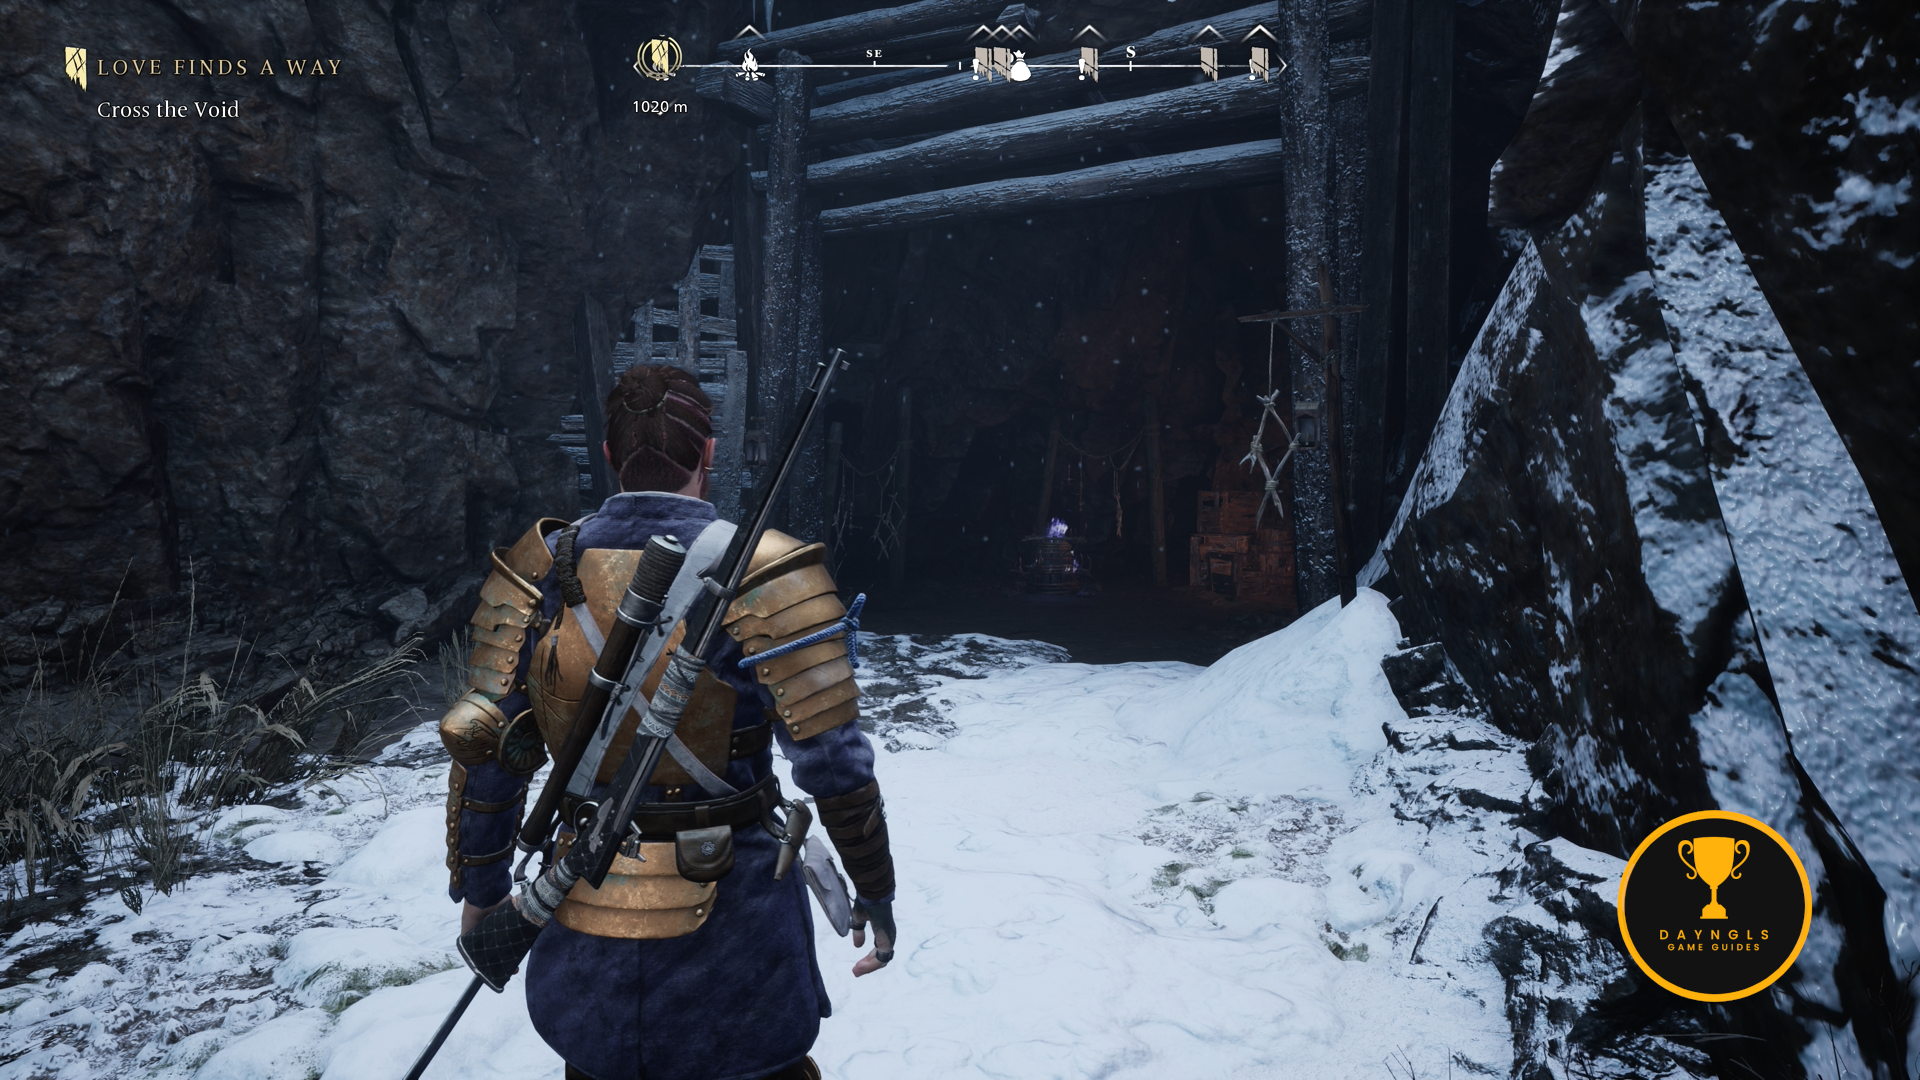
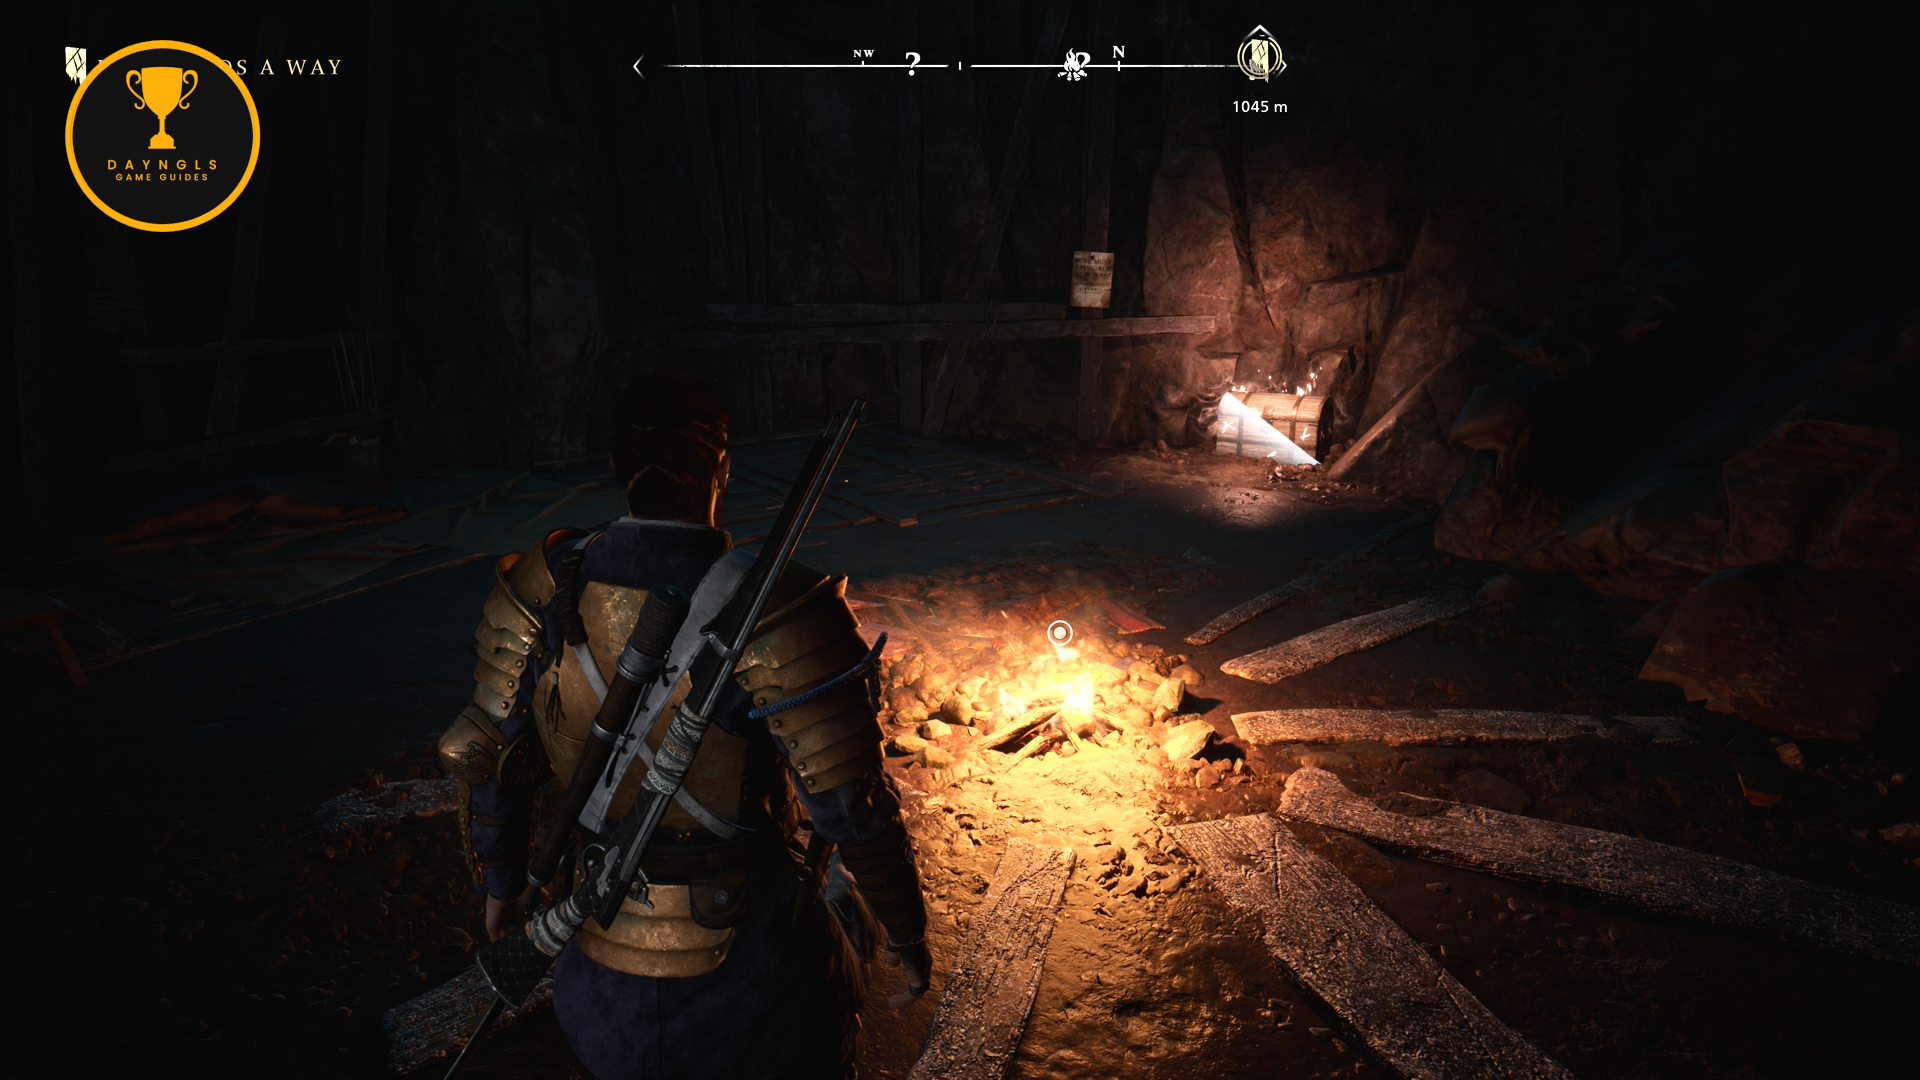
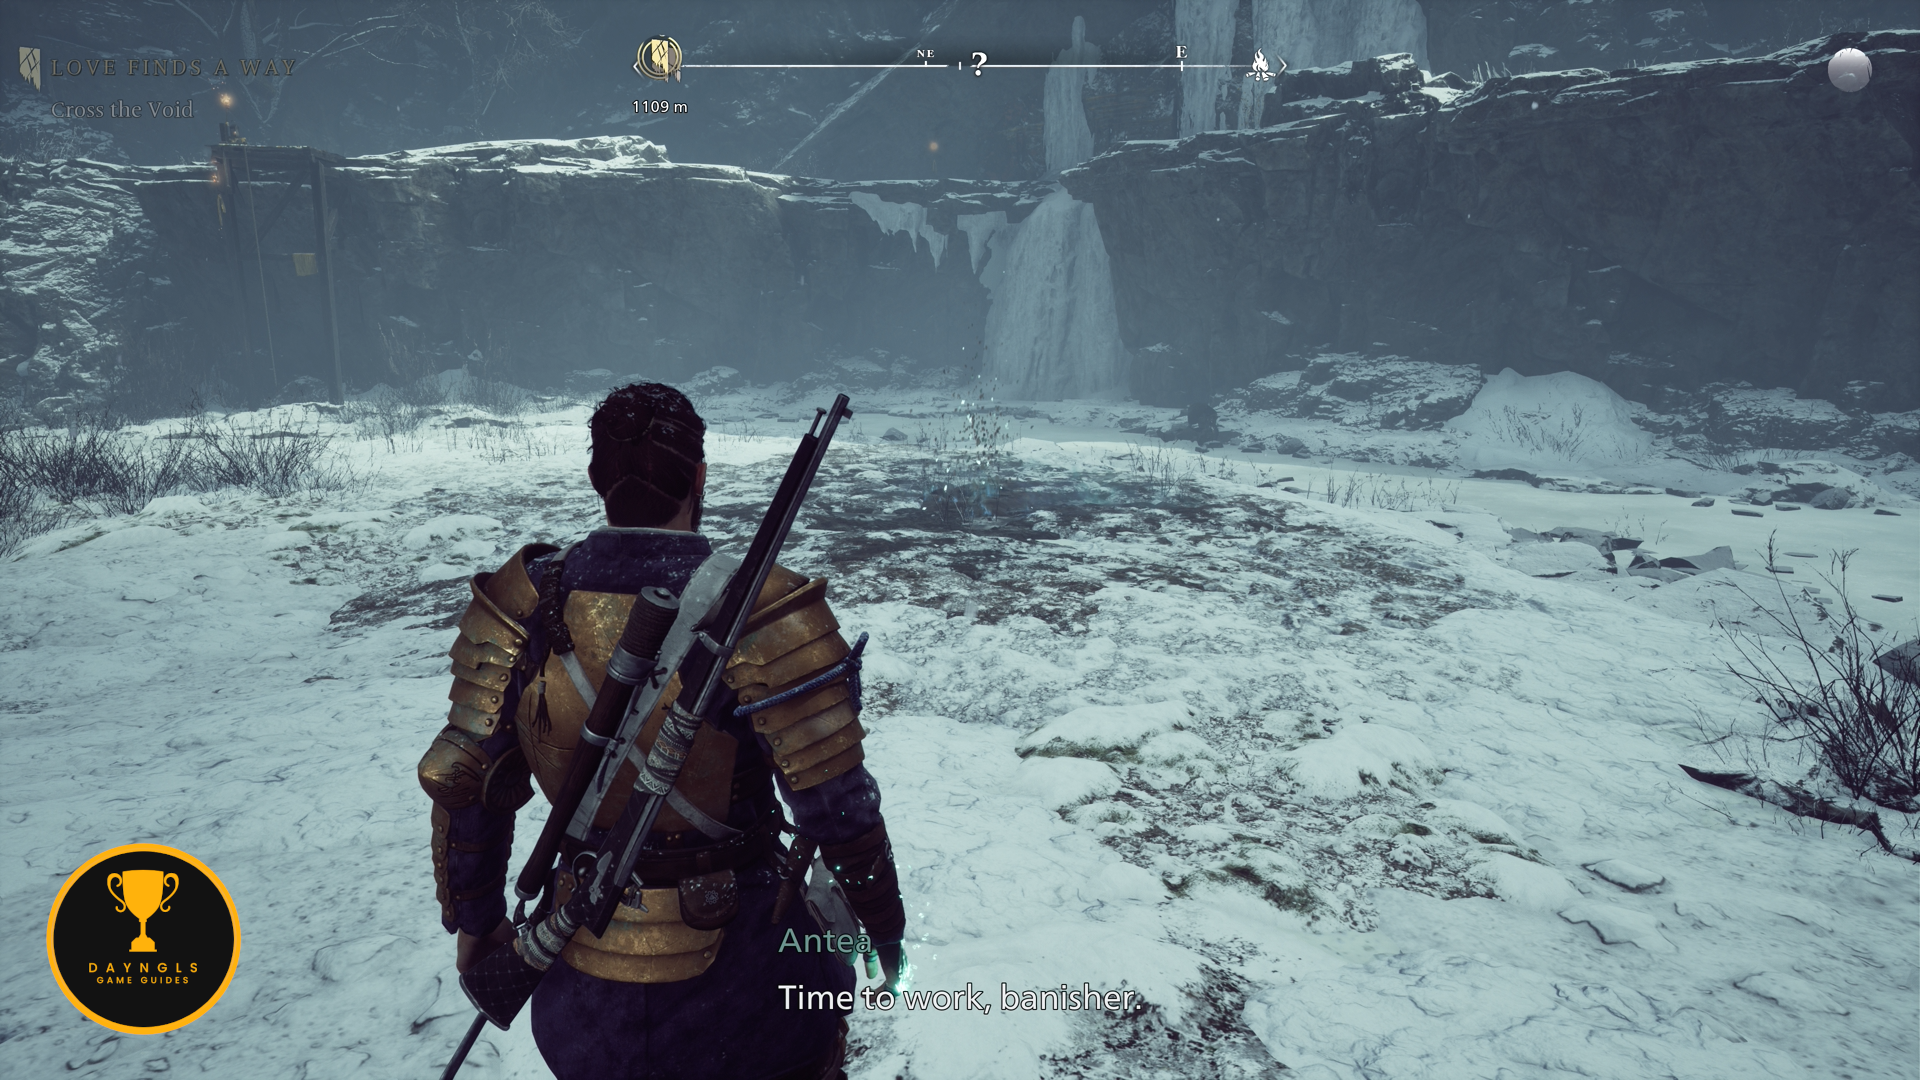
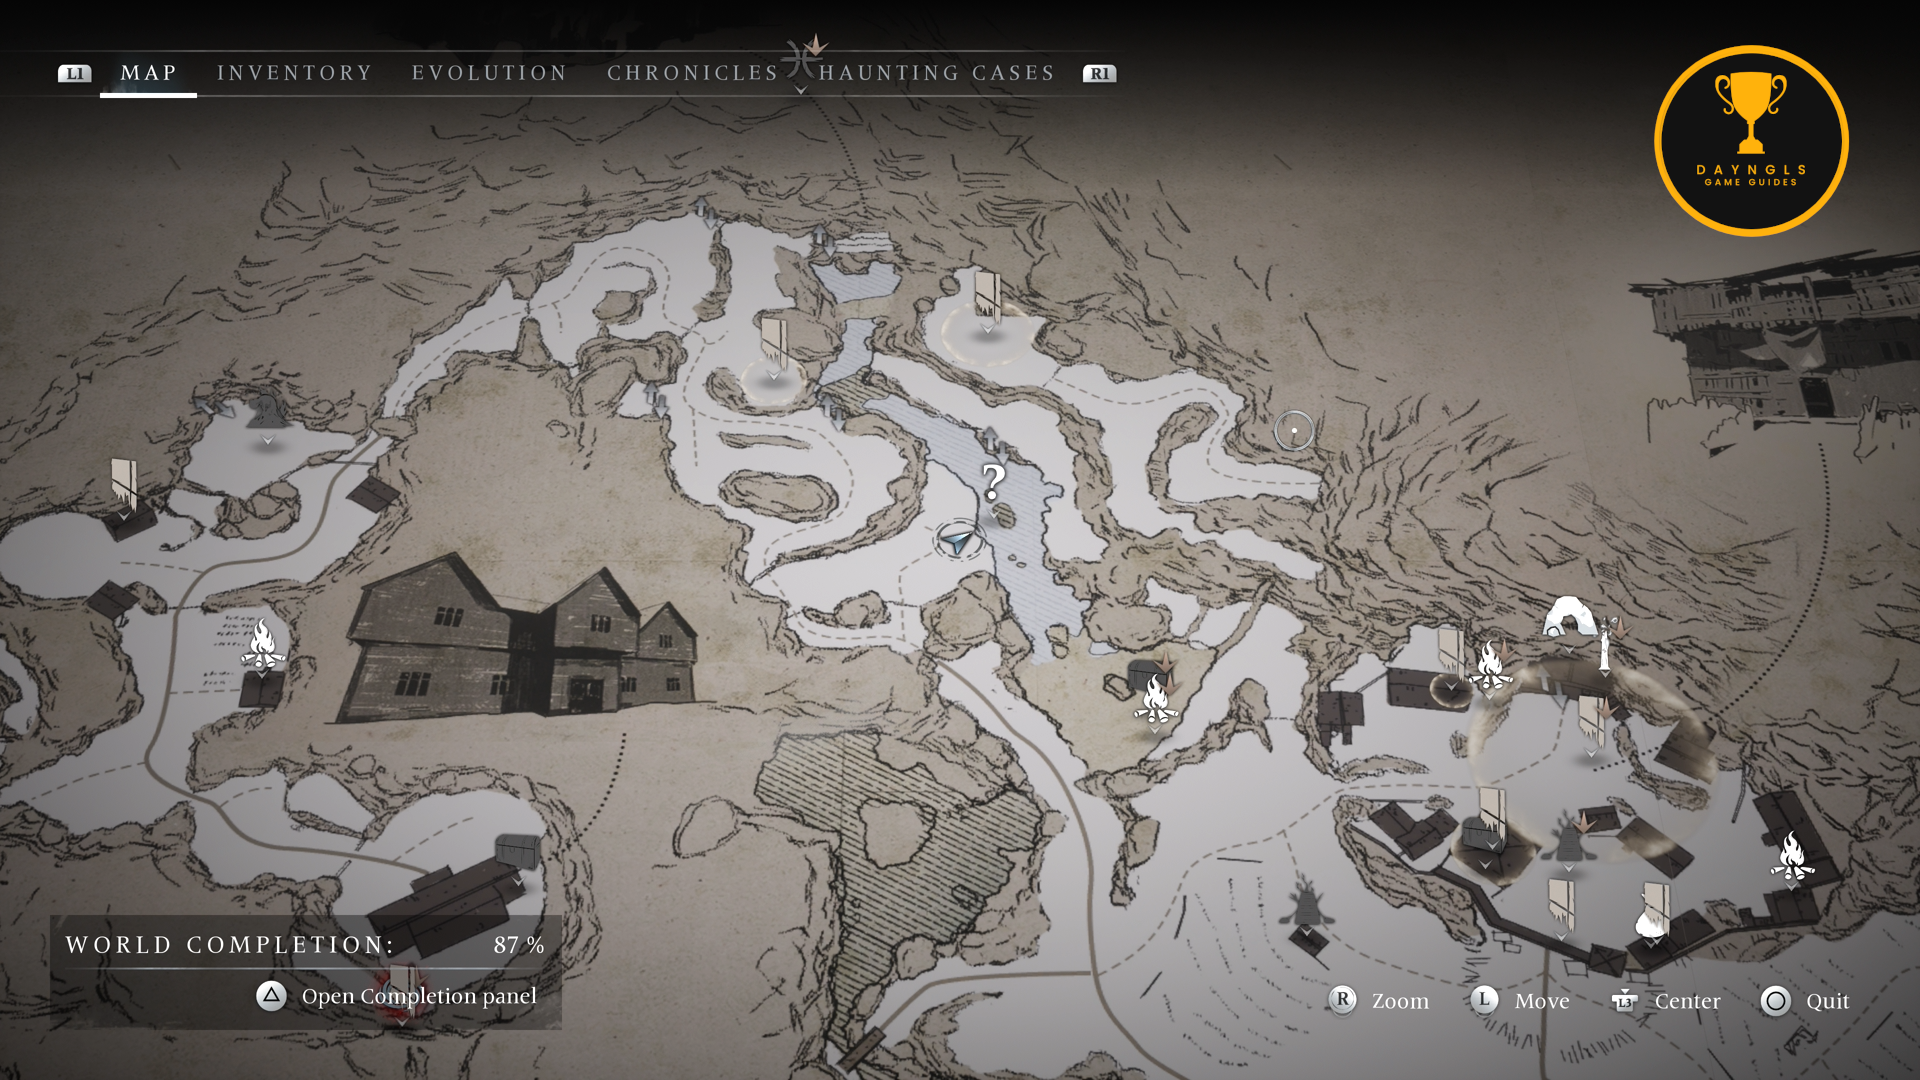
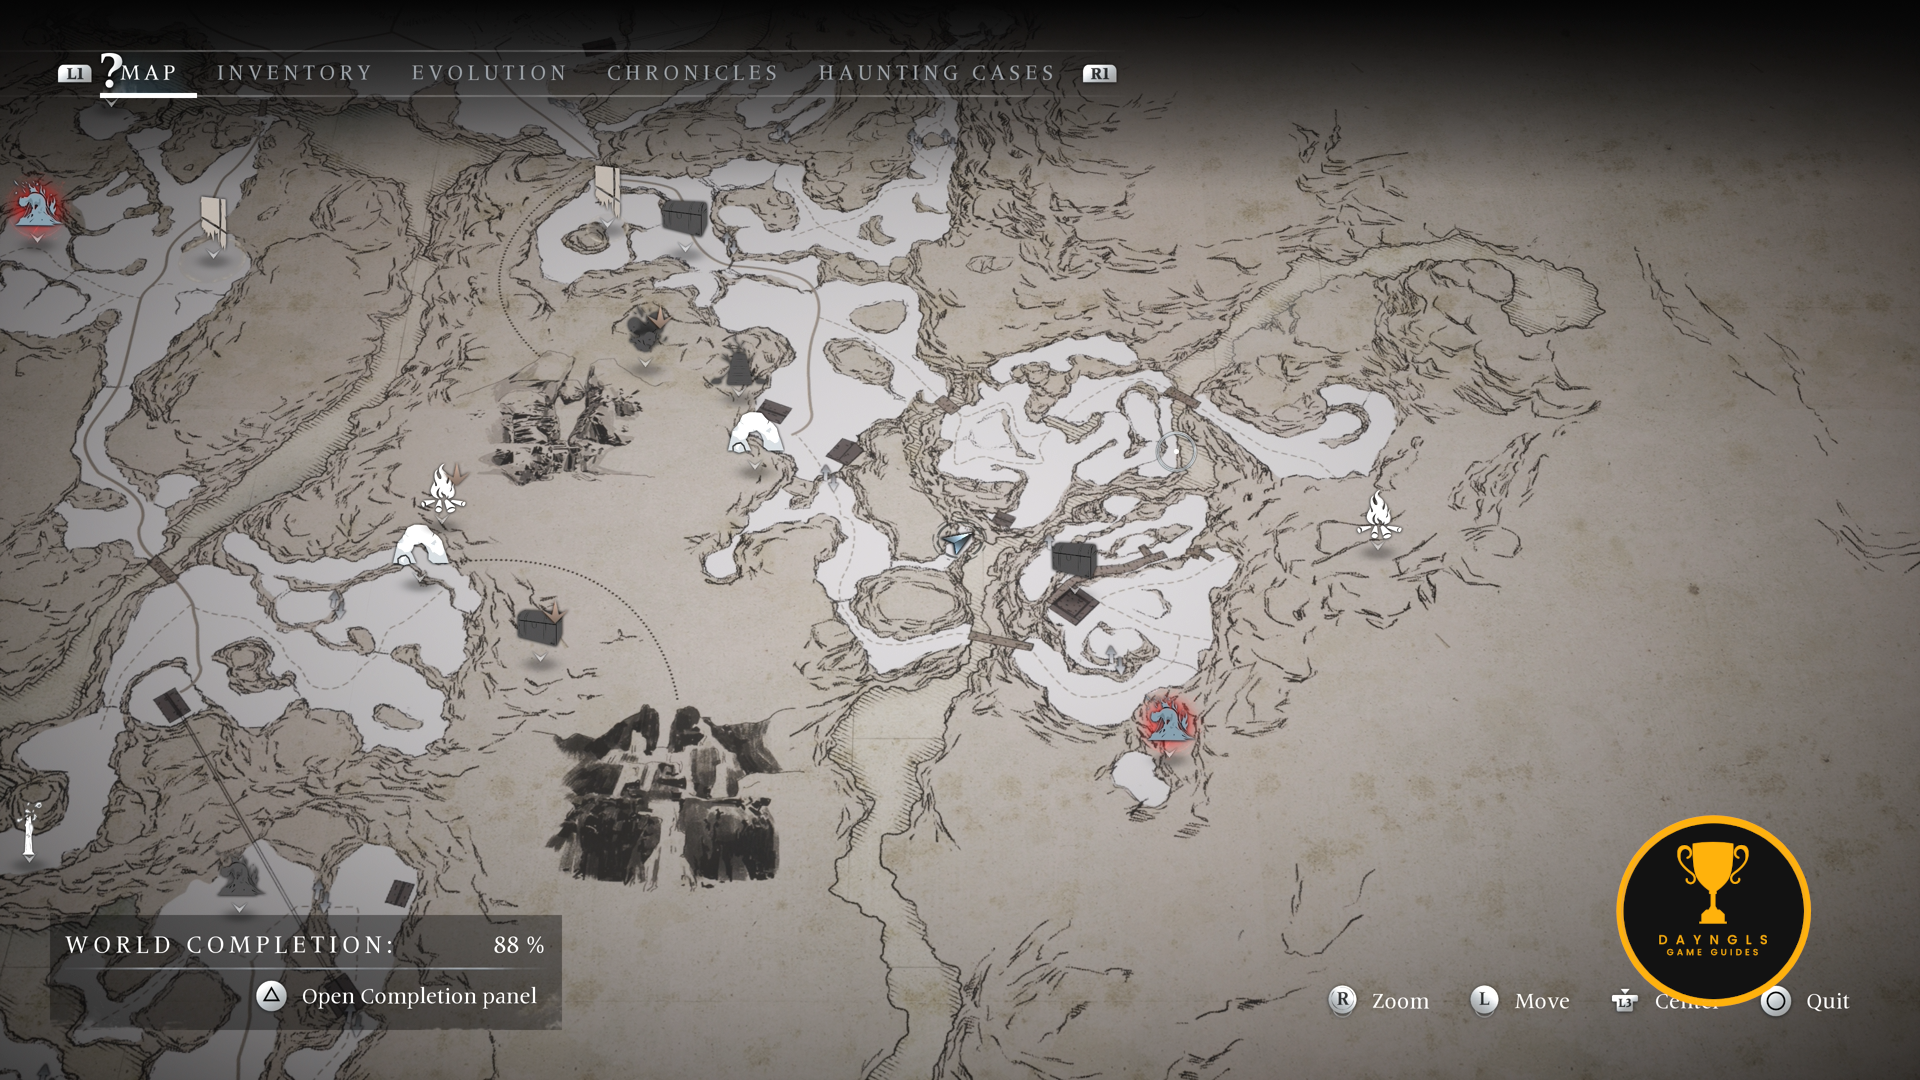
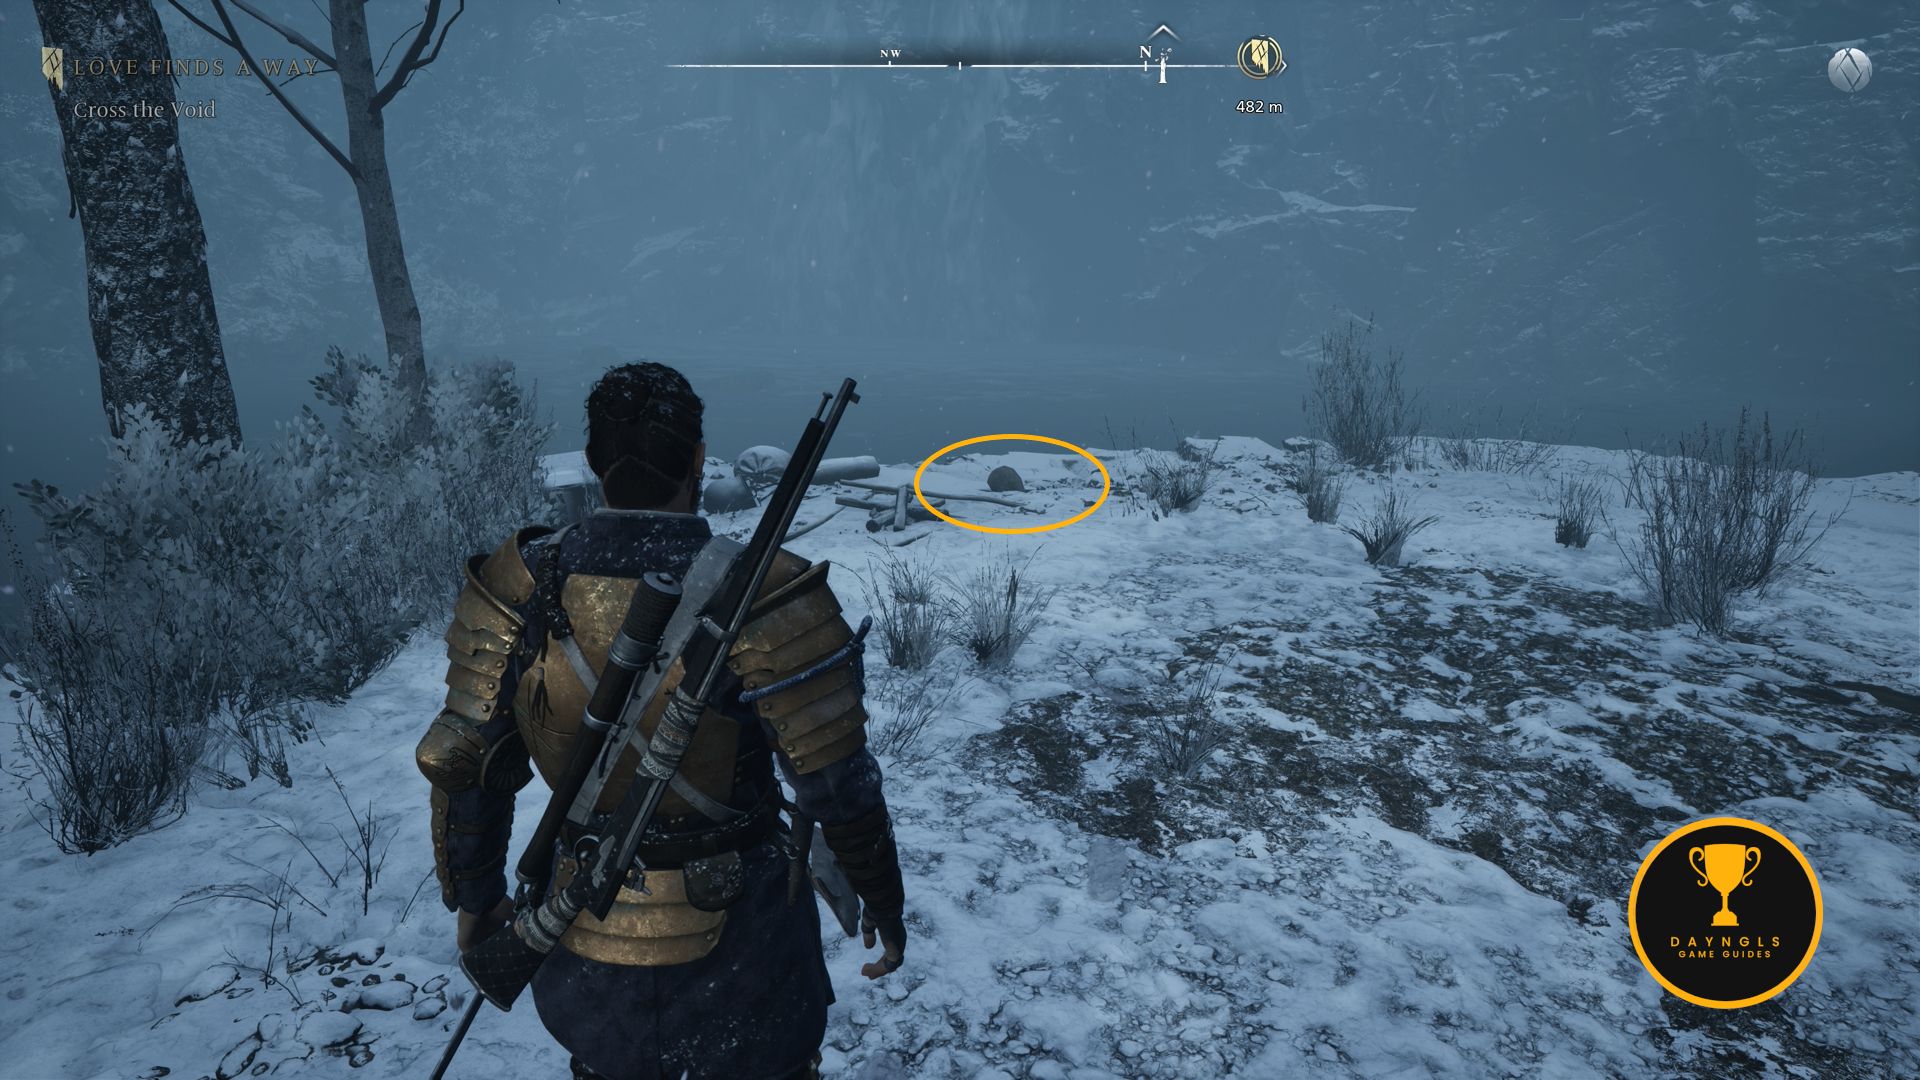
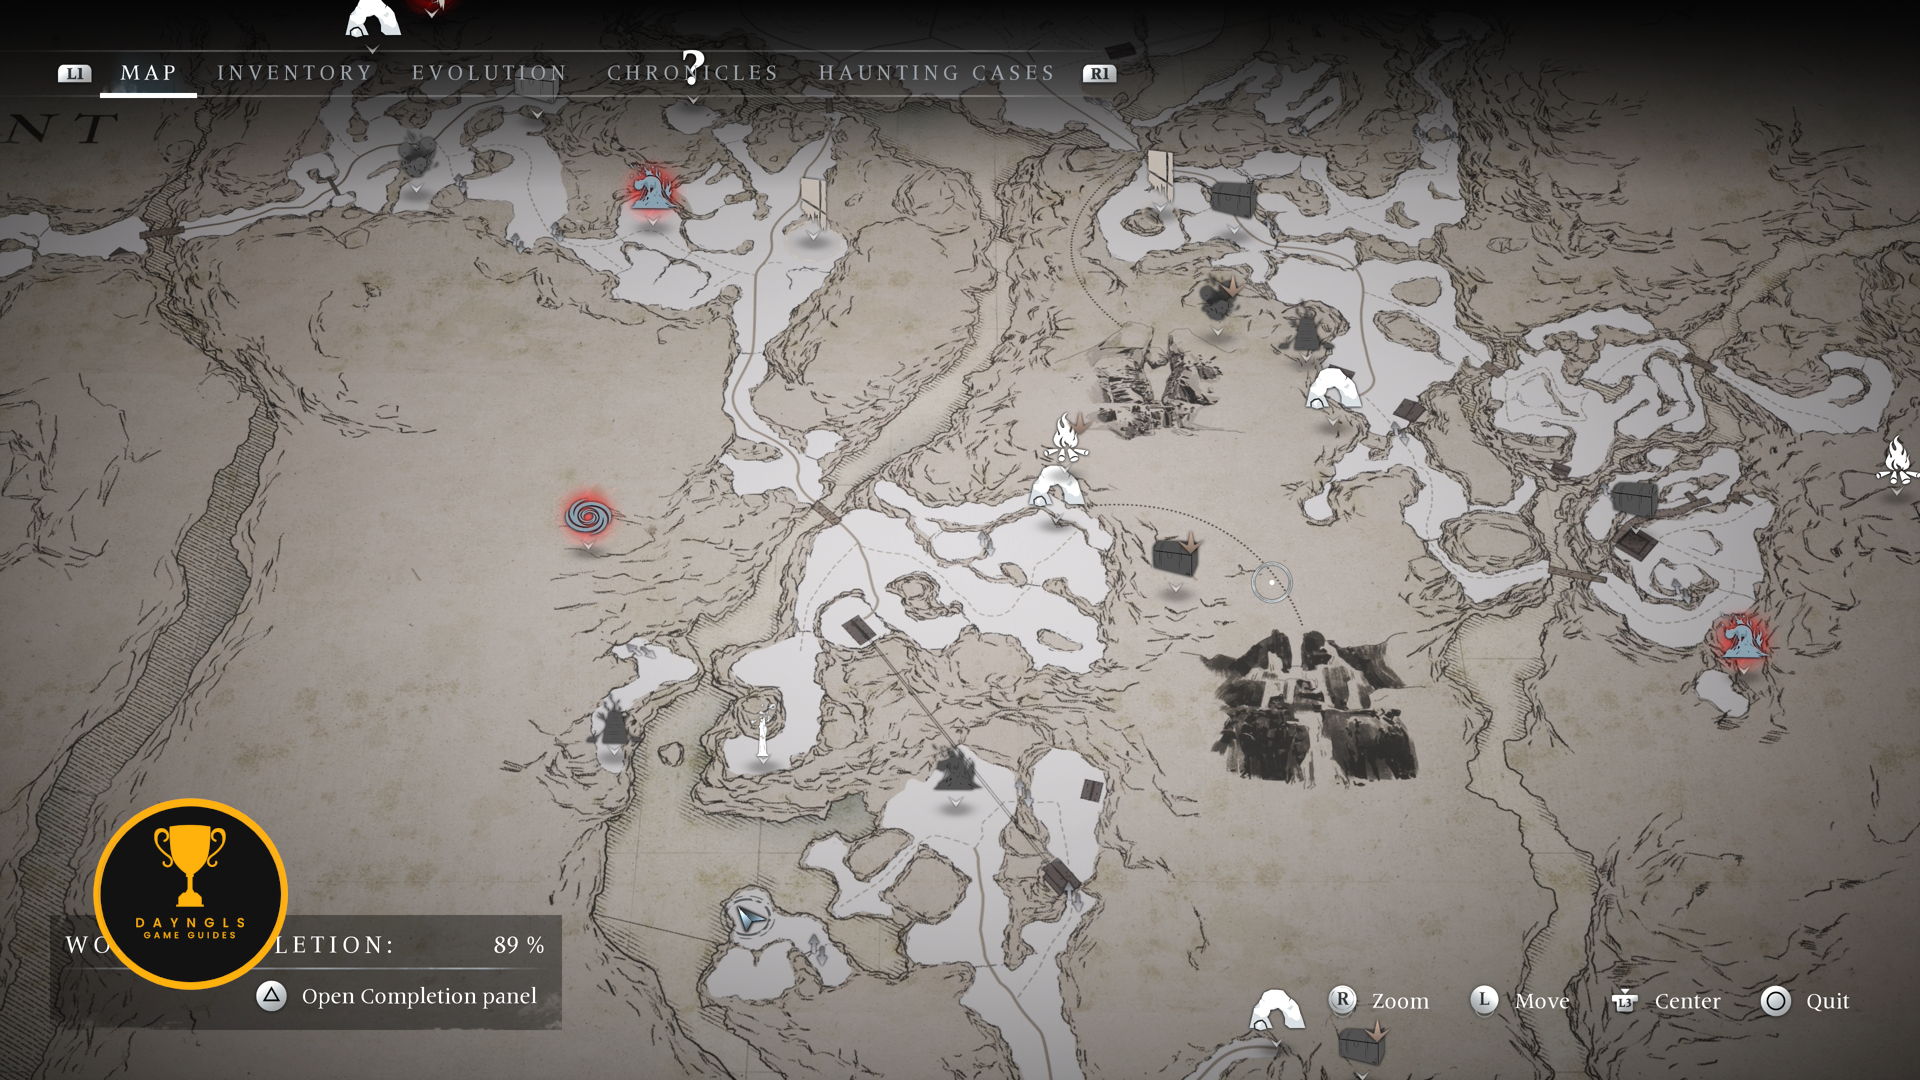
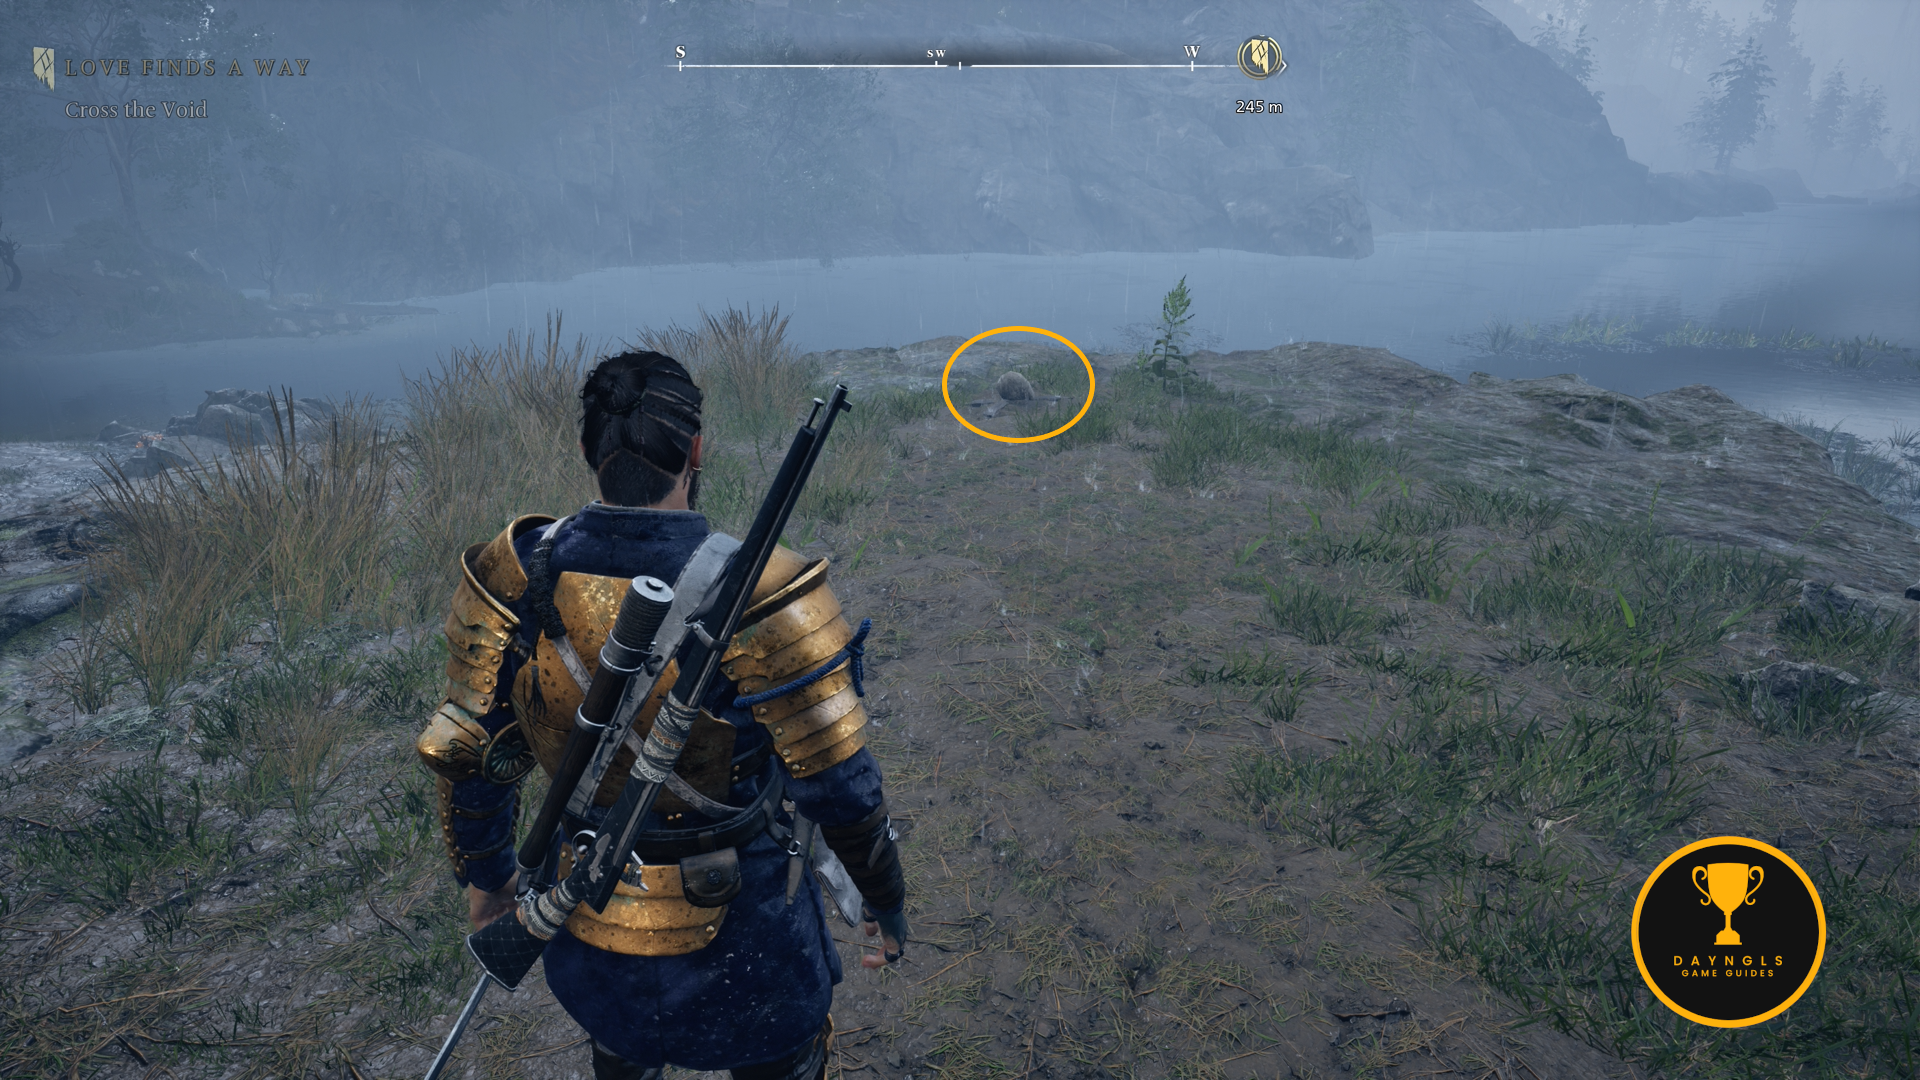
- The Vulkods of Roanoke / American Vampyr Trophy/Achievement – This is found where you met Seeker at Mount Pleasant during the main story mission, “Love Finds a Way.” You can use the Frozen Vales shelter to reach it. There is a house to the right of where Seeker was. Go inside and interact with the note on the table next to the doorway to pop this.


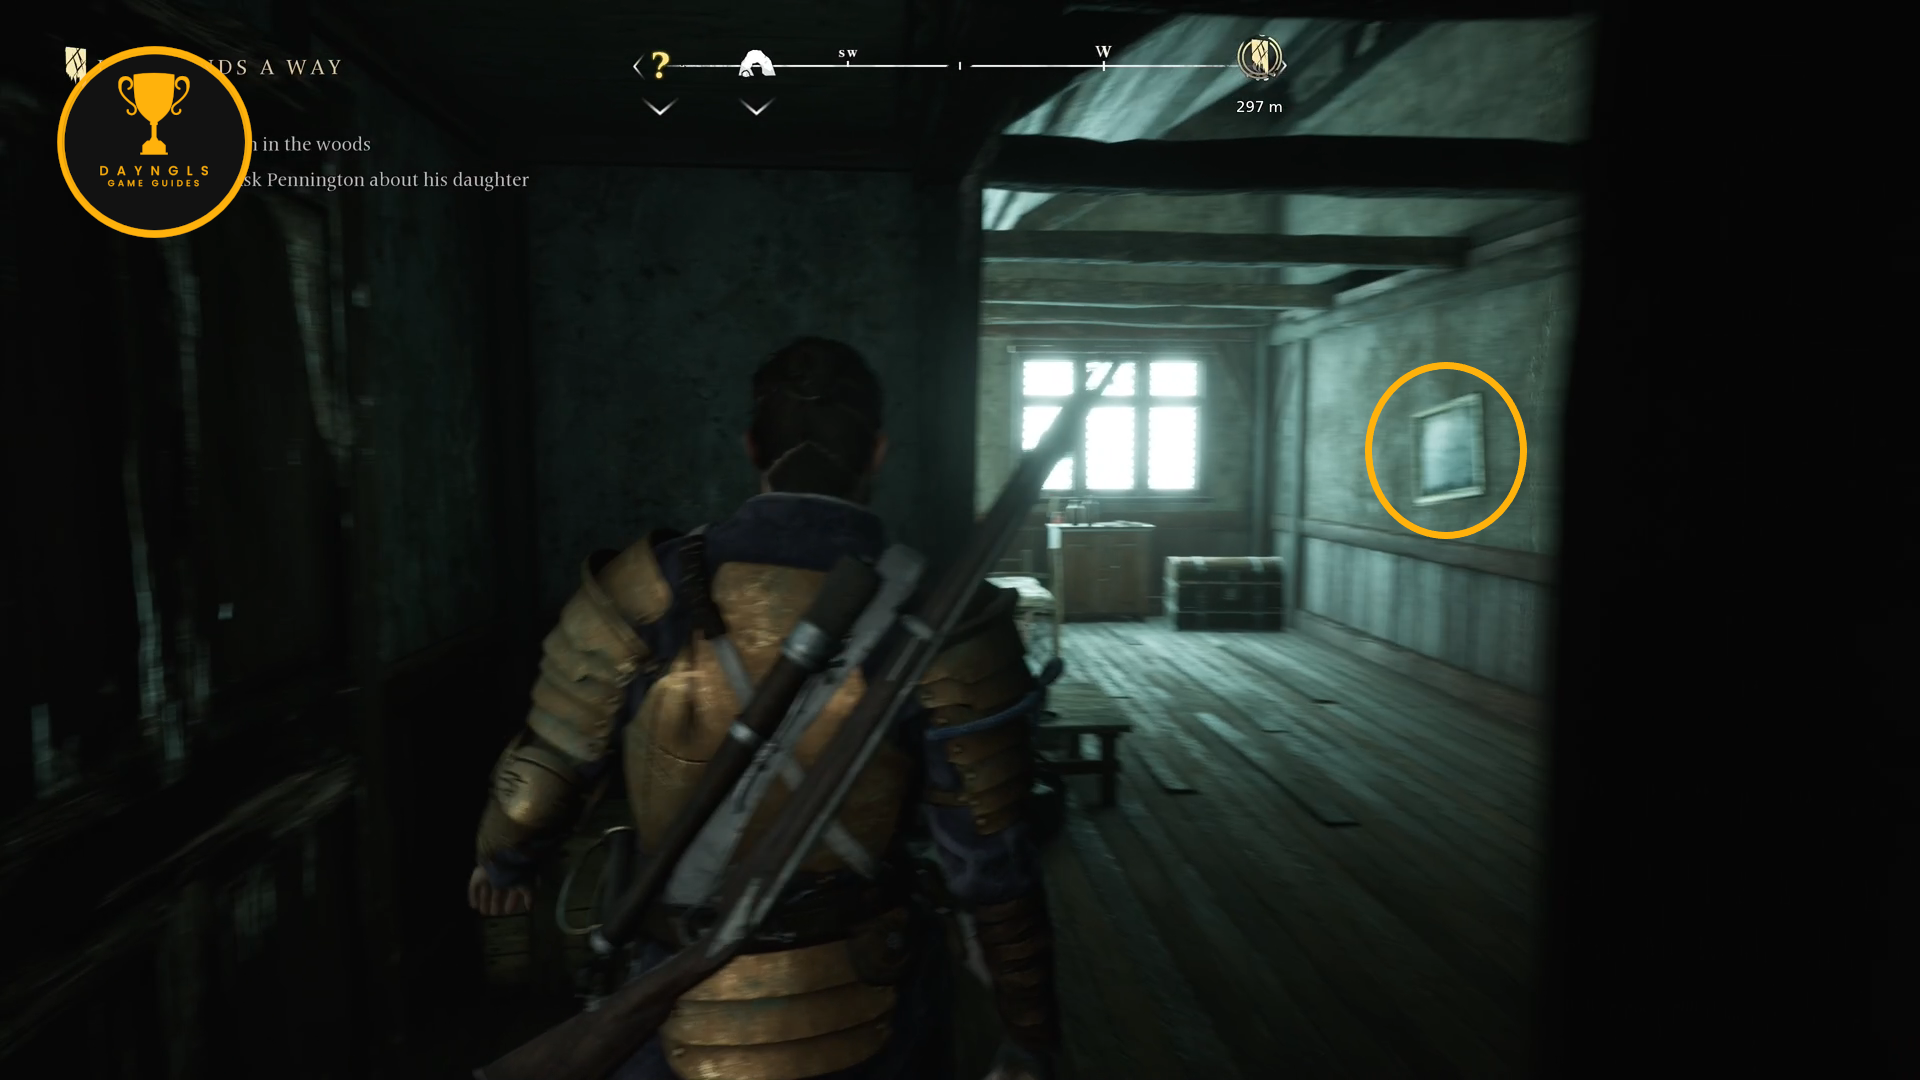
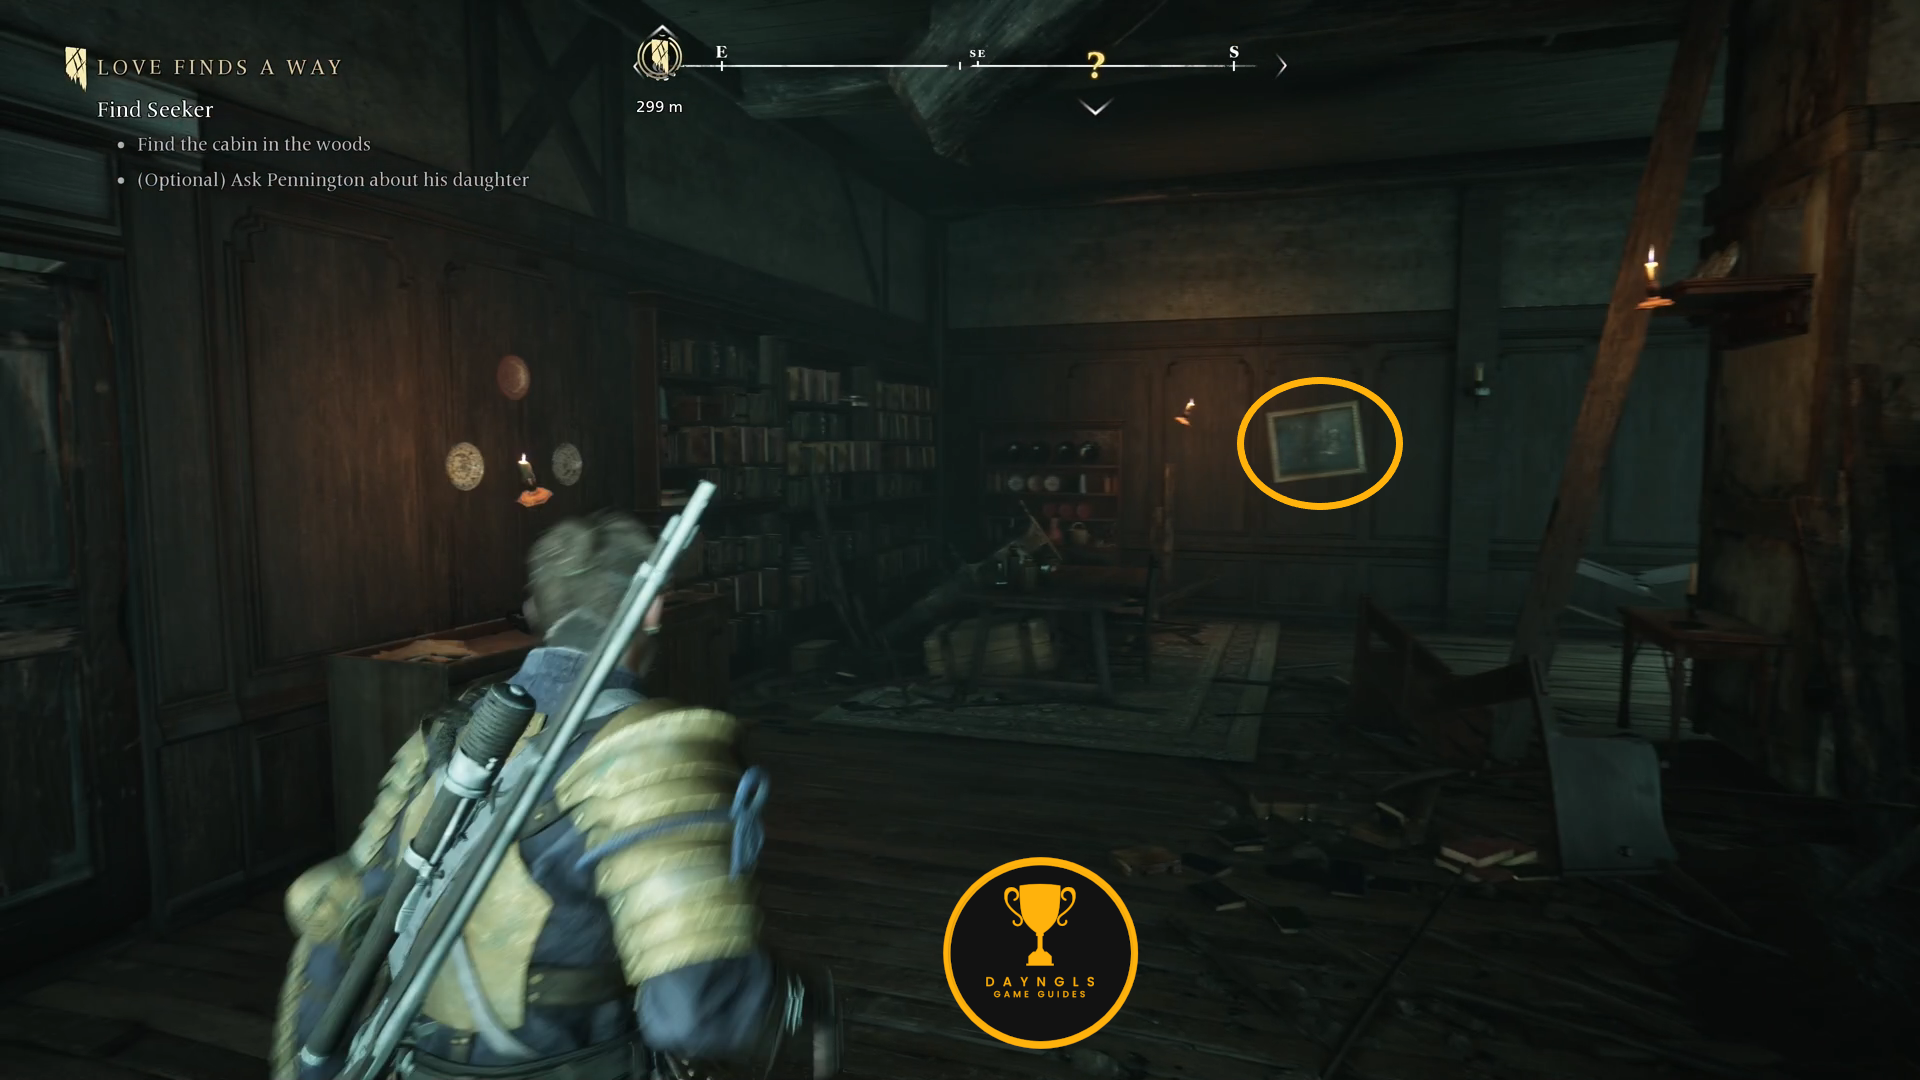
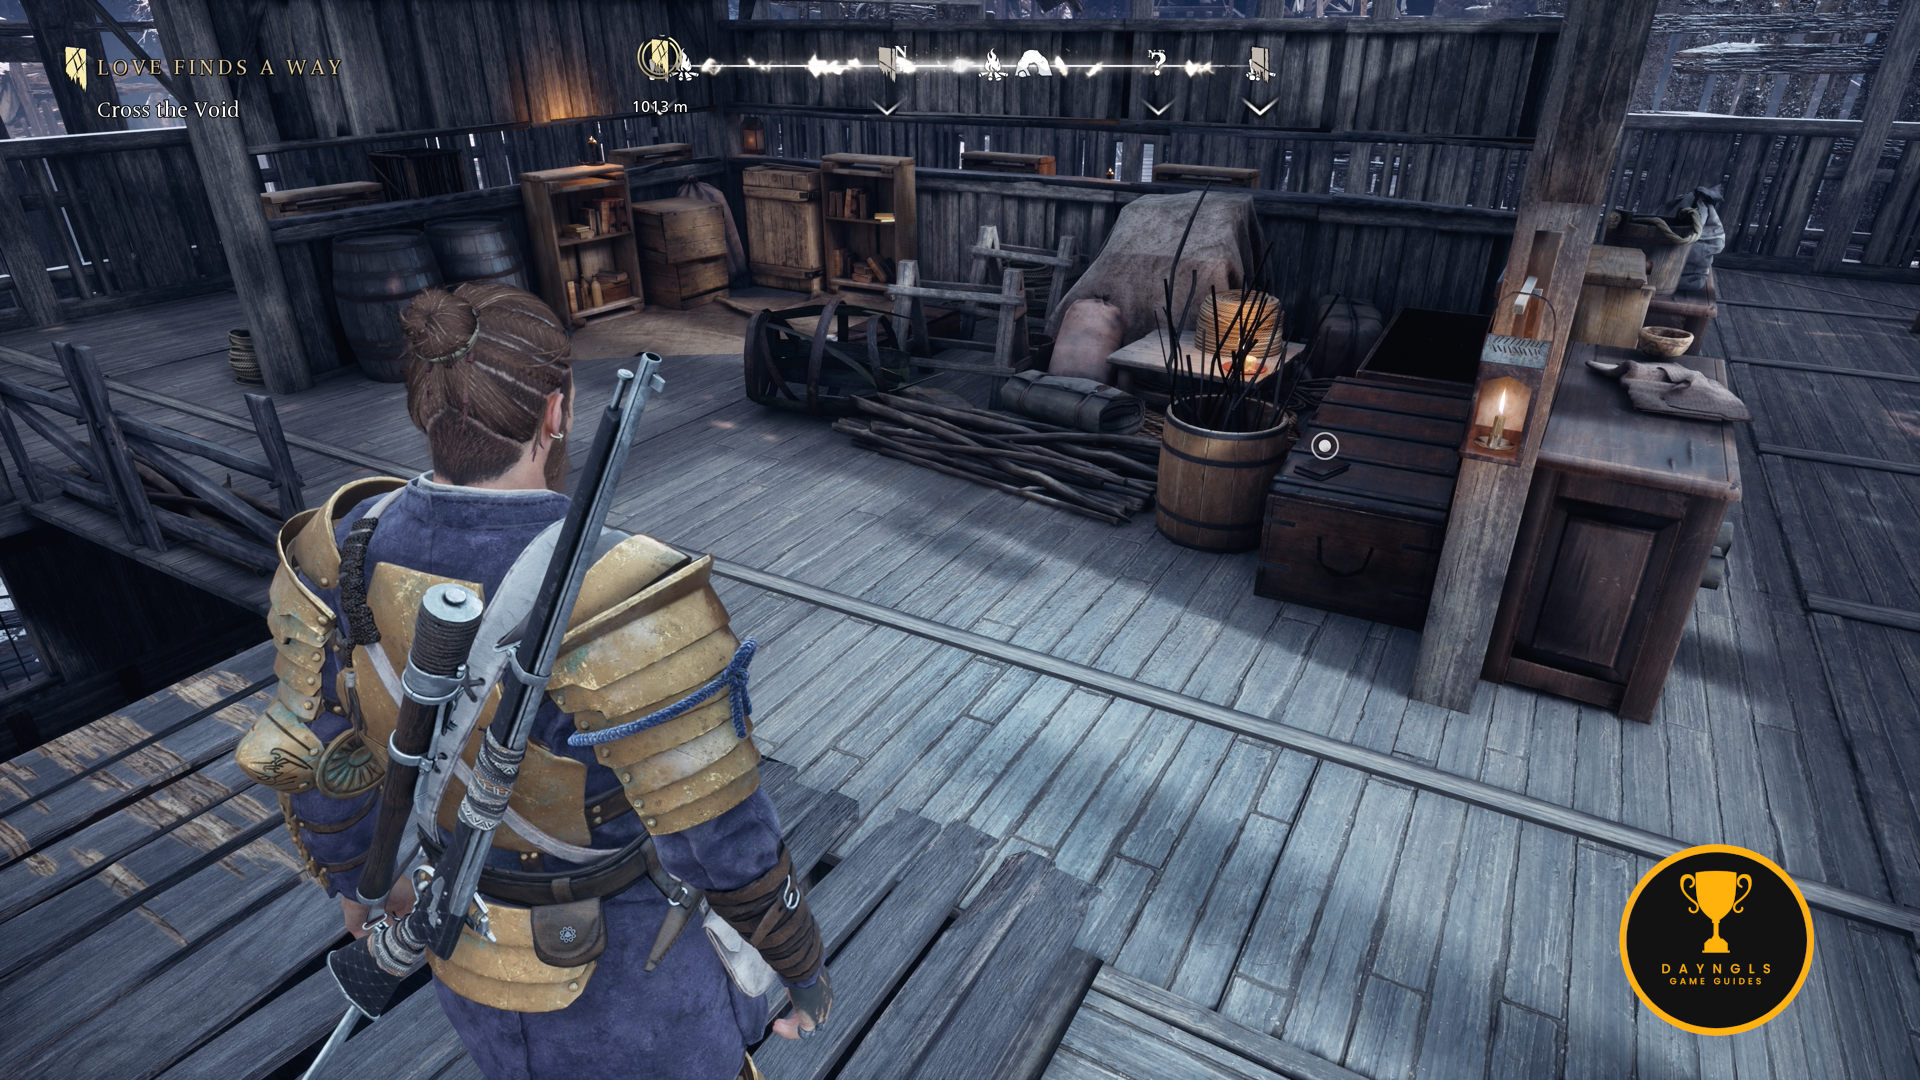
- Collectible – The Mystery About Old Moss-Head – This is found in the same house as the previous collectible.

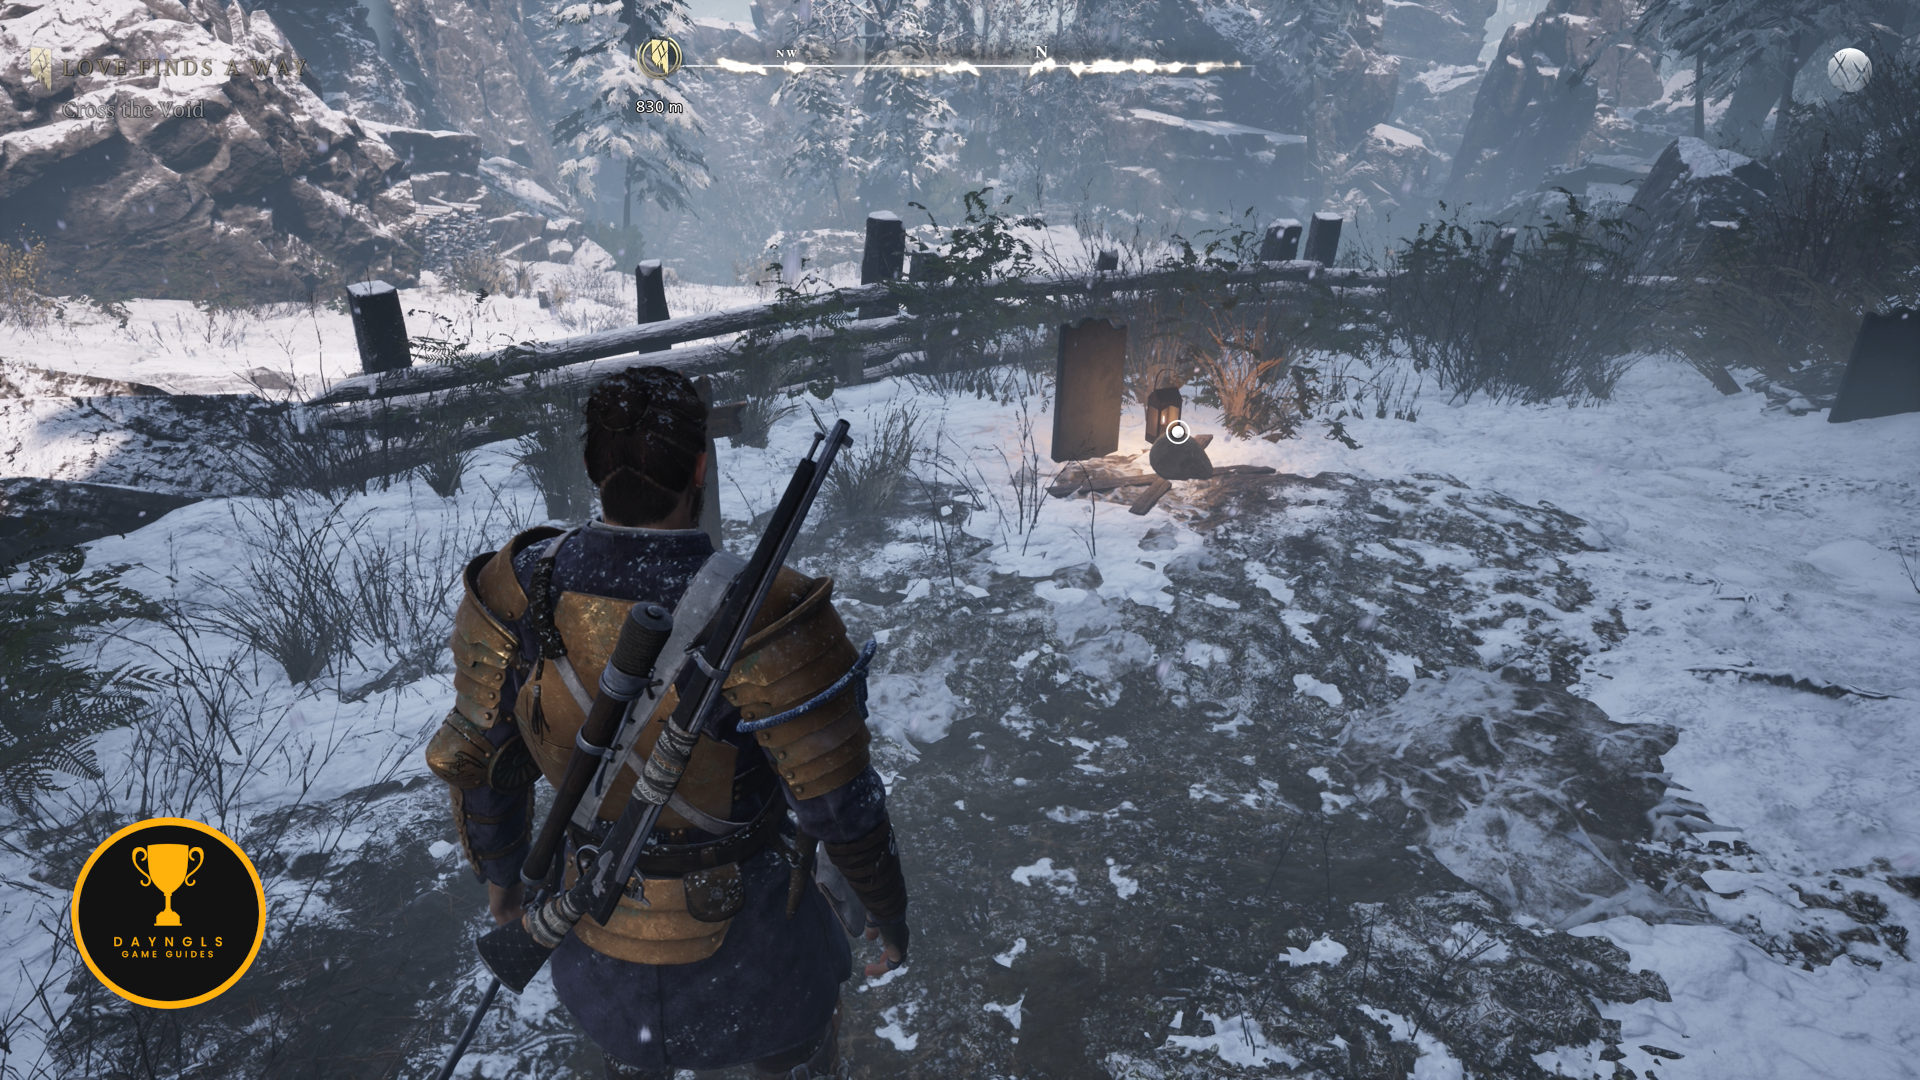
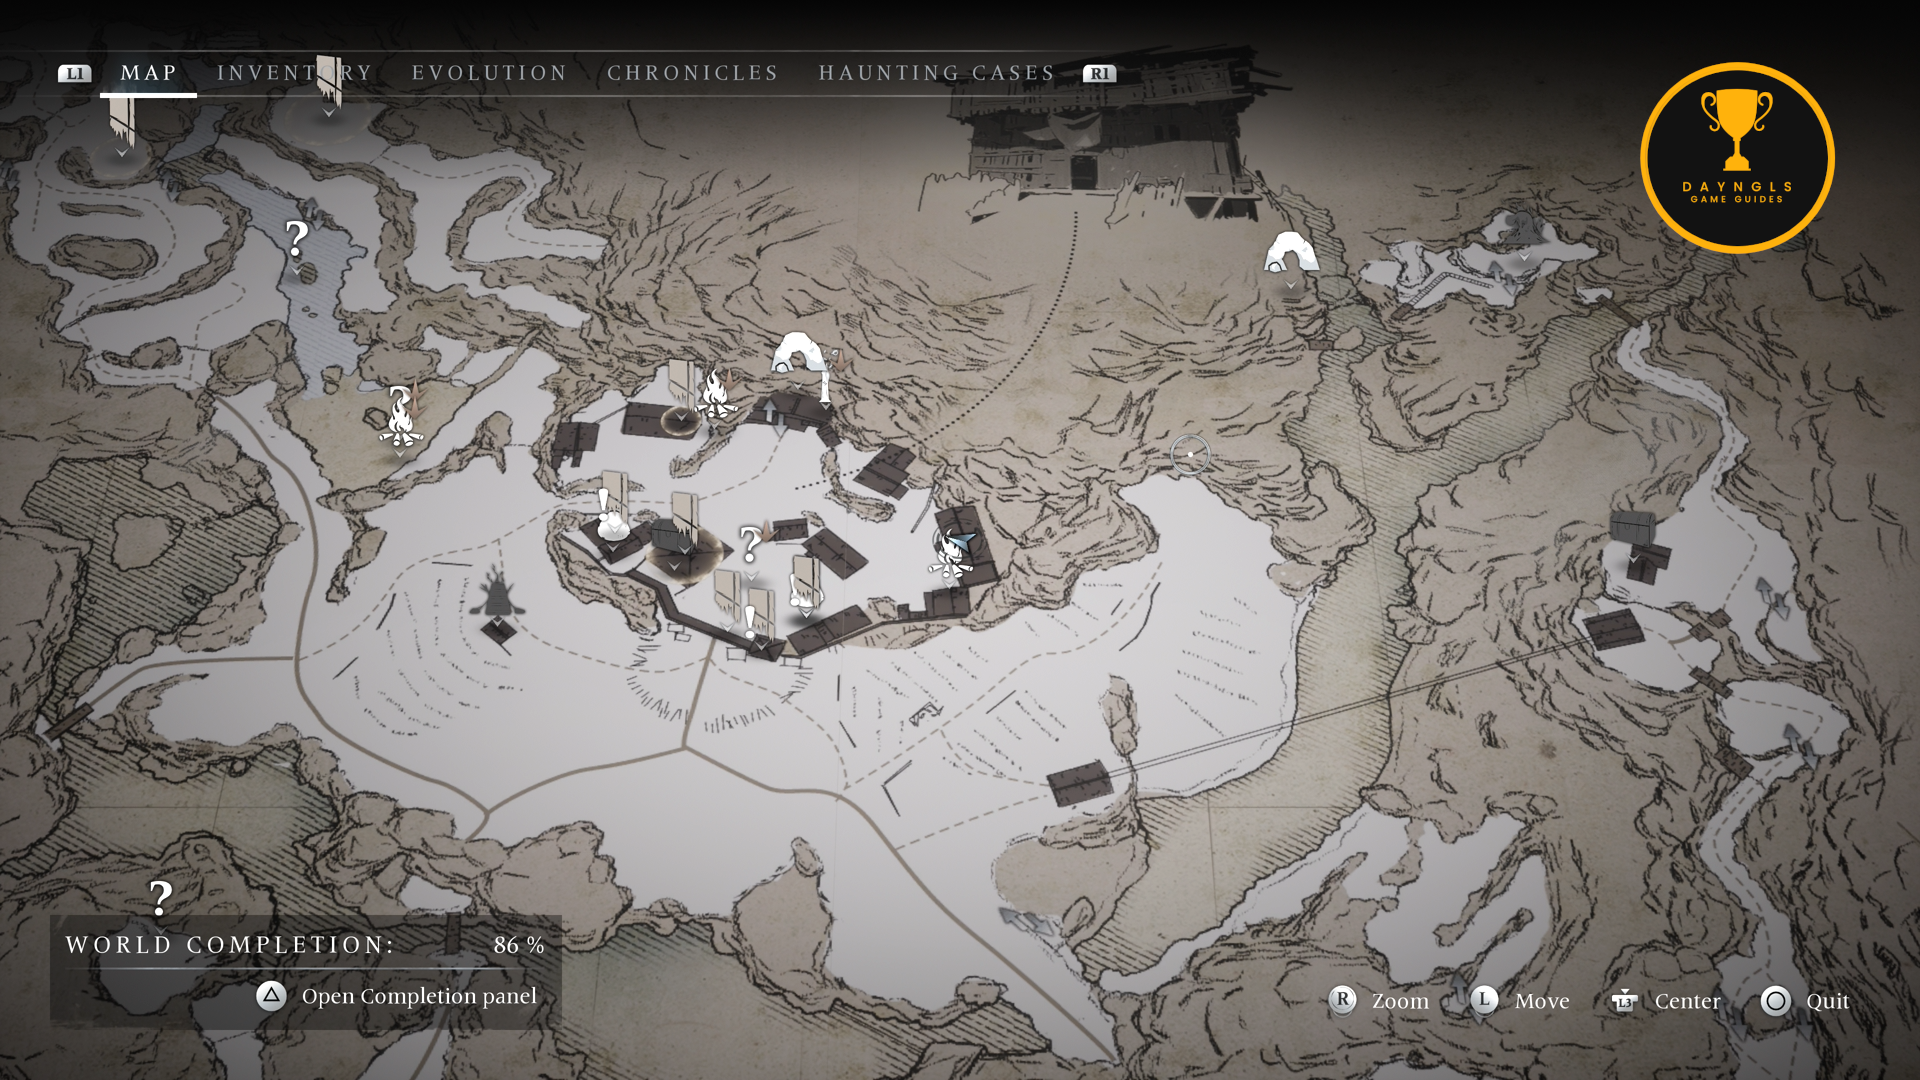
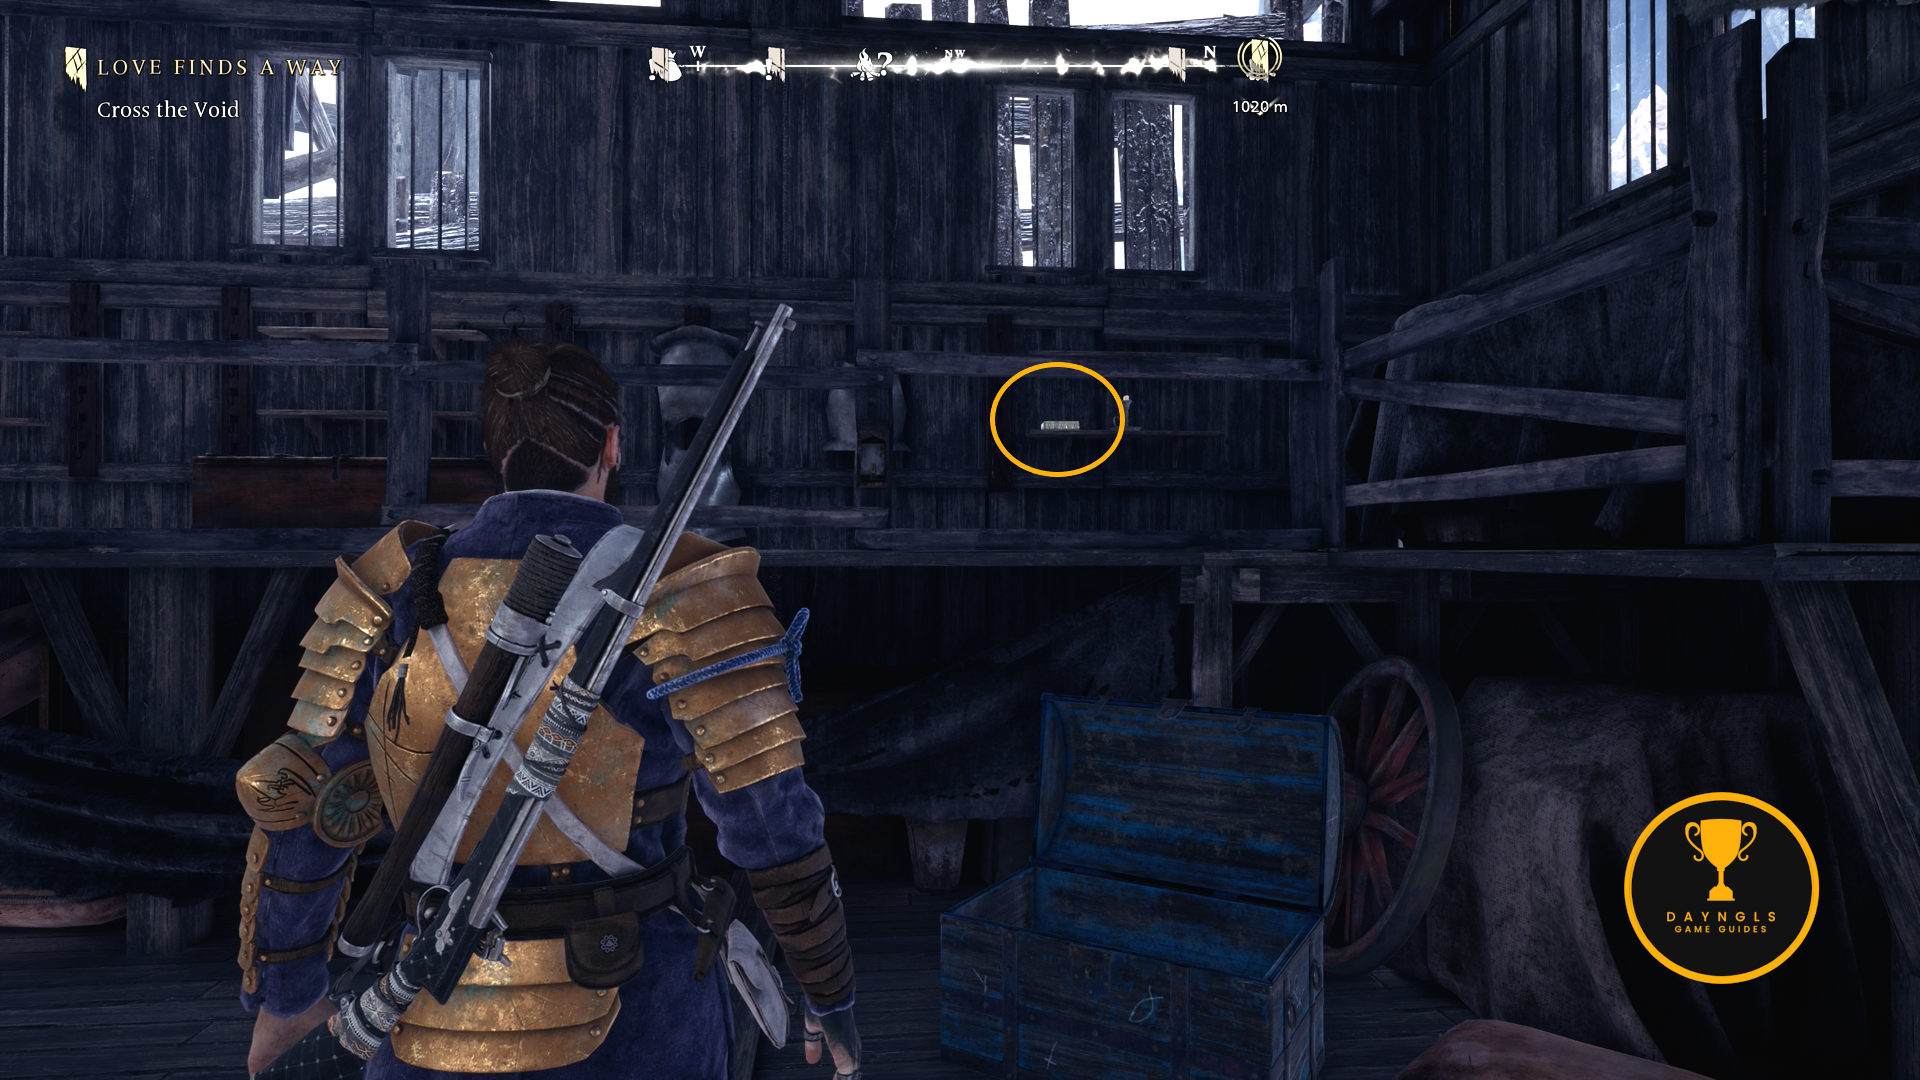
- Lost Chest – Ethereal Braid – This is found next to the house from the previous collectibles.


- Cursed Chest – The Climber – Retaliation Armor – Starting from the Frozen Vales shelter, climb up the nearby shortcut rope. Go north down the path and drop down a short ledge. After dropping down, go right until you drop down another ledge. After dropping from the second ledge, look to your left and switch to Antea. Use Outburst on the rocks and then go through where they were. Take a left and follow this to the end where the first key can be found on a body.

From the first key, turn around and head east. Squeeze through the wall at the end of the path. Follow the path out of the cave and go past the house on your left. The second key is on the left past the house.


From the second key, go north and drop down a ledge. As you land, look to your right to see some rocks that can be destroyed with Outburst. The third key is behind the rocks.


Backtrack to the cabin by the cave exit we passed earlier to find a wall that can be destroyed with Outburst. The wall is in-between the cabin and cave entrance. The chest is inside.


- Locked Chest – Traveler’s Strongbox – Balanced Veil – The key is found next to the Hunter’s Spot shelter.


Exit the cave and climb the watchtower outside. The chest is in side of the tower at the top.


- Elite Enemy – Cupid Gold Digger – Exit the watchtower and head back into the cave. Once inside head south and then crouch under the small opening in the wall. Squeeze through the gap in the next wall and then go right. Drop down from the ledge into the Elite area.


- Collectible – Witch Hunt – Clear the corrupted ivy from the cabin opposite of the one where the cursed chest was found. You will need acess to the rope shortcut nearby in order to reach one of the targets on the ivy. If you don’t have that, you can reach it by coming from the Hunter’s Spot shelter. Shoot the one in house, melee the one on the side of the house and then climb the rope and shoot the one close to the cave.
Once it is cleared, slide between the rock wall and house to get behind it. Enter through the door to find this on a table.


- Nest – Go back into the cave, squeeze through the wall, go left, climb the ledge, go northwest/north and you’ll come to the location.


- Lost Chest – Fervent Devotion – Exit the cave and head northwest until you come to a group of tents. This chest will be next to the tents.


- Treasure Map – Waterfall Cache – This is found on the top floor of the building with the lift on the east side of the region. Shoot the lock through the hole in the wall on the south side of the building to unlock the door. It is inside of a chest upstairs.


- Lost Chest – Ethereal Garb – This is found inside of the building next to north of the building with the lift on the east side of the region. You can use the lift to reach this area. It is in the bedroom.


- Collectible – The Invisible Enemy – This is found in the same room as the previous chest on a bookshelf.

- Elite Enemy – Starving Settler – Head north from the previous collectibles to reach this Elite.


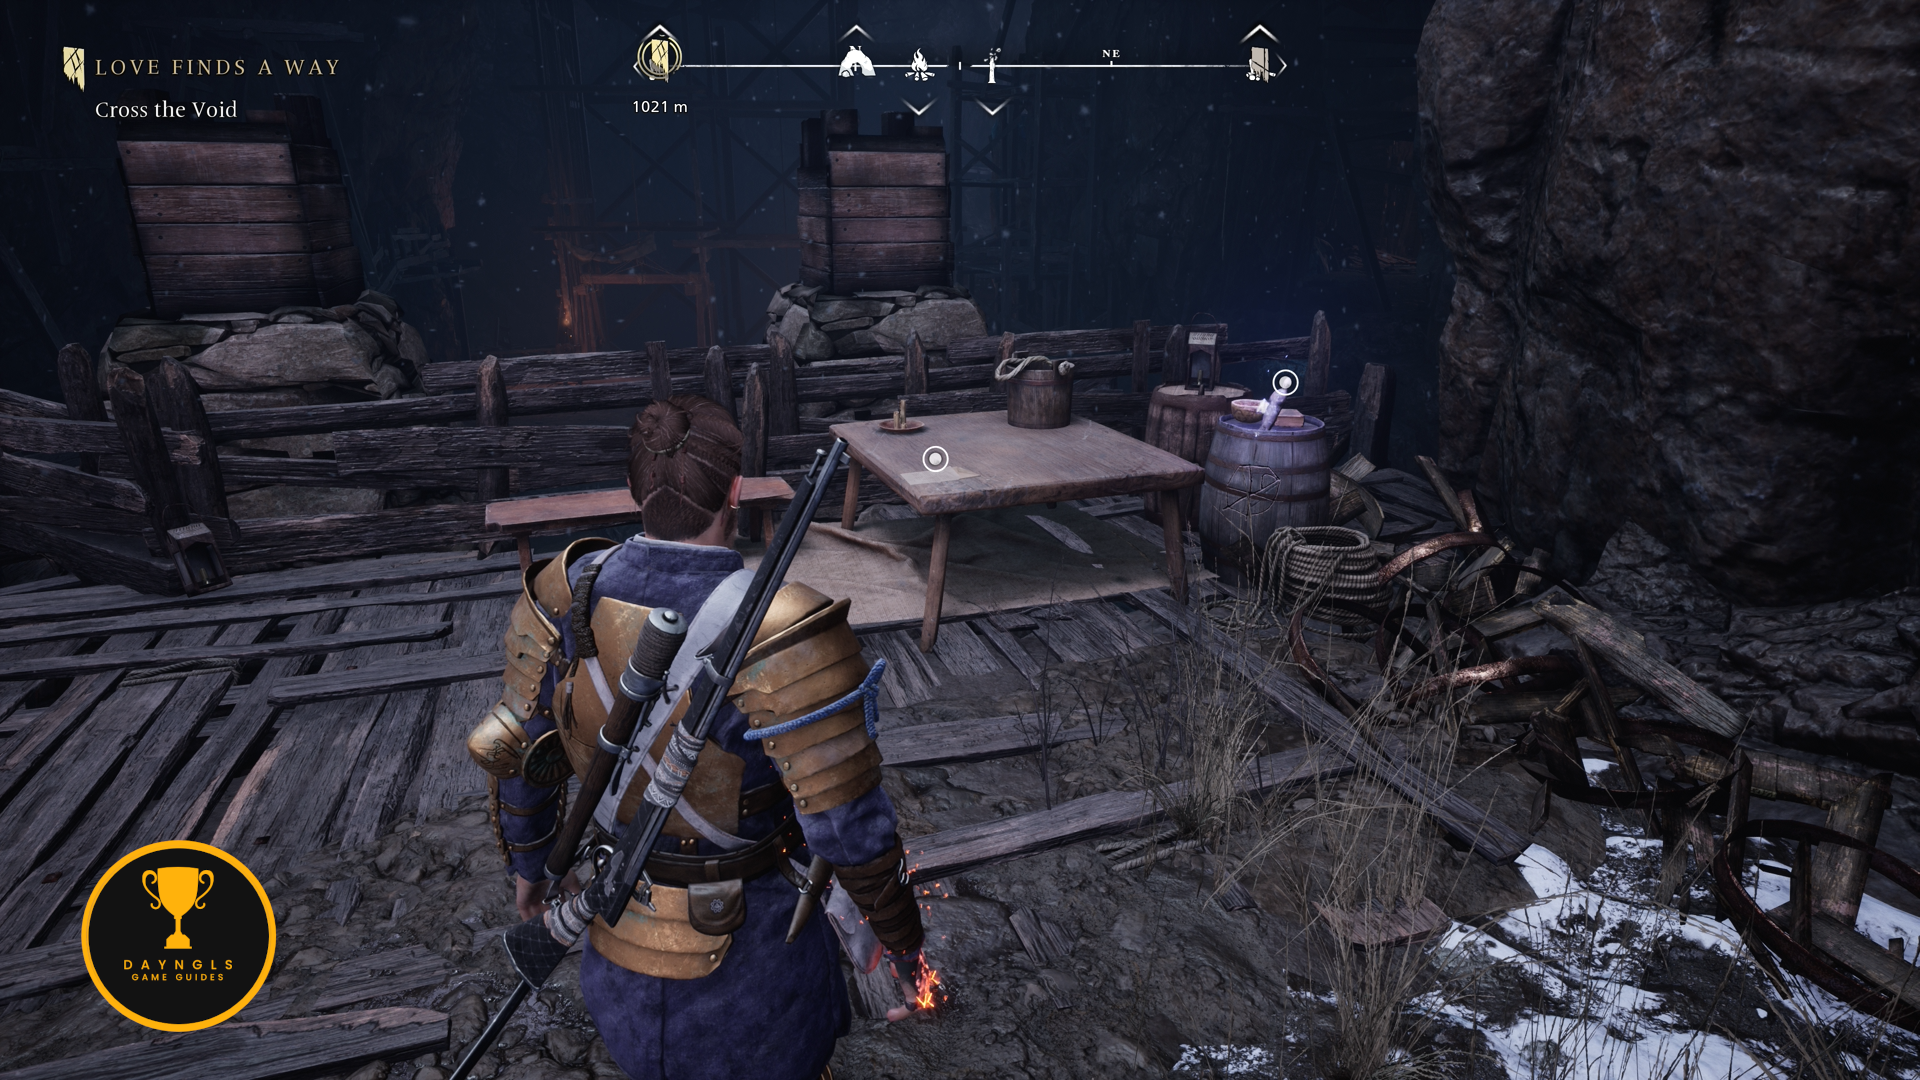
- Cursed Chest – The Navigator – Hawkeye – Head to the front of Fort Jericho to find the first key on a body.


Turn around from the first key and head northwest. The second key will be up ahead on a well.


From the well, continue going northwest/north to find this on the ground near water.


From the previous key, head back to where key #2 was. Destroy the debris on the small building next to the well and go inside to find the chest.


- Elite Enemy – Hanged Grave Robber – This is found south of Fort Jericho.


- Nest – Follow the path west from the previous elite to find this nest.


- Locked Chest – Bligh Manor Stolen Effects – Earthbound – From the previous nest, head north. Climb up the ledge and then crouch under a rock. The key will be found on a body after crouching through the rock.


Backtrack to the ledge you just climbed up and drop down. Climb up the climbable wall next to the nest. At the top, follow the path north/northwest to chest.


- Scourge – Eye-Gouging Harvester – From the previous nest, follow the path southwest.


- Nest – From the previous collectible, follow the path south and then east as it winds around. Ride the elevator down to reach the nest.

- Locked Chest – Hunter’s Storage Box – Trapper Garb – Use the elevator from the previous nest to get back to the mountain we just came from. This time, make your way up to the top of the mountain in the southeastern corner of the region. Before climbing up the climbable wall, head up the path to the dead end. Shoot the body hanging from above to get the key.


With that, get to the watchtower and destroy the corrupted ivy by melee attacking the weakpoints up the stairs. Enter the bottom door to find this chest.


- Void Breach – Careful Provision – Backtrack to the second nest from earlier. From that nest, head north into a cave where this breach can be found. The chest will be in front of you after completing and exiting the breach.


- Elite Enemy – Corrupt Accountant – From where the void breach takes you, drop down and follow the path up and around the Bligh Manor and you’ll come to the site of the Elite.


- Bible #11 – This is found inside of the Bligh Domain shelter on a table.


- Collectible – The New Eden Curse – The Evil Dreams – This is found just to the right of the Bligh Manor gates.

- Treasure Map – Manor Cache – Enter the manor and go up the stairs. Go into the doorway with no door at the top of the stairs and then turn right. Enter the room to find this map in a chest.
- Locked Chest – Ethel Bligh’s Personal Belongings – Wind Rose
First, you will need to interact with the note upstairs in a back hallway on a crate.
Upstairs Bedroom
Upstairs Office
Upstairs Guest Room

Downstairs Ballroom

Downstairs Dining Room

Head back upstairs to the first bedroom in these steps. The key is found on the nightstand and the chest will be in the newly open door in the same room.
- Treasure Map – Manor Cache – Solution – Fast travel to the Old Trading Route shelter. From there, ride the elevator down toward the third nest we did earlier. This is found behind a tree next to the incomplete frame of a building.
- Bible #12 – This is found in the Fort Jericho shelter on a box.
- Locked Chest – Military Arsenal – Spiritual Ward – The key for this chest is found on the bottom floor of the Fort Jericho shelter.
From the key, head west across the fort and then climb up onto the top floor of the watchtower to find this chest.


- Collectible – War Never Changes – This is found right next to the previous chest.
- Treasure Map – Legacy Cache – This is found in the same watchtower as the previous two collectibles.

From there, head straight south from Fort Jericho. This is found on a grave across from the nearby Elite Enemy.
- Bible #13 – Return to Fort Jericho and enter the building next to the Fort Jericho shelter to find this on a table by the door.
- Bible #14 – Bottom floor of the watchtower on a shelf to your right when you enter.

- Bible #15 – This is found in the basement of the same watchtower as the previous bible in a jail cell.
- Collectible – The New Eden Curse – The Loss of the Sense of Time – Enter the cave in the back of Fort Jericho and take the left elevator down. Get off and climb up the ledge on the left. Follow the path north/northwest and then crouch into the opening on the right. Follow the path to a wall gap you can squeeze through. Squeeze through and then hop over the barrier straight ahead. As soon as you hop over, go right and destroy the debris wall. Go in and switch to Antea to find this collectible.

- Cursed Chest – The Miner – Hear of Courage – Starting from the room where we got off of the elevator in the Fort Jericho cave, look to the left of the elevator we rode to find the first key.
Hop back over and crouch into the opening on the right side of the elevator room. At fork, go left. Destroy the barrels ahead, enter the room by crouching and then use Outburst to destroy rocks to reveal a hidden room where the second key is being held.
Backtrack to the elevator room. Go to the right corner of the room and destroy the breakable wall to reveal a miner cart. Pull it down so that you can use it to climb up onto the walkway on the right side of the room. Climb up and follow the path to the end where the third key is found.
Turn around from the third key and use Outburst to destroy the breakable wall to reveal the chest.
- Lost Chest – Black Belly – This is found in the Dormitory shelter. This shelter is accessed through the cave at Fort Jericho if you haven’t already been there. You can reach it by going right at the fork where we went left earlier looking for key 2 for the cursed chest.
- Spirit Rack – Purchased from Bathsheba/Helen/Pennington in Fort Jericho.
- Zen Mind – Purchased from Bathsheba/Helen/Pennington in Fort Jericho.
- Red Goddess – Purchased from Bathsheba/Helen/Pennington in Fort Jericho.

- Scourge – Cold Rage – This is found to the northwest of Fort Jericho.
- Treasure Map – Waterfall Cache Solution

- Treasure Map – Mysterious Cache Step 4
- Treasure Map – Mysterious Cache Step 5 – Return to Mire Marshes
If you missed any collectibles at the beginning of the game, you can get them when you return to New Eden at the end.
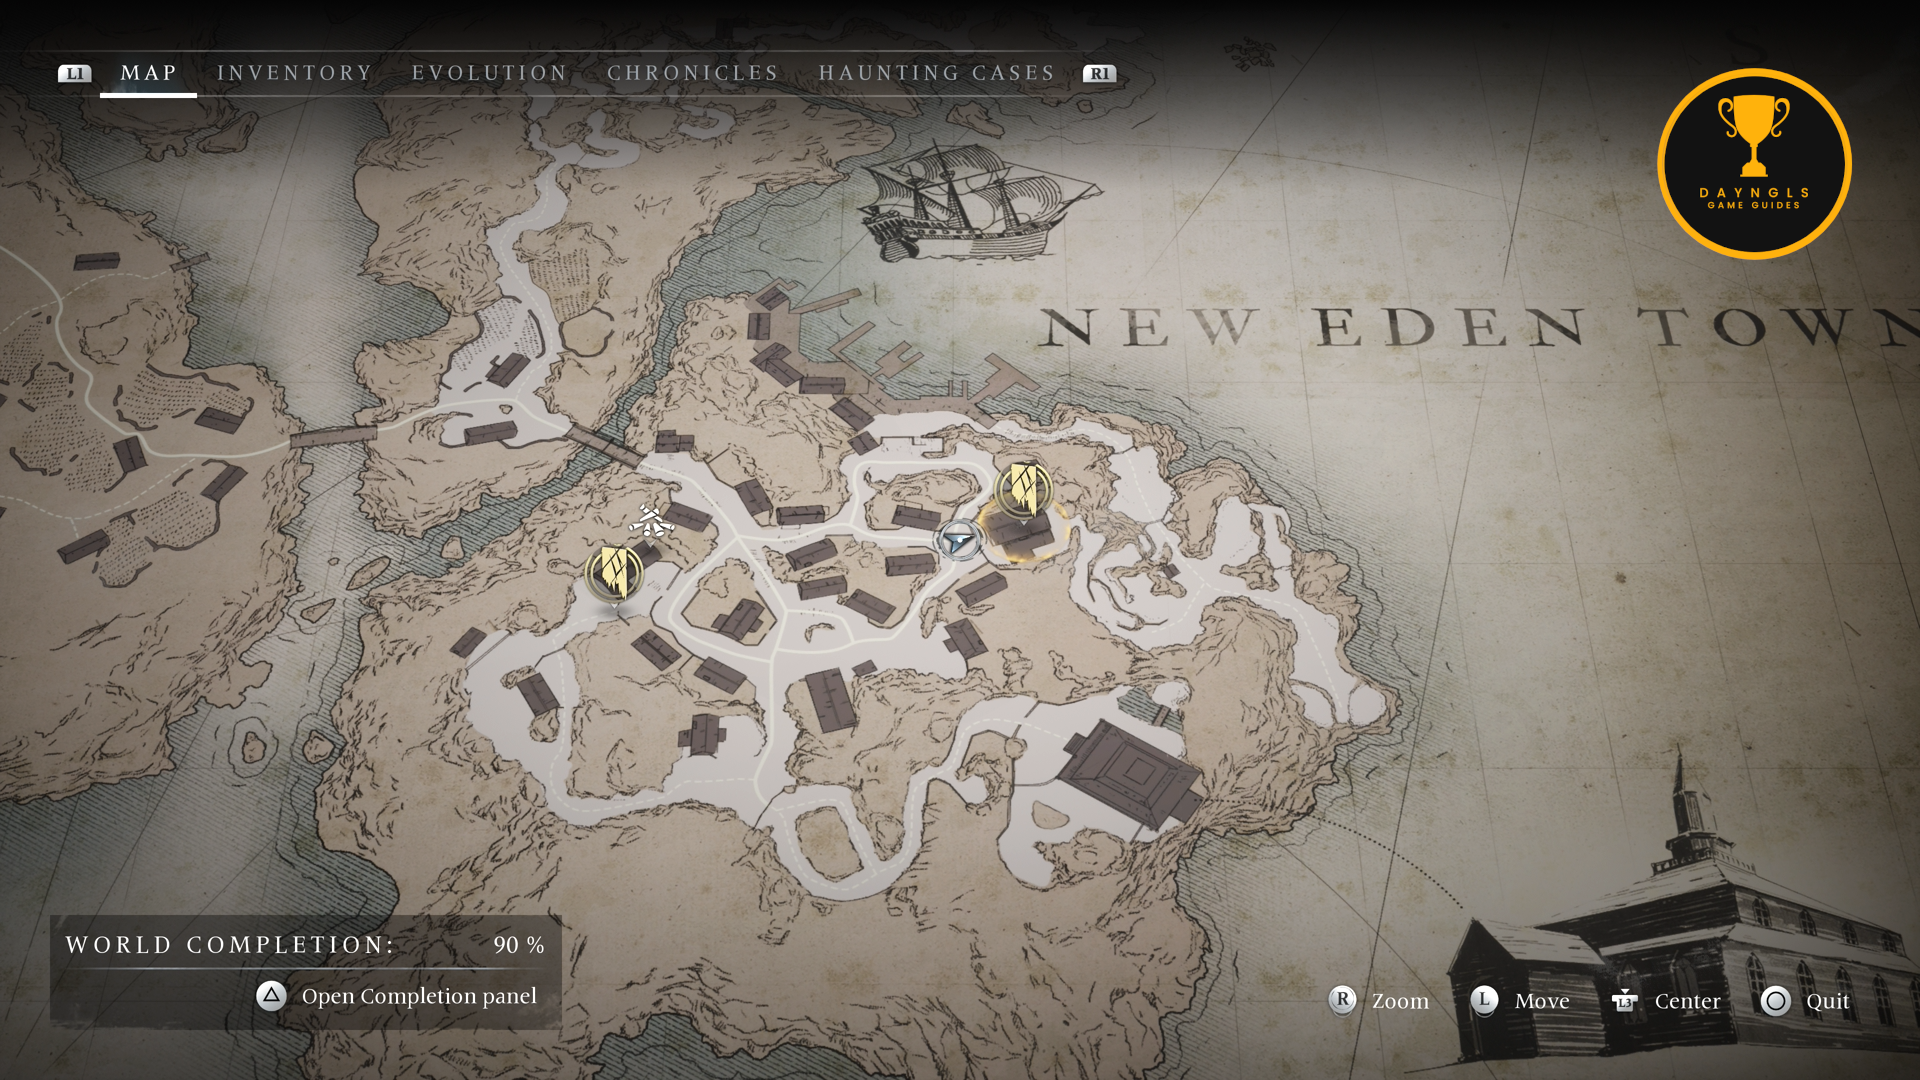
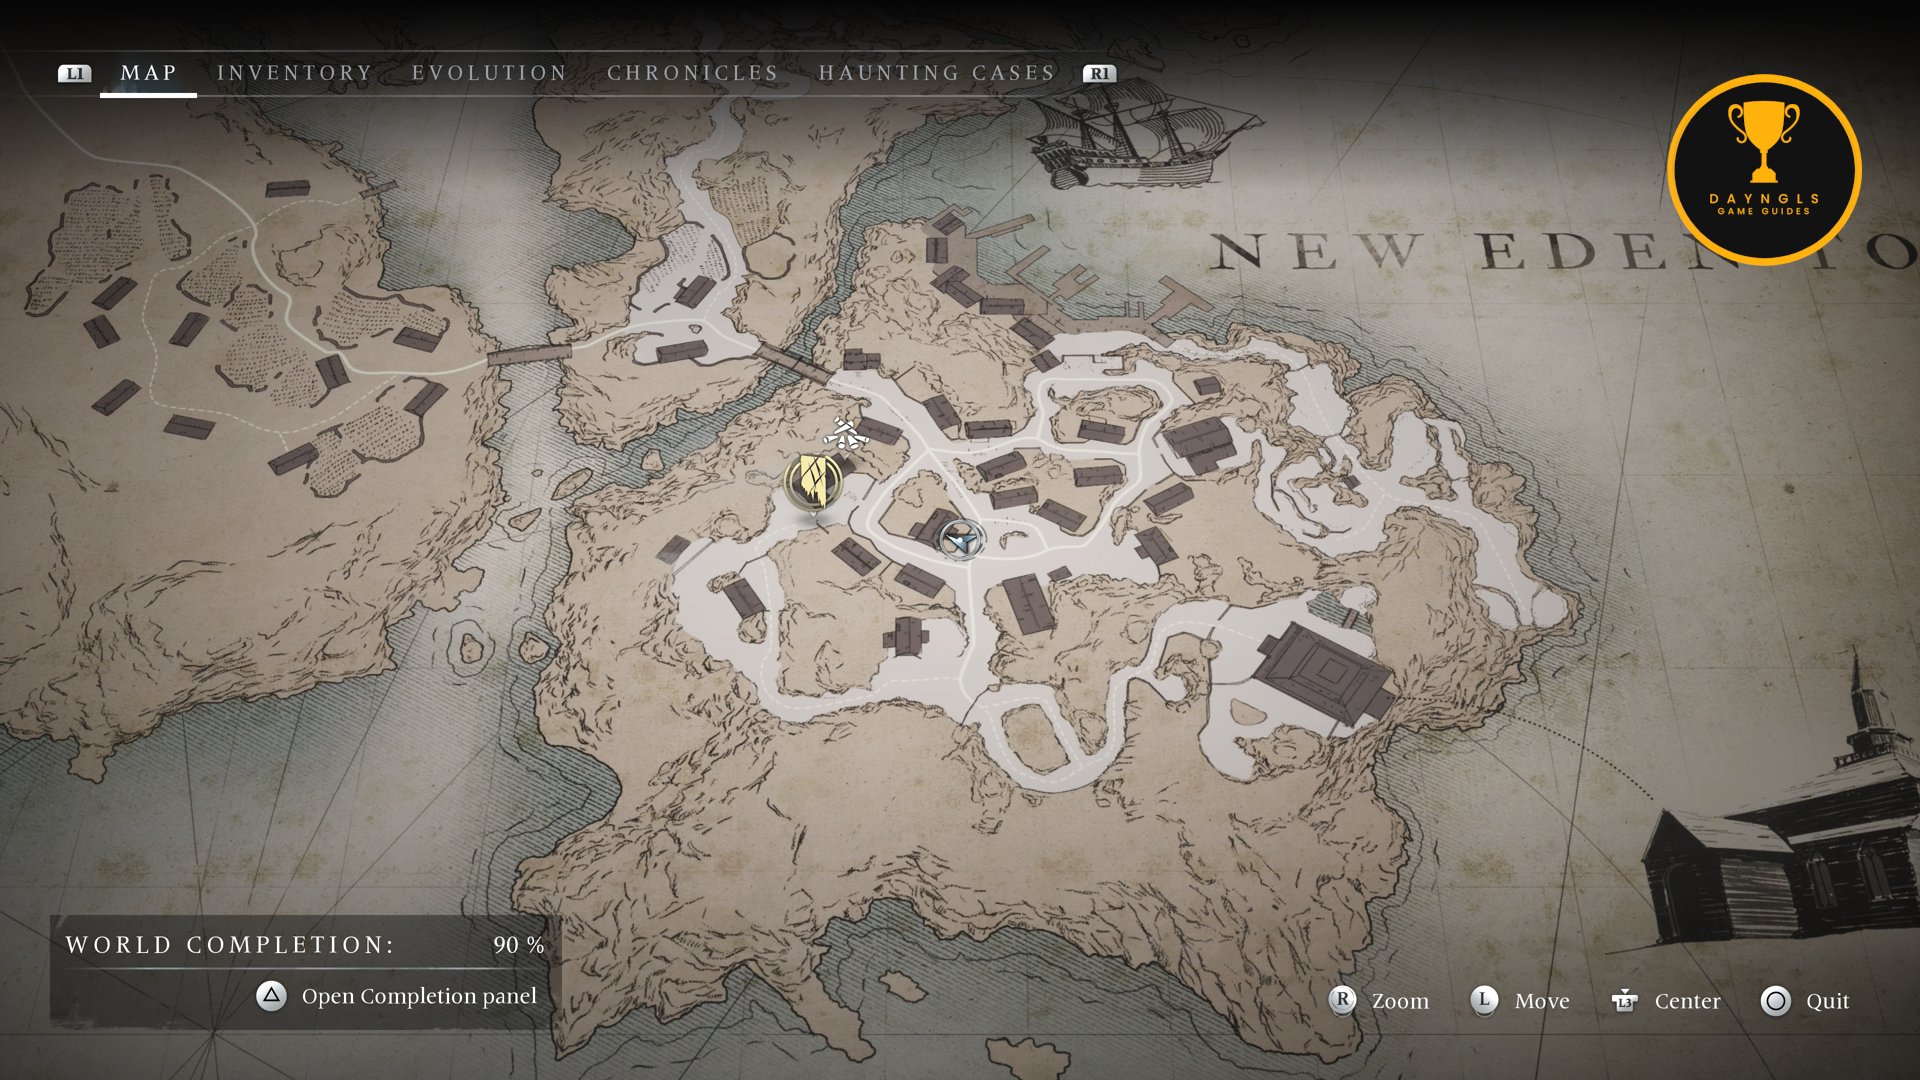
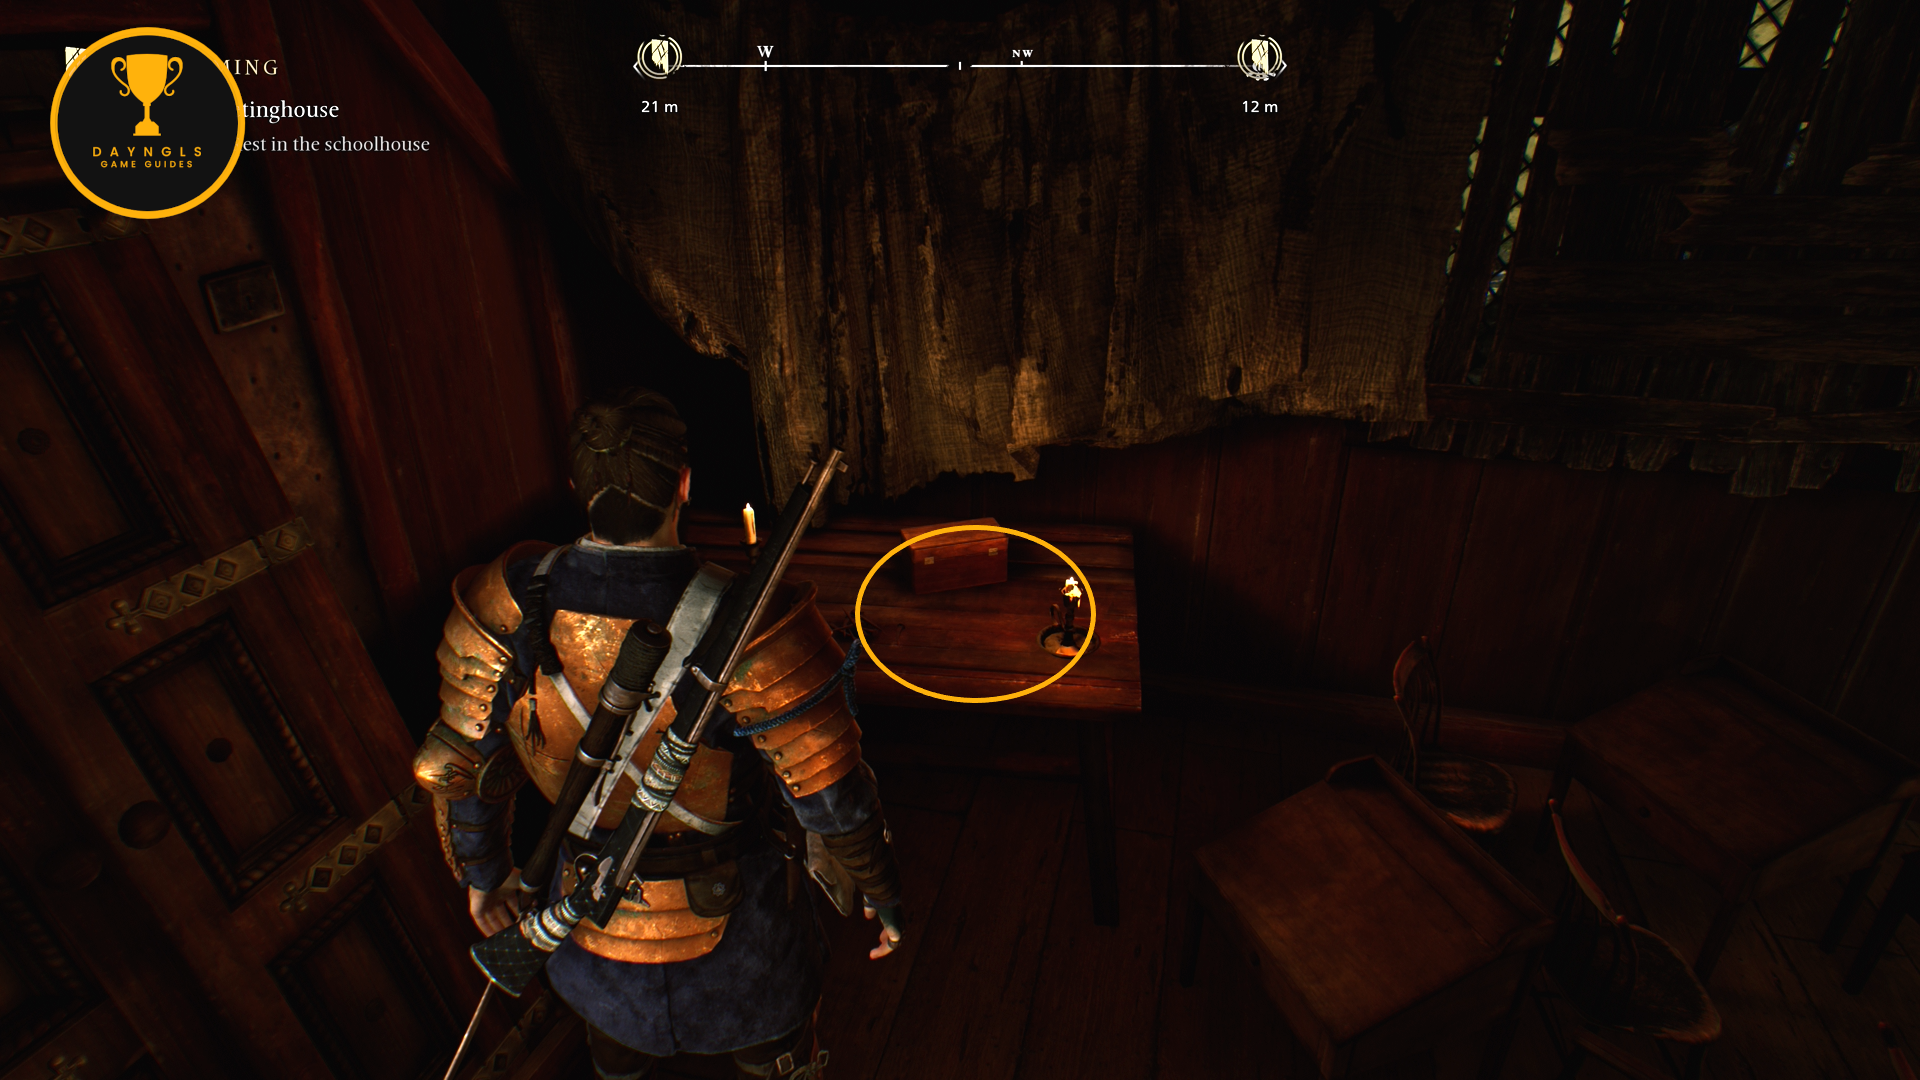
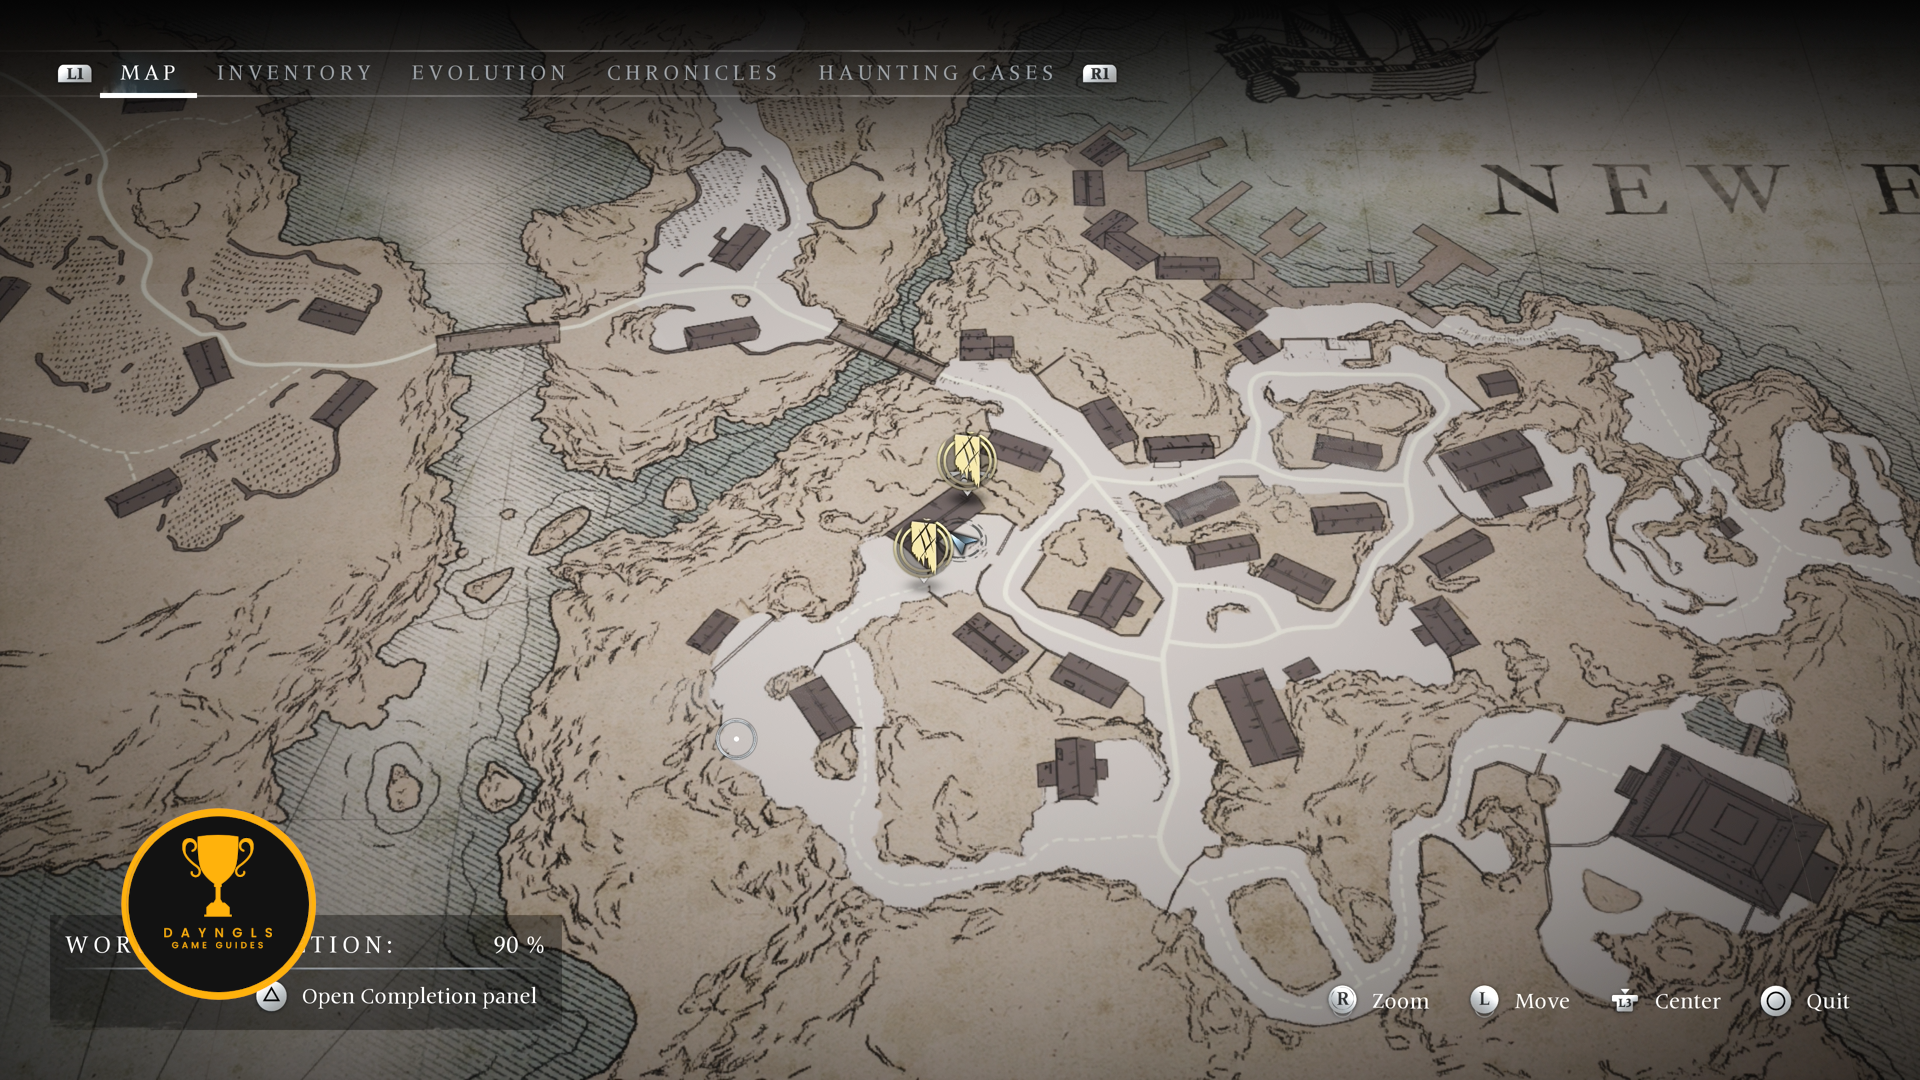
New Eden Town
- Collectible – Where Do Nightmares Come From? – Upstairs on a barrel.
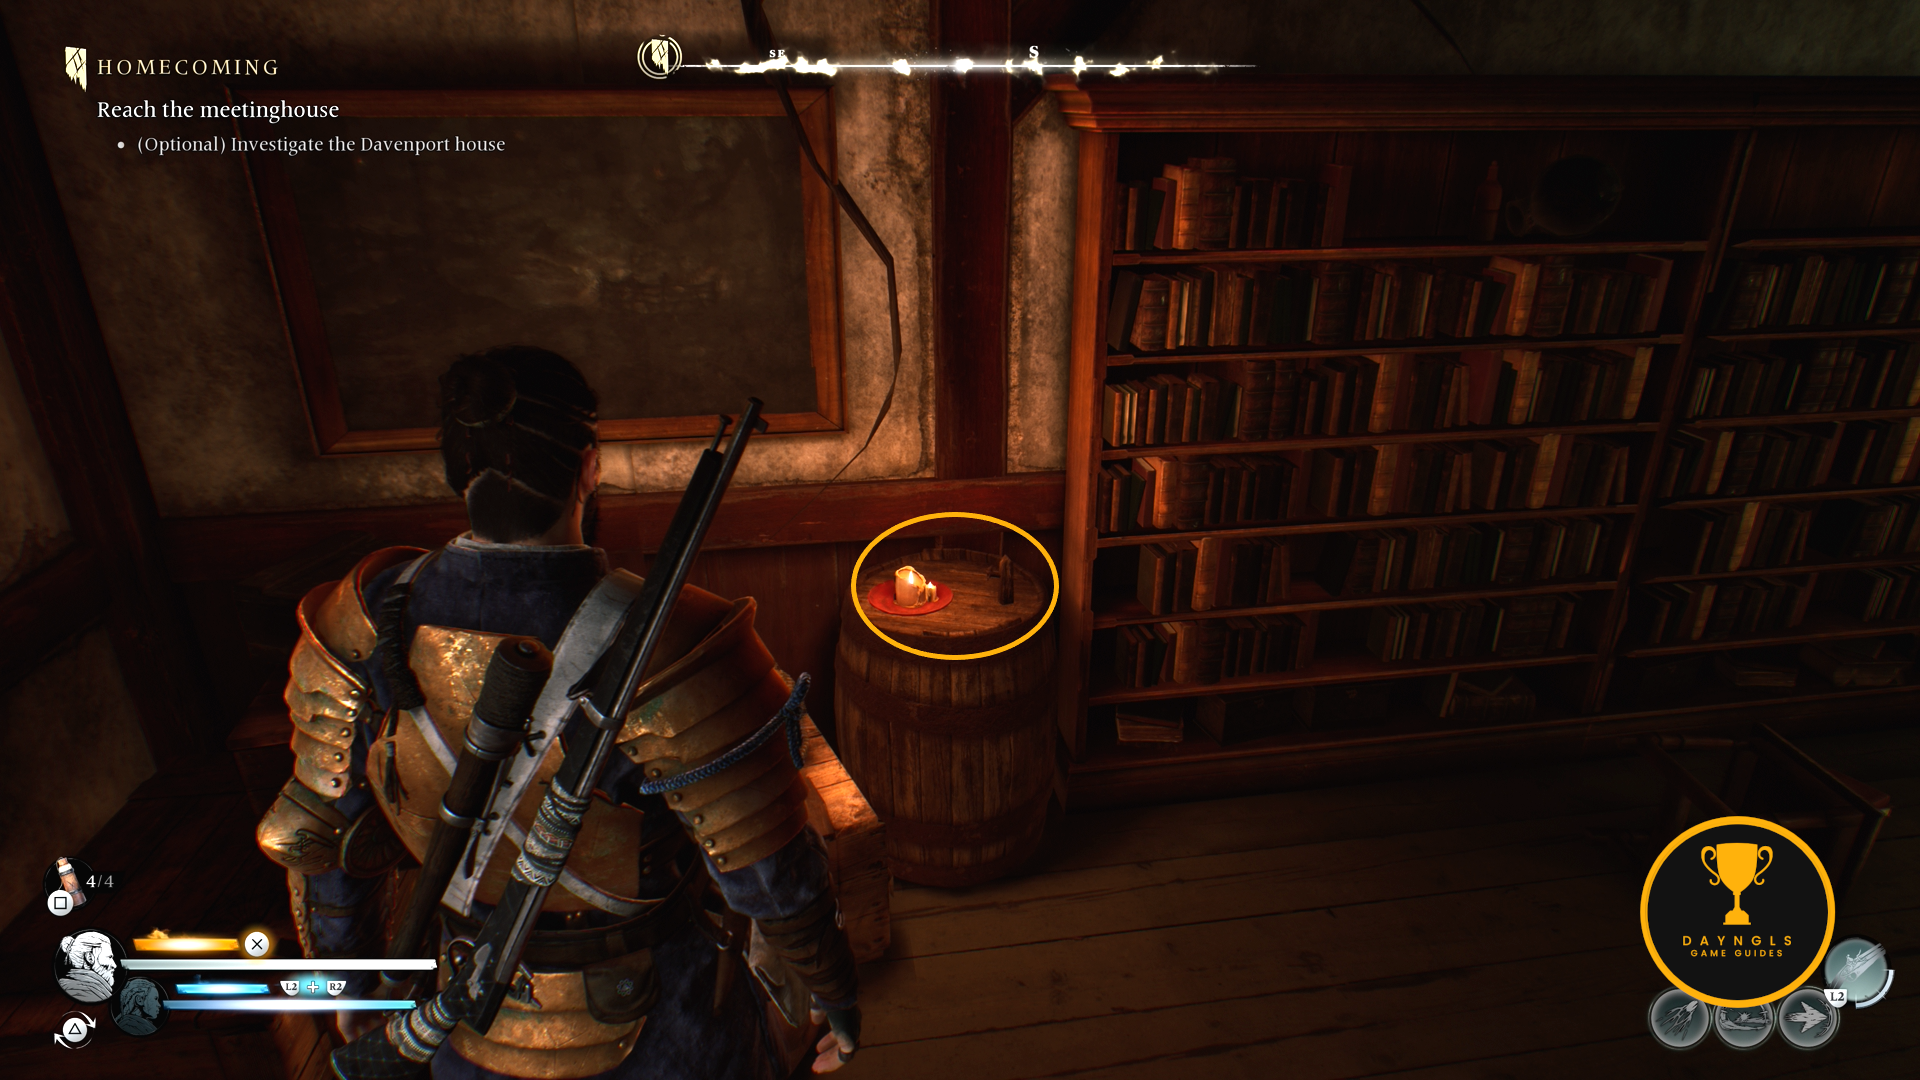
- Collectible – Ghost of War – This is found in the room to the left as soon as you walk in.
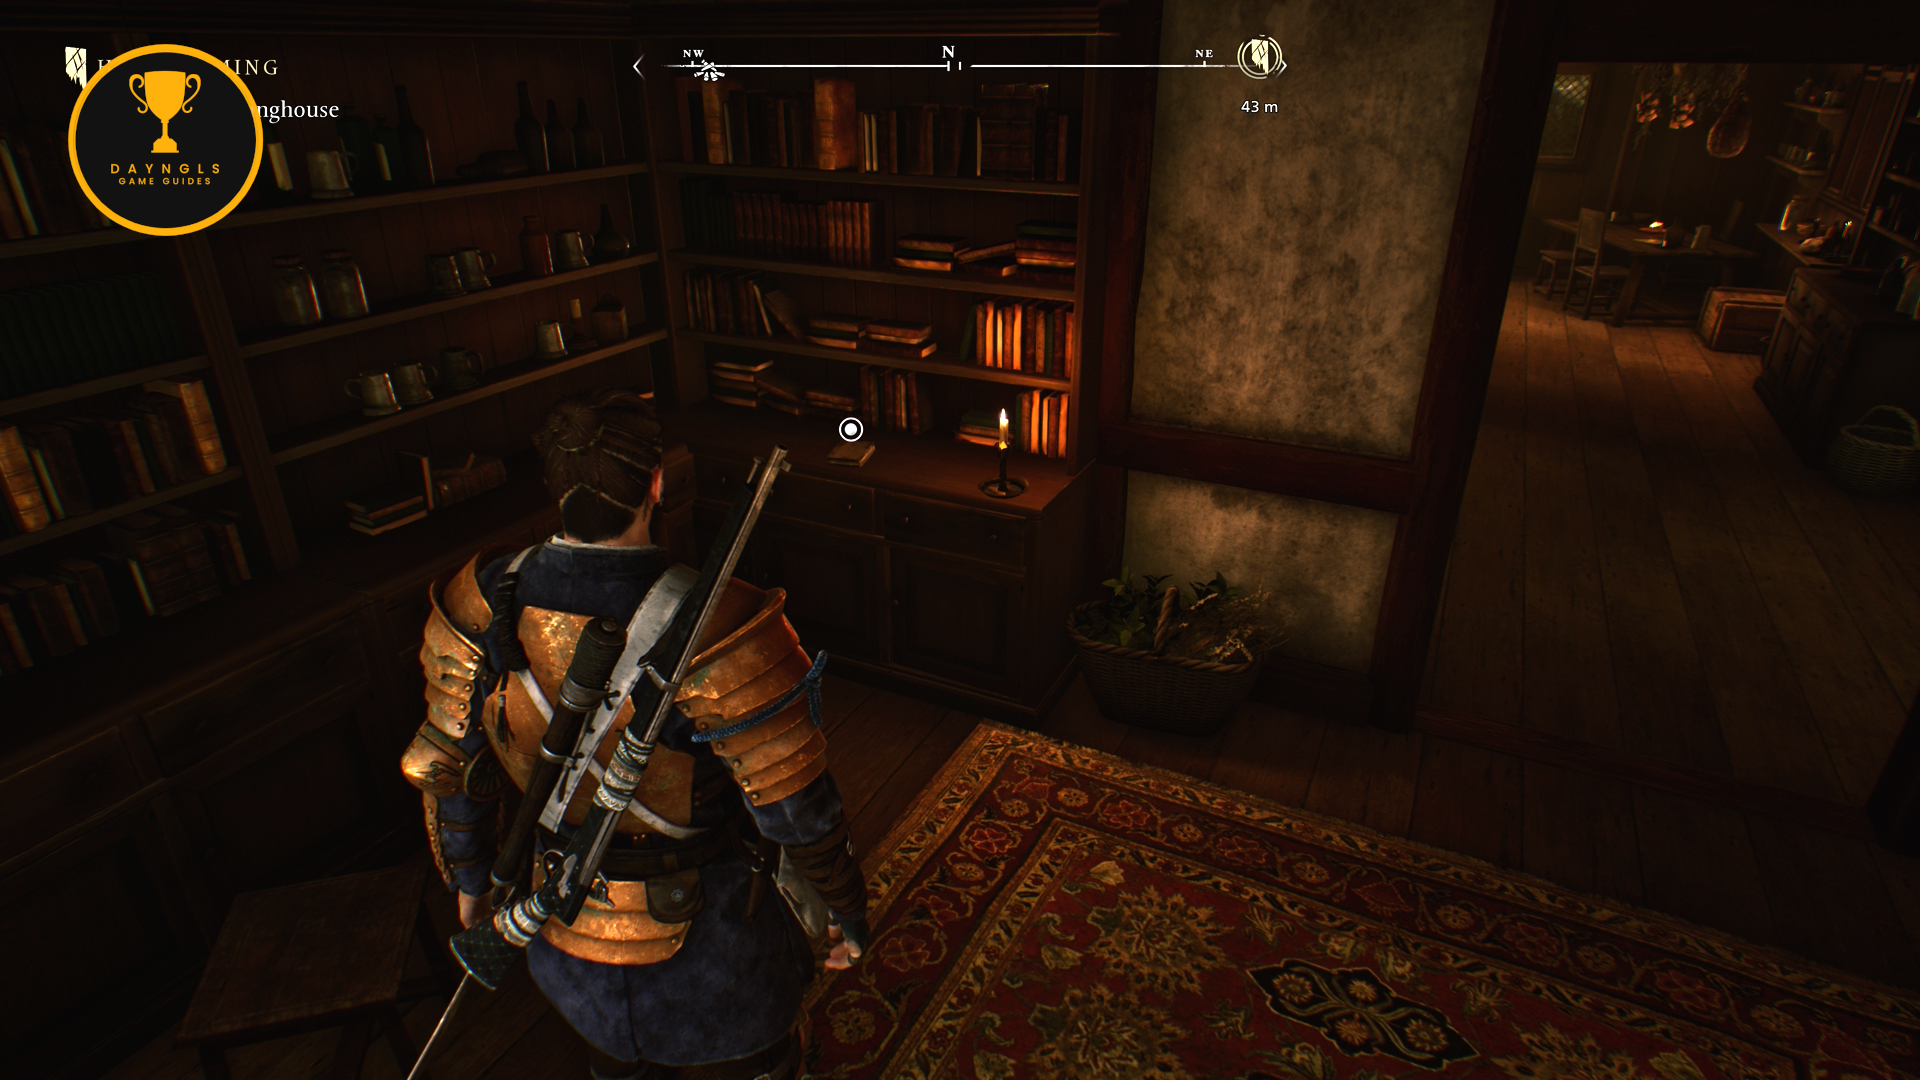
- Collectible – Banishers Techniques – This is on the desk in the back left corner of the house.
- Collectible – The Last Settlement of New Eden – Upstairs in a bedroom on a dresser.