
Welcome to the Trophy & Achievement guide for The Ascent! This is an overall easy list to knock out, as everything can be completed in one playthrough. There are fortunately no missables
You’re going to want to play through the story before doing the side missions. Most of them are locked behind inaccessible areas and high enemy levels. Areas won’t become unlocked until you visit them via the story first. So, you don’t really have much of a choice but to save the side missions for late in the game or even after completing the story.
Some of the miscellaneous Trophies/Achievements will require late game progress as well, so a majority of this list won’t be completed until later in the story.
There are two co op Trophies/Achievements here, but they can be completed either online or in couch co op with a second controller.
 Full Platinum
Earn all the other Trophies in ‘The Ascent’ to unlock Platinum, including Online Trophies

 We’re Just Getting Started
First enemy killed
Kill an enemy. That’s it. You probably aren’t even reading this.
 Suicidal
You died more than 100 times
Just like the first Trophy/Achievement, there’s nothing else to say other than die a lot. If you get through the game and still don’t have this, you’re gonna have to let enemies kill you.
 Do Over
Proficiencies were reset once
This is best earned early in the game before you have used a lot of skill points. The more skill points you’ve used, the more expensive this will be.
Go to a grafter (DNA strand icon) and choose “Go in for surgery” > Reset Skills.

 Fair Trade
You sold something!
All you have to do for this is go to any shop in the game and sell any item. It doesn’t have to be anything specific or done at any specific shop.
 Sashimi
You were killed by a katana
For this, you need to be killed by an enemy wielding a katana.
This can be earned while playing the third main story mission called “Trading_Places” during the objective “Kill Onyx Void Operative.” There will be several enemies using katanas during this fight. Just stand there and let them kill you. If you’re having trouble getting killed by gun fire, go behind cover and crouch down. The gunfire will miss you and the katana wielding enemies will run up on you.
 Helping Hand
Revived a DBNO friend
This is the first of two co-op specific Trophies/Achievements. This one can be done online or couch co op. All you have to do is revive your co op partner when they go down.
This is easily earned in couch co op with a second controller. Let the other player go down and then revive them.
 What Just Happened
Completed Arcology Blues
This is an unmissable story related Trophy/Achievement.
 Party Crashed
Completed Mutual Dependencies
This is an unmissable story related Trophy/Achievement.
 A New Friend
Completed Trading Places
This is an unmissable story related Trophy/Achievement.
 Power Hungry
Completed Empowerment
This is an unmissable story related Trophy/Achievement.
 Data Digging
Completed Data Miner
This is an unmissable story related Trophy/Achievement.
 Mnemonic Hunt
Completed Foreign Code
This is an unmissable story related Trophy/Achievement.
 Everyone’s A Smuggler
Completed Trace Protocol
This is an unmissable story related Trophy/Achievement.
 Magenta Power
Completed Syntax Error
This is an unmissable story related Trophy/Achievement.
 Nothing Personal
Completed Recompile
This is an unmissable story related Trophy/Achievement.
 Severed Board
Completed Board Meeting
This is an unmissable story related Trophy/Achievement.
 Protocol 61A
Completed Project MenShen#1
This is an unmissable story related Trophy/Achievement.
 Something Out There
Completed Project MenShen#2
This is an unmissable story related Trophy/Achievement.
 Win
Win
Completed all Main Missions
This is an unmissable story related Trophy/Achievement.
 Next Level AI
Upgraded your IMP
This is an unmissable story related Trophy/Achievement.
 Appreciation
Kira praised you
This is an unmissable story related Trophy/Achievement.
 Drop Your Weapon!
You made an enemy drop an exploding grenade
While in combat, enemies will throw grenades at you. When they do, you’ll see a red explosion radius from the incoming grenade. This radius will actually show up before the enemy has thrown the grenade. So, if you see that radius on an enemy, that means they are about to throw a grenade at you. When you see that, quickly shoot that enemy and they will drop the grenade.
This is something that you will likely unlock by naturally playing. There are a lot of enemies to fight and they will throw grenades often.
 Added Extras
You equipped two augmentations and a module
Augmentations are active abilities that you can equip to your character. They are used by pressing LB and RB when in combat. Augmentations can be found as loot while playing or purchased from grafters.
Modules are passive abilities that you can equip to your character. Just like Augmentations, Modules can be found as loot or purchased from grafters.
There are 4 slots for these, 2 Augment slots and 2 Module slots. For the Achievement, only 3 are needed to be equipped, 2 Augments and 1 Module. They can be equipped by pressing the View button and then tabbing over with  /
/  to “Augmentations.”
 Fullchrome
You equipped augmentations giving you the fullchrome appearance
In order to get this, you will need to have an Attribute at level 20 and have the “Biometric Timestamp” Augment equipped.
 Self Improvement
Allocated 3 Skill points
This can be earned as soon as you reach level 2. When you gain a level, you will be given 3 skill points. All you have to do is spend those 3 skill points on any attributes you want.
 Teamwork
You started your first co-op session
This can be earned immediately. From the main menu, select Online Co-op > Host New Game. Pick a slot and then choose “New Game.” This should pop during the loading screen. You don’t need another player and you don’t even need another controller.
 Aficionado
Fully upgraded a weapon
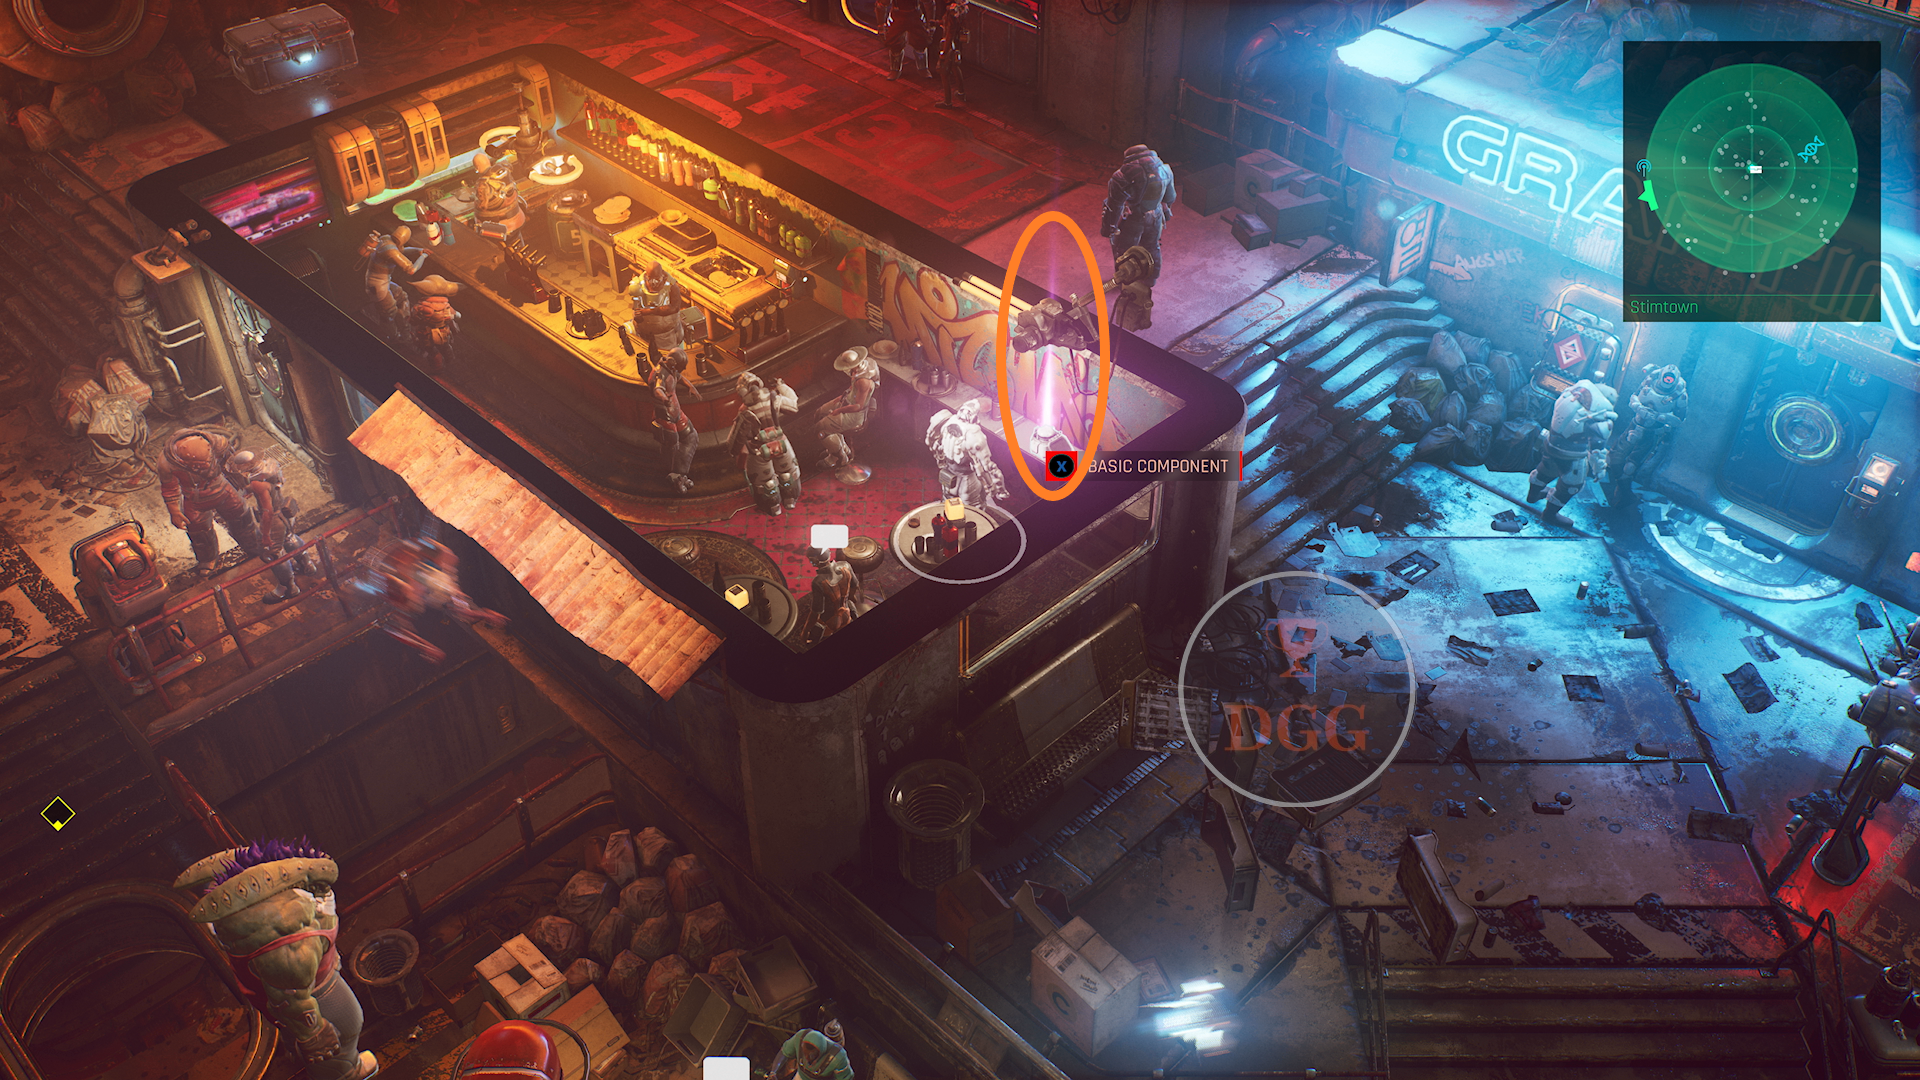
Weapons are upgraded at at gunsmith vendors. They are marked by a hammer icon. Upgrades for weapons cost component pieces. There are 3 different types of components and they are found out in the world. They are purple items.
As you reach certain levels with your weapon, you will need different components. The higher the weapon level gets, the rarer the component needed.
-
- Weapon Upgrade Levels:
- Level 2 – 1 Basic Component
- Level 3 – 2 Basic Components
- Level 4 – 3 Basic Components
- Level 5 – 5 Basic Components
- Level 6 – 1 Advanced Component
- Level 7 – 2 Advanced Components
- Level 8 – 3 Advanced Components
- Level 9 – 1 Superior Component
- Level 10 – 2 Superior Components
- Weapon Upgrade Levels:

 Getting Things Done
Side mission finished
See “For Both Our Benefits” below for more details.
 For Both Our Benefits
Completed all side missions
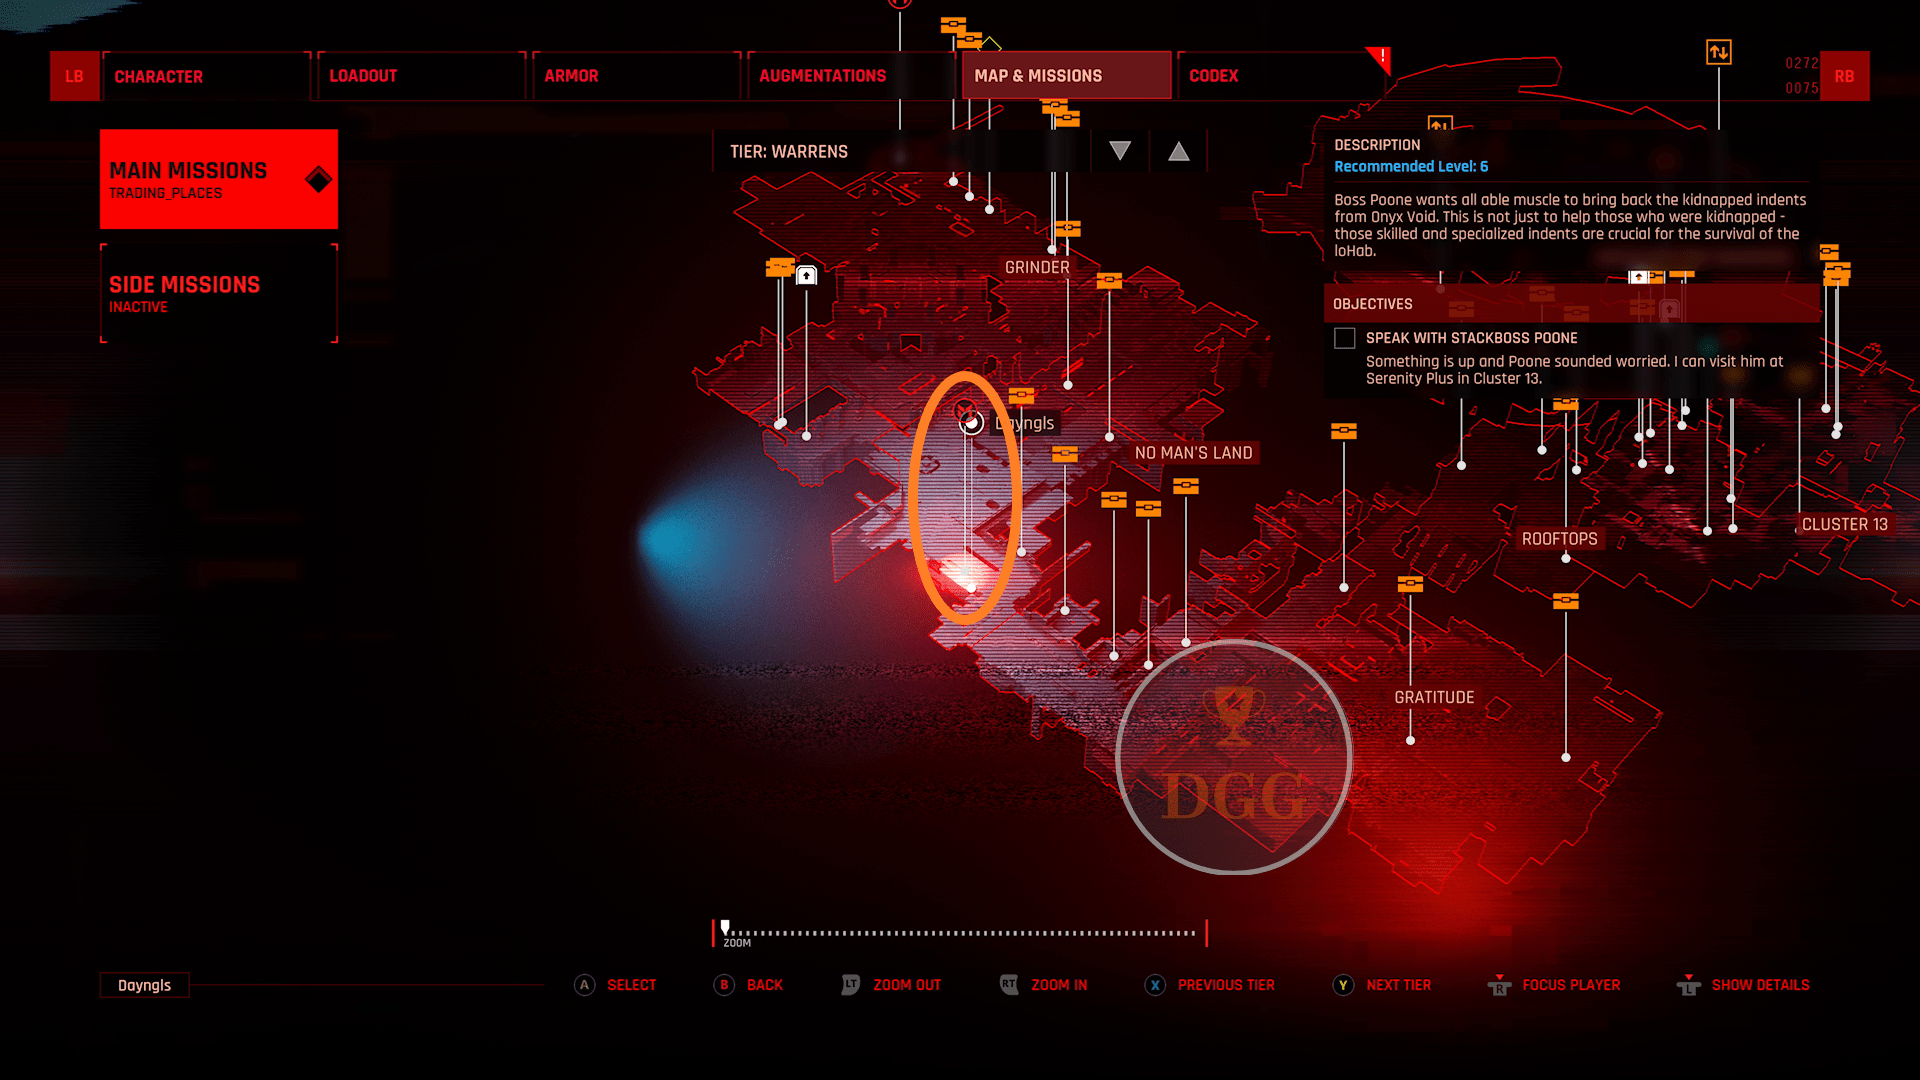
There are 28 side missions to complete and they will be marked by yellow diamond icons on your map and in the world. They will become available almost immediately, but they will not be able to be completed right away. Although you can pick them up, most of them will be out of your level range. Not only that, but some of them will take place in areas that are not yet unlocked.
The side missions are better left until much later in the game or even after you’ve beaten the story. You will be leveled up and have all of the areas unlocked. You cannot go to certain areas until the story takes you to them first. So save these for later.
All of these except for a noted few will show up on your map. As you complete the story missions, pick these up when you’re nearby them. The story will take you just about every where, so you can save a little time here by picking them up as soon as you see them on your map. Fortunately, none of these are missable.
-
- Anabolic Express
- Balls Deep
- Bubble Trouble
- Casino Courier – The Golden Satori – Acrocology: highStreet
- Casino Courier II – The Golden Satori – Acrocology: highStreet
- Casino Courier III – The Golden Satori – Acrocology: highStreet
- Casino Courier IV – The Golden Satori – Acrocology: highStreet
- Casino Courier V – The Golden Satori – Acrocology: highStreet – These do not appear on the map.
- Double Charge
- Dreadful Situation
- Dreaming High
- Exotic Dinner
- Gear up!
- Gen 9 H20
- Humidity Doctor
- Liberation Operation
- Lost and Found
- One More Rep
- Plug & Play
- Prison Break
- That Guy – Dirty Dive – Stimtown – This one doesn’t appear on the map.
- The Champ – Dirty Dive – Stimtown – This one doesn’t appear on the map.
- The Dark Horse
- The Recipe
- The Stash
- Silicon Optics
- Wash-n’-Go
- You Snooze You Lose
 Anonymous Withdrawal
Hacked an ATM
Before you can hack an ATM, you will need to upgrade your Cyberdeck to level 8. The Cyberdeck is upgraded by finding the actual upgrades out in the game. They can’t be purchased. You can check what your Cyberdeck can hack by pressing the Touchpad / ![]() > Character > Cyberdeck. On the right side of the screen, it will list what your Cyberdeck is capable of doing. The different upgrades are actually named. You will need to have your Cyberdeck at “The Arcade.”
> Character > Cyberdeck. On the right side of the screen, it will list what your Cyberdeck is capable of doing. The different upgrades are actually named. You will need to have your Cyberdeck at “The Arcade.”
You will find a lot of these upgrades by just following the story missions. They are yellow objects that really stand out against everything else.
Below is a list of where to find all of the Cyberdeck upgrades. You will need find these for other Trophies/Achievements. There are 11, but you are only able to pick up 9. The Cyberdeck will be maxed out 9


-
- Cluster 13 – On a rooftop near the armor vendor. There is a ramp up nearby.
- No Man’s Land – You can find this by going down a stairway through a room where a crafting component is found while on your way to the Grinder. It will be in a chest.
- Coder’s Cave – Near nogHead’s room during the story mission “Trading Places.”
- Vault – On the main path of the story mission “Data Miner.”
- Cosmodrome – On the southwest side of the Cosmodrome map. It is in a red chest.
- Lainer’s Apartment – This will be on the story path in the surveillance room during the mission “Trace Protocol.”
- exMat Lab – During the “Trace Protocol” story mission, this is on a desk in one of the rooms of the lab.
- corpZone – This can be found in the southern most section of the corpZone map near RezDev in an Ice 1 chest.
- Pinnacle – Following the story will take you to the Pinnacle area. This is found in the outdoors area of Pinnacle on the eastern side of the map. There will be a big “Sector T3” written on the ground at the door way used to head outside.
 Free Candy
Got the goods by hacking and destroying vending machines
Vending machines are found all over the game. You can buy items from them at almost any time. For this, you’re going to need destroy one and hack one. You can destroy one immediately. Just shoot it until it explodes.
The hacking won’t be able to be completed until you’ve upgraded your Cyberdeck. The Cyberdeck is upgraded by finding the actual upgrades out in the game. They can’t be purchased. To hack a vending machine, you will need to find 4 upgrades. You can actually check what your Cyberdeck can hack by pressing the Touchpad / ![]() > Character > Cyberdeck. On the right side of the screen, it will list what your Cyberdeck is capable of doing. The different upgrades are actually named. You will need to have your Cyberdeck at “Plug.”
> Character > Cyberdeck. On the right side of the screen, it will list what your Cyberdeck is capable of doing. The different upgrades are actually named. You will need to have your Cyberdeck at “Plug.”
Once you have at least 4 Cyberdeck upgrades, go up to any vending machine and hold  /
/ ![]() to hack it.
to hack it.

 Omnihacker
Hacked at least one of each hackable category
There are only 5 different hackable categories. They are actually listed in the Cyberdeck screen of the View button menu. Character > Cyberdeck. Go up to each item and hold Y to hack them.
-
- Doors
- Chests
- ATM
- Turrets
- MISC (Vending Machines)
You won’t be able to hack each one right from the start. You will need to find Cyberdeck upgrades For more information on where to find those, see “Anonymous Withdrawal” above.
 Black ICE
Deployed black ICE against hacker enemy
You’ll first encounter hacking enemies in the Corpzone. The story will take you there. You’ll know you’re being hacked when you see a big yellow dome surround you. Once you see that, immediately hold Y to counter hack the enemy.
 Getting Out of the Slums
Collected 200’000 uCreds
uCreds are currency in The Ascent. Unfortunately, this is not accumulative. You will need to have all 200,000 on you at once. You can gain uCreds by completing missions, bounties, finding them in the world and by selling your gear.
 Bounty Hunter
Claimed a bounty
While you’re completing missions, you will come across enemies that have a name over their head with a bigger health bar. They will also be marked by a bigger red icon on the minimap. When you kill this enemy type, pick up what they drop and then return to any bartender and turn in the bounty.


 Snooze or Lose
You tried Snooze
You won’t be able to unlock this until later in the story when you go to Stimtown. Go to the pink building called Wanda’s and you will see an NPC with a speech bubble above his head right outside. Speak to him and he will ask you if you want to try Snooze. Select “Yes” and the Trophy / Achievement will pop.


 Fight Smart
Killed a robot with energy damage type
This can be earned during the 4th story mission. You will end up going to an area where there are many robot enemy types. The robots will use energy based weapons. Kill the robots until one of them drops their weapon. Pick it up and equip it. Use it to kill a robot. You can check what type a weapon is by looking at the type in the loadout screen. If the lighting bolt icon is colored, that means it is energy based.

 Extreme Overcharge
Delivered 4000 amount of stasis damage to one target
For this and “Overkill,” you’re going to need to have the Stasis Drone equipped under “Tactical” in your loadout. This can be bought from the Cyber Vendors. You’re also going to want to have upgraded weapons to do more damage.
This is best done against one of the bigger enemies. They will have more health, meaning you can do more damage. Use the Stasis Drone and it will attack an enemy basically trapping them in place. While the drone is trapping them, you need to drain their red health bar and then fill up the blue bar that takes the place of the health bar. Just keep shooting them to do this. When the blue bar fills up, the enemy will explode. If you did enough damage, a damage counter will pop up. If it is above 4,000, this will pop. If not, you either need a better weapon or a different enemy type. I was able to pop this against the big alien like enemy that swings the big hammer.
If a second enemy dies as a result of the explosion from the enemy trapped in stasis, you will also pop “Overkill.”

 Opportunist
Killed 10 enemies using exploding barrels
Any experienced gamer already knows about the explosive red barrel. Well, they can be found in The Ascent. During combat, shoot the barrels to cause them to explode. Make sure enemies are in the radius and are killed. This is an accumulative Trophy/Achievement. You do not have to kill 10 enemies at once.

 Overkill
Kill another enemy by overcharging an enemy while it’s in stasis
See “Extreme Overcharge” above for more details.
 Hygiene
Used the sink after flushing a toilet
This can easily be earned during the story mission “Trace_Protocol.” During the mission, you will eventually be sent to Lanier’s apartment. While in there, go up the stairs and into her bathroom. Interact with the toilet first and then interact with the sink after.

 Explorer
You discovered all locations
You will automatically discover every location by completing the main story and every side mission.
 Tourist
You rode the Interlink Express
The interlink Express is a train that acts as fast travel to the different locations. All you have to do is ride this train to any destination to pop this. They are marked on your map as a red “M” logo.


 Comprehensive
You filled the Codex
See “Flatliner” below for more details.
 Curious Consumer
You read 10 datapads
This is something that should pop as you play because interacting with datapads will be part of some missions. Datapads can also be found out in the world. They are marked with a speech bubble icon in game. All you have to do is interact with them by pressing  /
/ ![]() .
.
 Flatliner
Unlocked all enemy Codex entries
At the time of the game’s launch, both Achievements related to the Codex are glitched.
As you play through the game, you’ll unlock codex entries. Completing every story mission, side mission, visiting every location and found at least one piece of gear from each of the different brands will fully unlock the codex entries. Both main and side missions will take you to every location, force you to battle every enemy type and speak with every relevant NPC.
All of the Codex Entries are listed below:
Bios
These are all earned by completing all side missions and main story missions.
- 438 Hung
- Aleks
- Anteen
- Ariel
- Atticus
- Beezelchek
- Boseman
- CEO Tahm
- Chef Wegner R.
- Clobber
- CTO Dakyne
- Dr. Humidore
- Flabby Ricone
- Flamingo
- Flavvus
- Fouch
- Francone
- Grateful Abbott
- Grigori
- Hans
- Harlan
- Humble Ivan
- Imp
- Influencer Celine
- Iris
- Kaiser First
- Kira
- Krog
- Kudo
- Lockesley
- M-G Rep
- Merle
- nogHead
- Palu
- Polter Dee
- Raphel
- Sal Mon
- Salucious D
- Sanguine Humbert
- Spice
- Stackboss Poone
- Taoka
- The Shipping Master
- Trenning
- Trummer
- Twisty
- Ubi Gadeeter
- Voit
- Warton
- Won Harting
Enemies
You’ll earn these by killing enemies. Completing the main and side missions will ultimately bring you to all of the enemy types.
- 438 Hung
- Ascender Combatants
- Automated Defences
- Barrager
- Black Hacker
- Celine
- Combat Hacker
- Corporate Grab Teams
- Dozer
- Ferals
- Fullchrome
- Hammerhand
- Havoc
- Heavy Monobot
- Interdimensional Calamity
- Jogger
- Light Monobot
- Logbot
- Megarachnoid
- MG Operative
- Nug Engineers
- Nug Gadgeteer
- Onyx Void Operative
- Papa Feral
- Rojins
- Scatters
- Scientists
- Siege Mech
- Turbo Kees
- Turbo Thugs
- Ungrateful Merc
- Ungratefuls
Locations
Completing all of the main and side missions will take you to every area except for the Outskirts.
- Ascent Group HQ
- Black Lake
- Blossom Hills
- Cluster 13
- Coder’s Cove
- corpZone
- deepStink
- dNexus
- Gemini Stacks
- Gratitude
- Grinder
- highStreet
- MenShen
- Nitroad
- No Man’s Land
- Onyx Void HQ
- Outskirts
- Pod Lot
- RBM-5
- RezDev
- Rooftops
- Scrapland
- Serenity Plus
- Stimtown
- Sub-Sector 41A
- Tham’s Gate
- The Common
- The Cosmodrome
- The Dusk
- The Edge
- The Glut
- The Golden Satori
- The Node
- The Pinnacle
- The Shaft
- The Umbilical
- The Warrens
- Veles
- Waste Recycling Network
Lore
These are all earned by completing all side missions and main story missions.
- AGI
- AI & SI
- Arcology
- Augmentations
- Habber
- Habstack
- ICE
- IMP
- Imprinting
- InCon
- Indent
- LoHab
- NetSage
- Project MenShen
- stackBoss
- Stasis Tech
- The dataNet
- The Interlink
- The RBM-5 Tokamak
- uCred
Manufacturers
These are unlocked by picking up or buying gear from the following manufacturers.
- Black Market
- Canary
- Cybersec Mega
- EightCo
- Habnet Technology
- uPlus
- Whisper Cybernetics