
Welcome to the Trophy and Achievement guide for Praey For the Gods! If you’ve played or are familiar with Shadow of the Colossus, you know exactly what to expect here. You’ll fighting giant bosses that require you to climb up onto them and attack set targets. There are only eight bosses to be fought in Praey For the Gods.
Despite this game being an homage to Shadow of the Colossus, it’s not completely the same thing. There are smaller enemies and mini bosses you can fight through out the open world and there are survival elements to this game. You will need to stay warm, stay rested and eat in order to survive. The survival portion may sound a little daunting, but it can be turned off when you start up a new game if those mechanics do not appeal to you on your first playthrough. On your legendary playthrough, the cold can kill you however.
The entire list should take about 15 to 20 hours to complete.
First Playthrough
None of the Trophies/Achievements are missable and there is free roam post game. Anything you don’t do during the story can be cleaned up afterwards. In order to complete this Trophy/Achievement list, it’s going to take 1 and a half playthroughs. Your first playthrough can be on any difficulty you’d like. You should use this to familiarize yourself with the game and map. You should knock out all of your miscellaneous and collectible related Trophies and Achievements here during this first playthrough. You can set the survival settings to “Story” on your first playthrough to make things easier on yourself.
Half Playthrough
Your half playthrough will need to be on Legendary difficulty. On this difficulty, you’ll take more damage, the cold can kill you, you can drown in the water if you run out of stamina while swimming and your health will not auto regenerate. You can set the survival settings to “Boost” on Legendary to make things a little easier on yourself here. You only need to beat five of the eight bosses for the “Legendary” Trophy/Achievement. Beating them on Legendary will also unlock the “Elite” Trophy/Achievement. Much like difficulty Trophies/Achievements stacking when you a beat a game, the same will happen here.
Every so often a blizzard will come through. This can cause damage if you’re out in it without fire for too long. It also obstructs your view. It can be a bit of a pain to navigate through. So when a blizzard hits, go ahead and pause the game. You can make a manual save and then immediately load that save to reset the weather.
 Platinum Trophy
Platinum Trophy

 Release the Satyr
Beat Boss 1
Climb up the leg of the Satyr and make your way up to the midsection. You can recover stamina up here, before heading up its back. The first target is on the upper back to the right. The second target is in the top of its right shoulder. If you need to regain stamina, you can safely stand up on the base of its neck between the shoulders. After that, climb up to the top of its head to find the third and final attack point.
 Release the Devourer
Beat Boss 2
Before you can climb onto this boss, you will need to first run around the perimeter of the battle area. There are four square platforms that you need to stand on. Stand on them to raise up a pillar. Then, stand behind the pillar so that the boss will shoot it. Do this on three different platforms. After the third platform, there is a fourth that has a big wall behind it that will light up. When you stand on it, the boss will stick its head into the water. Here is where you will be able to climb on to it.
When the boss pulls its head back out of the water, you’ll be at the top. Climb down the boss attacking the targets. The targets are on the sides of the boss. You can follow the ropes to get an idea of where the targets are found.
 Release the Boar
Beat Boss 3
Before you can climb onto this boss, you’re going to have stand in front of the wall or on the square platforms. It’ll charge at you and you need to roll or jump out of the way so that it runs head first into the wall. Once it does that, it’ll be knocked down for a few seconds opening up an opportunity for you to climb up on to it.
There is a target underneath it between its front legs. You won’t be able to hang on and hit this one. You’ll need to climb on and damage this target while the Boar is knocked down from hitting the wall. You’ll only be able to get one attack in each time it falls over down here.
There is also a target on the top of its head that will be uncovered by it hitting the wall several times.
 Release the Dreki
Beat Boss 4
The boss will be flying in the air above you during this fight. Down on the ground in the boss fight area, there will be four structures that are encased in ice. in order to free them, you’re going to need to stand in front of them and wait for the boss to shoot an attack toward you. It’ll shoot fireballs down in your direction. Dodge them and the fireballs will hit and melt the ice around the structure you’re standing in front of. When the ice is gone, climb up the structure and use your melee attack to hit the circular object on top. You’ll need to repeat this on each of the structures.
After you’ve activated the circular object on top of each structure, a big vent will be blowing air upwards. Jump on to it and equip your glider with ![]() /
/ ![]() . You’ll then be lifted up into the air and can then land on the boss. There is a target at the very back end of the boss and the others can be found underneath the big chain like collars across its body. In order to reveal the targets underneath the collars, you’ll need to melee the same circular objects that you hit on the structures down below. They will also be up on the boss.
. You’ll then be lifted up into the air and can then land on the boss. There is a target at the very back end of the boss and the others can be found underneath the big chain like collars across its body. In order to reveal the targets underneath the collars, you’ll need to melee the same circular objects that you hit on the structures down below. They will also be up on the boss.
 Release the Yeti
Beat Boss 5
There are a few different ways you can get onto this boss. You can wait for him to try and hit or stomp you. Dodge the attack and its fist or foot will be down for a few seconds. You can climb onto them while they are down. Another way to get on is to climb onto the pillars that surround the boss fight area. Stay hidden behind a wall and when it gets close you can jump off of the wall and reach some of its fur. Or the other way is to jump off a wall when it is close and then use the grapple hook to grapple onto it. There are two grapple points near its shoulders toward its back.
Once you’re on, you can attack the targets on its arms and head. You can regain some stamina on the back of its neck and head area if needed.
 Release the Crogon
Beat Boss 6
This will be another boss that stays up in the air. There are a few ways to get up to the boss.
Look for the giant arm statue. Underneath the arm is a big vent that will shoot you up into the air when using your sail cloth. You can shoot up and then glide over to the boss as it flies by. You can also use this vent to shoot up to that giant arm statue. You can wait on the arm to time the boss a little better and then sail to it when it comes near you.
The other way to get on takes place down on the ground in the center of the area. There will be two circular structures that you can climb on top of. Press  /
/  just like you would on a boss’ weak point three times on each structure. After that, another structure will raise up with a fire on it. Climb up to the platform with the fire and that will lure the boss down toward you. The boss will shoot an attack at you up here. Dodge the attack and then use the Grapple Hook to grapple up to the boss.
There are targets on top of both wings, on its tail and then underneath it on its chest area.
 Release the Thrall
Beat Boss 7
Before climbing onto the boss, you’re going to want to stick to the outer perimeter of the boss fight area. The boss will throw boulders at you, but they can be dodged by running or by taking cover behind big stone structures. You’ll notice that there are glowing flower like plants in here. you can knock those down yourself or wait for the boss to knock them down with the boulders it throws at you. When they’re down, interact with them by holding  /
/  . Aim them at the glowing blue areas on the boss’ leg, its upper back and the big item that is hanging off of it. You need to do this because the climbing paths are blocked. Hitting them with these will destroy the blockage and open up paths for you to climb on and target.
When you’re ready, you can climb its leg by avoiding a stomp attack. There will be targets on its leg, both arms and head. In order to reach the head, you’ll need to climb toward its hands along its arm. It will raise its arm to attack leaving you a little bit of time to jump from the arm to a platform on its shoulders. When it does attack with the blue lasers, climb to the back side of its arm and the attack will clear away more armor on the boss.
 Release the Aldrnari
Beat Boss 8
The final boss will take place at the temple and it’s a bit of a long fight. You should also make sure you have a decent amount of upgraded stamina. You’ll be doing a lot of climbing here.
The first section of the fight will have you using the blue explosive plants to attack blue weak spots on several lava giants. When you kill these enemies, sections of their lava will harden allowing you to climb up them. As you climb up them, you’ll come across the circular light like objects that you can melee to harden more lava. This will go on for awhile until you’ve climbed all the way to top of the tower on these enemies.
The next section will have you jump off this tower and on to a flying boss. There are three targets on this flying boss. Two of them are on the sides and the third is near the base of the neck area. This boss will work the same as the ones in the previous section. You’ll need to melee the circular objects on it in order to harden the lava. This will give you a path to follow to find the targets. The targets start in the back and go toward the head. They are a long the sides of the boss.
After you damage the three targets, the big wolf will join you near the head of the boss. You’ll need to jump onto its back and hold as it carries you to the head. The fourth and final target will be here at the head. It only becomes available after completing the first three.
 Pathfinder
Collect 10 totems
Totems are a collectible that can be used to increase your stamina and health in groups of three. So, every three that you find will grant you an upgrade. You’ll know you have enough as there will be a totem icon on the right side of the screen.
When you’re near them your controller will vibrate and you’ll hear a little treasure like noise. On PlayStation, this will play through the speaker on the controller.
There are 60 in total and some of them can be a little difficult to find.
 Explorer
Collect 20 totems
See “Pathfinder” above for more details.
 Elite Explorer
Collect 30 totems
See “Pathfinder” above for more details.
 Adventurer
Collect 40 totems
See “Pathfinder” above for more details.
 Elite Adventurer
Collect 50 totems
See “Pathfinder” above for more details.
 Ultimate Adventurer
Collect 60 totems
See “Pathfinder” above for more details.
 Souls Echo
Beat a Boss in Echo Mode
In order to earn this, you’re going to need to defeat any boss again after you’ve already beaten them. Return to where you fought them and you will find their body in the area. There will also be shining blue lights in front of the body. Step into the blue light and press ![]() /
/  to initiate the boss fight.
 Cleanse the land
Defeat 50 Undead
As you explore the map you’ll come across enemies that will spawn out of the ground. They usually spawn in groups of two or three. All you need to do is kill 50 of them.
Make sure to kill every one of them that you come across. There seems to be an issue with the tracking of this one. You may not get credit for killing all of the undead that spawn. I sometimes would only get credit for one or two kills in a group of three. Be sure to keep an eye on this as you encounter them.
*UPDATE* The game has been patched to fix the tracking issue. However, there is a very specific method to get the kills to count despite the patch.
The in game stats counter found in the pause menu must be same as your Trophy/Achievement counter in order for the kills to count toward the Trophy/Achievement. The in game stat you need to be looking at is “Minions Killed.”
We can use me as an example. I was stuck at 44 on my original save file. I started a new game and started killing undead enemies. The Trophy counter did not update but the in game counter was working just fine. I loaded up my original save and killed a group and the Trophy counter finally updated.
So, if you start a new game, it’ll only count your kills once you’ve reached the same number in game as the Trophy/Achievement counter. And no, farming the same group of enemies by reloading your save will not work as reloading your game also reloads the in game stat counter.
 Cook
Cook
Cook 10 pieces of food
See “Chef” below for more details.
 Chef
Chef
Cook 20 pieces of food
Although you can start your own fires out in the map, you won’t be able to cook at those. For this, you need to use set campfire locations. Before you can cook, you will need to have a couple of things.
First, you need to have bundles of wood. When you come across a campfire location, you will need the wood in order to start the fire. Obviously, you will also need food that you can cook. You can cook meat acquired from hunting animals and you can cook mushrooms that can be found out in the open world.
When you start a fire, you’ll be able to go through your inventory and select what you want to cook.


 Apprentice Craftsman
Craft 10 items
See “Craftsman” below for more details.
 Craftsman
Craft 20 items
You can craft items by going into your items menu and then select the bundles of wood. You’ll then have several crafting options. Craft whatever items you want or need until you hit at least 20.
Bundles of wood can be found in the open world and by cutting down trees. After tree is cut down, keep melee attacking the fallen logs to break them down even further into bundles of wood.

 Apprentice Hunter
Kill 10 animals
See “Hunter” below for more details.
 Hunter
Kill 50 animals
There are various kinds of animals found in the open world. All you need to do is kill at least 50 of them. Aside from the Trophy/Achievement, you’ll also receive supplies from hunting animals.
 Reach for the Gods
Climb up to the top of the temple
So, this can be done without having to max out stamina unlike in Shadow of the Colossus, but you will need a decent amount. You can get around having to need a ton of stamina by using the Grappling Hook. I was able to reach the top with only having upgraded my stamina twice.
The temple that you need to climb is the area where you are transported to after defeating a boss. You’ll need to reach the highest point, which is at the front of the temple.
To start, you’ll need to be inside of the temple. There is a lot of ice on the walls, but if you look closely, you should be able to see that there is some exposed brick wall on both the left and right sides. You can climb these exposed areas and grapple to them. You can also use the tree like objects that are inside to get a higher vantage point. You can use the Grapple Hook to get on top of them and then use the Grapple Hook again to get reach higher on the exposed brick walls. This can save stamina usage.
Once you’re at the top, make your way to the front of the tower where the two giant stones are. You can use your Grapple Hook to get up them. There are actually a couple of areas up the wall where the ice sticks out just enough to where you’re able to stand on them and regain stamina if you need to. Grapple from one of the two towers to the other until you reach the top. The shorter tower cuts in enough to where you can get near the top and then regain stamina. From there, you can grapple up near the top of the taller one and climb the rest of the way.
This will pop just before you reach the very top.
 Firestarter
Light 100 things on fire
You can easily and quickly knock this out by lighting your arrows on fire at a camp fire. Get some bundles of wood and craft arrows. Then, light up a campfire where you can cook food. Aim your bow and walk very close to the fire. The arrow will light and you can then shoot it and draw back another to repeat the process.
 Junior Logger
Cut down 5 trees
See “Lumberjack” below for more details.
 Logger
Cut down 10 trees
See “Lumberjack” below for more details.
 Lumberjack
Cut down 20 trees
Shortly after defeating the first boss, you’ll use your parachute to glide down from the tower. Follow the trail forward and you will come across an axe to your right.
You can equip this axe and then attack trees to cut them down. Repeatedly attack a tree and it will eventually fall down. Make sure to continue chopping at the fallen logs to get bundles of wood for fires and crafting.
 Elite
Elite
Defeat 5 bosses on Hard
See “Legendary” below for more details.
 Legendary
Defeat 5 bosses on Legendary
For this, you don’t need to beat the game. You only need to beat the first five bosses. You cannot farm the same boss five times. Even if you start a new game, it will not count. So no, you cannot start a new game five times only fighting the first boss.
On this difficulty, you’ll take more damage, the cold can kill you, you can drown in the water if you run out of stamina while swimming and your health will not auto regenerate. You can set the survival settings to “Boost” on Legendary to make things a little easier on yourself here. The bosses will have the same targets in the same locations, so whatever strategies you used during your first playthrough will still apply here.
You can get through this just running straight to the boss locations. You may want to pick some totems on your way to upgrade your stamina, but you really don’t need to go too far out of your way to get this done.
Every so often a blizzard will come through. This can cause damage if you’re out in it without fire for too long. It also obstructs your view. It can be a bit of a pain to navigate through. So when a blizzard hits, go ahead and pause the game. You can make a manual save and then immediately load that save to reset the weather.
Also, the “Elite” Trophy/Achievement will pop when you earn this. It stacks just like beating games on higher difficulties.
 Cartographer
Find 5 maps
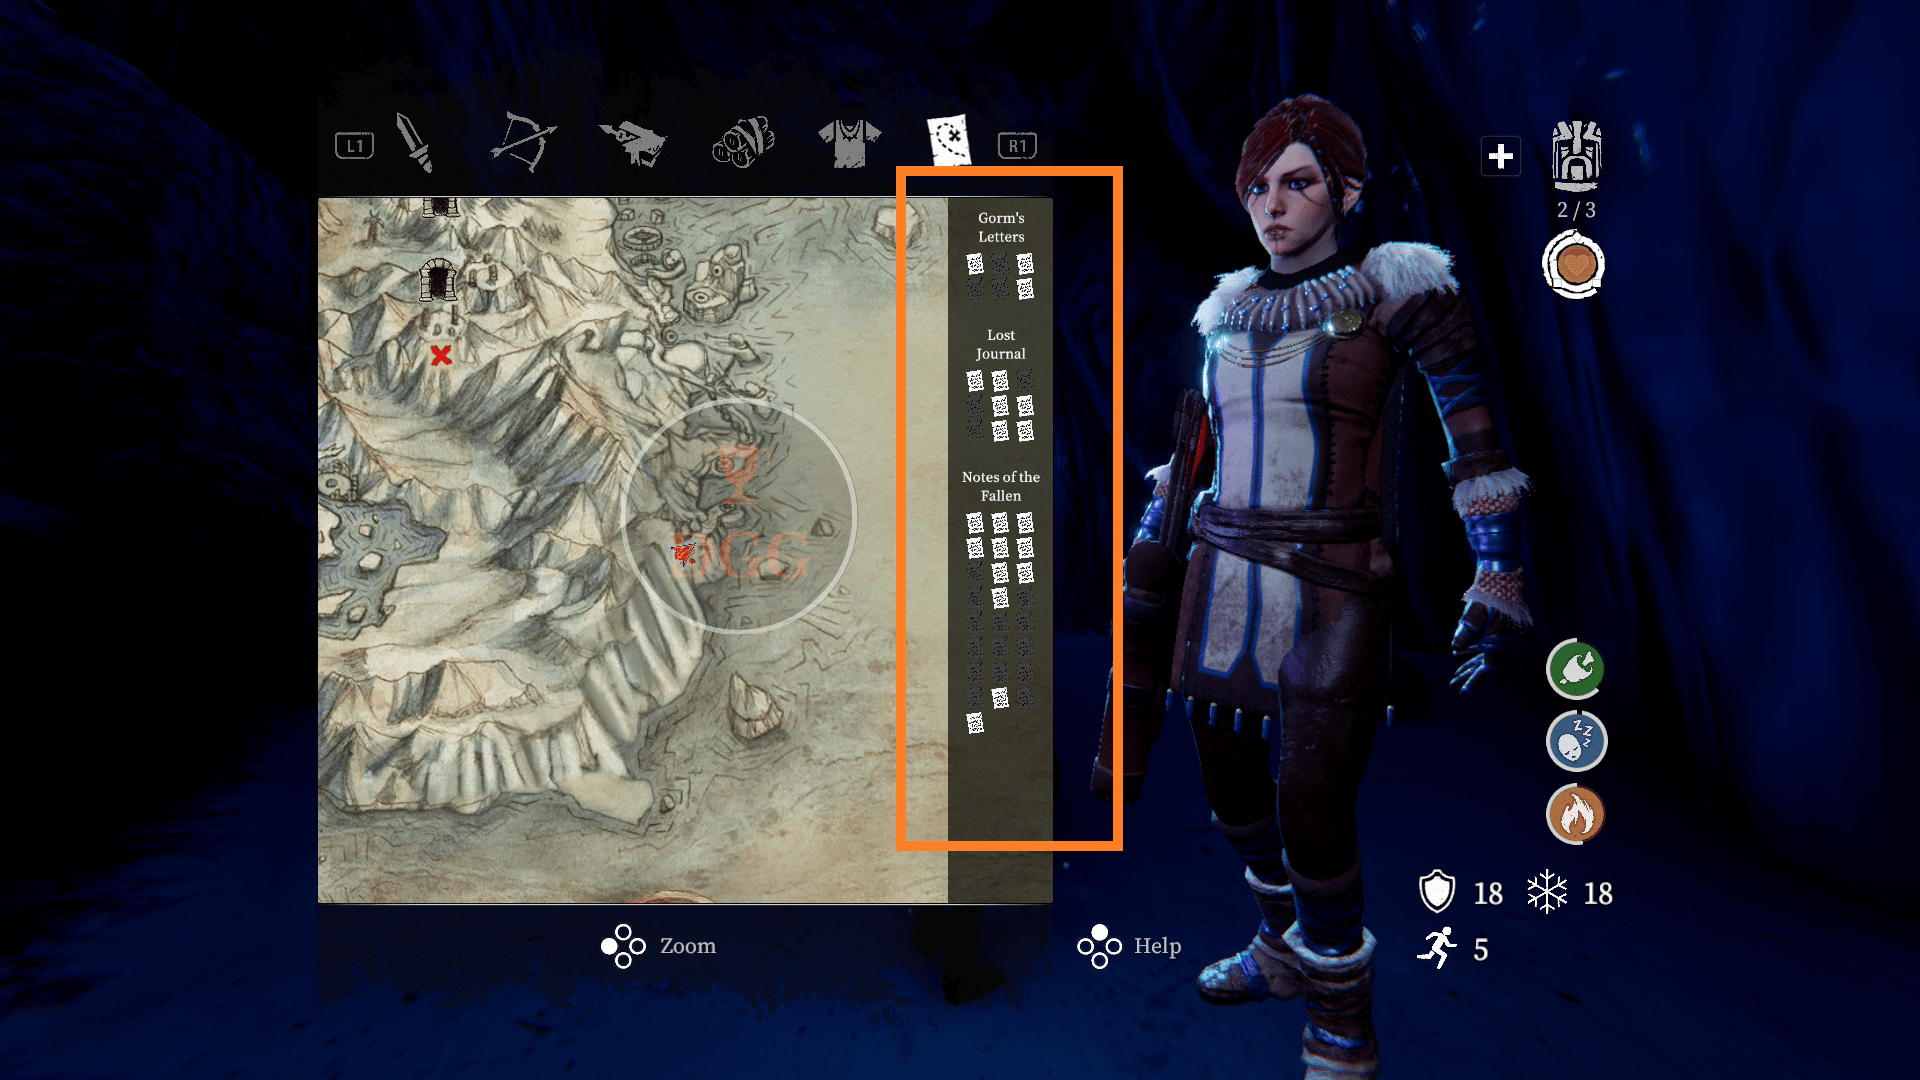
Maps are found in two different ways. They can be found as note on the ground like a normal collectible. These are treasure maps that will put an “X” on the world map. They can also be found in caves painted on walls as a cave painting. The cave paintings are big red circular paintings. They are usually found in the small caves that house campfire locations or near bosses. All you need to do is interact with them and they will be collected. The cave painting maps will uncover sections of the world map when found and interacted with.
Each time you collect a map, you’ll uncover more of the overall map found in your inventory menu. There are more than five maps to find, so you do not need to find them all for this Trophy/Achievement.

 Slayer
Defeat 3 Champions
Champions are mini bosses that can be found at certain locations. They have the same target that the other bosses have except the Champions only have one on their back.
In order to get on their back, you’ll need to attack their legs and they will eventually go down for a brief moment. For these fights, you’re going to want to stay behind the boss and near the legs. Get in a few attacks and then roll away.
When they go down, you can jump and climb onto their back. After you damage the weak point, the Champion will do a heavy attack that will damage you and throw you off. So, after you damage the weak point, jump off to avoid taking damage. Attack the legs again and repeat the process. It will only take three hits to the target area to kill them.
![]()
 Bibliophile
Find 10 Lore Notes
See “Decipherer” below for more details.
 Decipherer
Find 20 Lore Notes
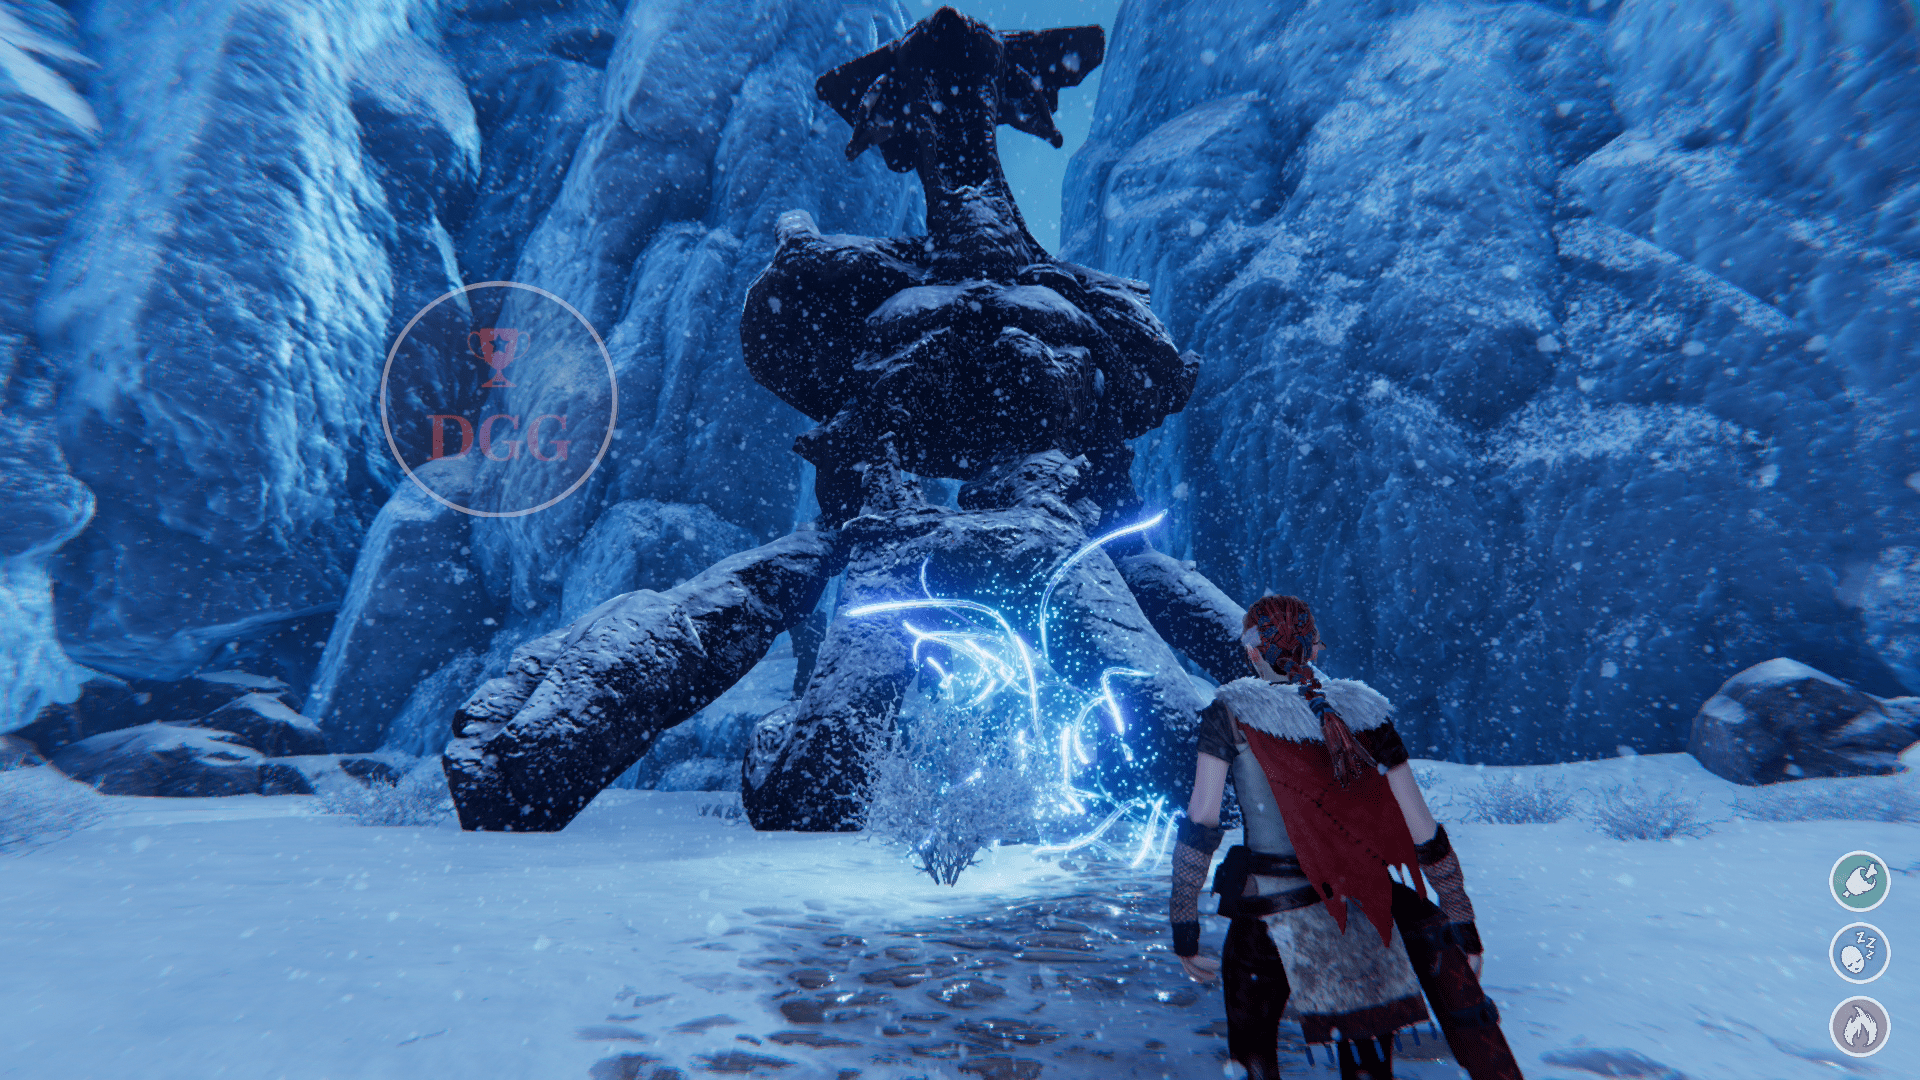
Lore Notes are exactly what they sound like. They’re a collectible type of note that provides you with some lore. These are found all throughout the open world and will actually be very visible when you come across them. They will be marked with a white streak of light.
There are three different types of notes, but they all count as “Lore Notes” for this Trophy/Achievement. You can check how many you have by looking on the right side of your map. There are actually more than 20 and you’ll come across these when hunting down the Totems.
Ja trofeum legendarny zdobyłem po ukończeniu gry mając większą wytrzymałość, wszystkich 5 bossów do zdobycia trofki pokonałem w trybie powtórki, podchodziłem do już pokonanego bosa zmieniałem dopiero wtedy poziom trudności na legendarny i tak 5razy, nie trzeba dosłownie po kolei ważne żeby 5 na jednym podejściu, a po pokonaniu bosa zmieniałem poziom na easy dochodziłem do innego i powtarzałem, ale faktycznie jest tak jak pisze w poradniku po ubiciu ostatniego z pięciu bosow trzeba wejść do menu i zmienić poziom albo coś bo trofka wpada po czasie,