
Welcome to the Trophy and Achievement guide for Necromunda: Hired Gun! This is a pretty easy and straight forward list to complete. Fortunately, there is nothing missable. Every mission can be replayed as many times as you need in order to get everything unlocked via mission select. It’s important to note that there are some Trophies/Achievements that won’t pop right away. Some of them will pop after completing whatever Chapter you’re in. These will be noted in the guide below.
There is a Trophy/Achievement that will require you to get an A rank on every main mission. So, if you want to avoid having to play all the Chapters an additional time for A ranks, aim for headshots, use Takedowns, try to avoid dying and find all of the chests in a Chapter to score high. S and A ranks can be earned on easy as well.
Glitch Note: I played this on PlayStation 5. Most of the Trophies unlocked just fine for me, but there were a few that seemed to have gotten stuck. I would do the requirement and they wouldn’t pop. So, I would move on to try another Trophy. When a different Trophy would pop, the one that previously didn’t pop would then unlock as well. It almost seemed as if another Trophy popping would push the stuck one through.
 Real Hired Gun
Unlock every other trophy

 Headache
You have killed 100 enemies with a headshot
Not much to say here. This is almost a default Trophy/Achievement for shooters. Aim for the head whenever you’re in combat and this will eventually pop.
 Sadistic
You have performed 100 Takedowns
Takedowns are performed by running up to an enemy and pressing Square/X. These are immediately available to you in Chapter 1. Get up close to an enemy and hit Square/X until this pops. Killing dogs with these count as well. The game will throw plenty of enemies at you, so 100 shouldn’t take very long as long as you are regularly using it.
 The Bounty
Finish Chapter 1
This is a story related Trophy and Achievement.
 The Captive
Finish Chapter 2
This is a story related Trophy and Achievement.
 The Beast
Finish Chapter 3
This is a story related Trophy and Achievement.
 The Ambush
Finish Chapter 4
This is a story related Trophy and Achievement.
 The Escape
Finish Chapter 5
This is a story related Trophy and Achievement.
 The Siege
Finish Chapter 6
This is a story related Trophy and Achievement.
 The Dark
Finish Chapter 7
This is a story related Trophy and Achievement.
 The Stair
Finish Chapter 8
This is a story related Trophy and Achievement.
 The Meeting
Finish Chapter 9
This is a story related Trophy and Achievement.
 Gang War
Finish Chapter 10
This is a story related Trophy and Achievement.
 The Scent
Finish Chapter 11
This is a story related Trophy and Achievement.
 Martyr’s End
Finish Chapter 12
This is a story related Trophy and Achievement.
 The Past
Finish the Main Campaign
This is a story related Trophy and Achievement.
 Additional Income
Finish your first secondary mission
Secondary missions are just side missions. These will become available to you after finishing Chapter 2. These are acquired in the same place as where you choose the main missions. Interact with the big terminal immediately to your mastiff’s right. Press R2/RT to tab over to the secondary missions. All you have to do is choose one and complete it. As soon as you pick it, you’ll be taken to it. Finish one to earn this.


 New Allies
Fill one faction bar
Faction bars are filled by completing side missions for the same Faction. Your progress for this can be viewed by tabbing over with R2/RT from the mission select. If the faction doesn’t have any active side missions, you can refresh the page with Triangle/Y to get a new batch of side missions. Each mission will have the name of a Faction in the bottom right corner of the mission select. The description says “bar,” but every bar of the faction needs to be filled. There are five bars in each Faction. These can be completed pretty quickly. The game seems to infinitely spawn enemies during these missions, so just go straight for the objectives.


 Small Update
Buy your first upgrade to the Rogue Doc
The Rogue Doc is in Martyr’s End. You will be automatically taken here after finishing the first level. When you regain control of your character, you’ll actually be right in front of him. Interact with him, select “I need you to look at my bionics” and then buy any upgrade for yourself to pop this.
This is the same place where upgrades for your mastiff can be purchased as well. Interact with the Rogue Doc and select “I’m here for my mastiff.” Purchase any upgrade to also unlock “Man’s Best Friend.”

 Still Human?
Upgrade one implant to the class 4
Implants are upgraded at the Rogue Doc and they are upgraded with credits. Each tab will have a variety of implant upgrades, but you will have to first max out the very top row before you can fully upgrade the rest. Each upgrade in a row will get a little more pricey with the fourth costing 90,000+. Upgrade anything to four and this will pop when you back out of the Rogue Doc upgrade screen.
 Gecko’s Feet
Wallrun 2500m
This is an accumulative total. To wall run, jump up near a wall and hold X/A to run along it. Wall running is used for level traversal and during combat. There aren’t a whole lot of places where this will be forced to use, so make sure you’re using it as much as you can.
 Now I See You
Take out 50 shields with the grapnel
You will encounter some enemies that will be holding a shield in front of them. All you have to do here is aim for the shield and press L1/LB to use the grapnel. If aimed correctly, you’ll pull the shield away from the enemy.
 Who’s The Boss Now?
Finish a mission with an S rank
In order to get an S rank, there are only a few things you’ll need to do and this can be done on easy. Try to only kill enemies via headshot or use take downs. If you need help getting headshots, spam the Heighted Senses ability to slow time down. This will improve your “Kill Style” score. If you find all of the chests in a Chapter, this will boost your score as well. Lastly, don’t die. This is an obvious one when going for score based Trophies/Achievements. You can use the Medikits to regain health, but using a Stimm after dying will negatively impact your score. The very first mission can easily be S ranked to get this out of the way.
When starting a new mission, make sure you always have plenty of Difusers with you. They can be purchased at the pre mission loadout screen. Some chests will have explosives on them that will damage you. The Difuser will be automatically used if the chest has an explosive.
You only need one missions S ranked, but try to stick to the same formula in every mission as you will need to get at least an A rank on all 13 story Chapters. The chests are not a requirement for A as long as you don’t die and most of your kills are headshots and Takedowns.
“The Best Student” was one of the Trophies that glitched for me. After finishing all Chapters with an A or S, it didn’t pop. I replayed Chapter 1 getting an A rank and it popped.
 Death Comes From Above
Kill 100 enemies while wallrunning
As mentioned in the intro, this is one of the Trophies that got “stuck” for me.
You can begin working on this from the very beginning of the game. To wall run, jump up near a wall and hold X/A to run along it. Once you’re running on a wall, fire at enemies and kill them. When you fall off, just get back on and run through again. This can be a little tricky, but this can be made easier by upgrading your Suspensors. The Suspensors will make it much easier to aim and run on walls. While going for this, I found that grenades and the grenade launcher were the easiest to use as you don’t need to be as accurate. One other method is to use Perfect Aim, run on a wall and just hold down the R2/RT on an automatic weapon.
 Treasure Hunt
Open 20 chests
Chests can be found in every main mission and in some side missions. Like most games now, these chests are full of loot that you can collect. All you have to do is open 20 of them. If you replay a level the chests will respawn. So, this doesn’t even have to be 20 different chests.
 Weapons Lover
Kill an enemy with every weapon
As mentioned in the intro, this is one of the Trophies that got “stuck” for me.
There are 19 different weapons in the game counting the grenade. Most of theses will be found during missions, in chests or bought from the weapon vendor directly across from the Rogue Doc in Martyr’s End. Get a kill with everyone of the following weapons:
Basic
- Striker
- Vpanthers
- M’ma
- Death Bringer
- Doghammer
- Pious Legacy
Pistol
- Ironfist
- Escher’s Kiss
- Epitaph
- Scars Machina
- Firebird
Heavy
- Iron Rain
- Tempest
- Scatter
Special
- Hashin’s Eye
- Burningsun
- Wrath
- Funeral Ball
 Who Let The Dogs Out
Kill 30 enemies with your Mastiff
You’ll be introduced to the mastiff mechanic in the very first chapter. All you have to do is press O/B to call you mastiff. It will then attack and kill enemies. There is a short cooldown period between uses, but this can be earned pretty quickly and early in the game.
 Bionic Master
Kill 100 enemies by using Augmetics powers
There are some abilities that can be purchased from the Rouge Doc that can be used to kill enemies. This will pop when you’re working on “Zap,” “It’s Not Cheating!” and “Kaboom.” In order to get all three of those Trophies and Achievements, you’re going to need 120 kills, so don’t even worry about this. See the previously mentioned Trophies and Achievements for details on these abilities.
 The Best Student
Finish all main missions with a rank of A or more
This only applies to the 13 main story missions. See “Who’s the Boss Now?” for more details.
 Man’s Best Friend
Buy an upgrade for your Mastiff
See “Small Update” for more details.
 Who’s A Good Boy?
Pet your dog in Martyr’s end
This can be earned immediately after finishing the first Chapter. A cutscene will play and you will wake up in Martyr’s End. When you regain control of your character, you’ll be standing right in front of the Rogue Doc. From here, turn left and walk toward the bar. Your mastiff can be found just to the right of the bar. Walk up to it and press Square/X to pet it.
 Bull’s Eye
Complete the shooting training in Martyr’s End
This can be earned as soon as you finish Chapter 1. After the cutscene finishes you’ll be in front of the Rogue Doc. Turn around and go up the stairs to the right. Follow them all the way up to the top. Interact with the desk to start the training. Shoot every target that pops up to earn this. There are not that many, so this is pretty quickly and easily earned.
 Explorer
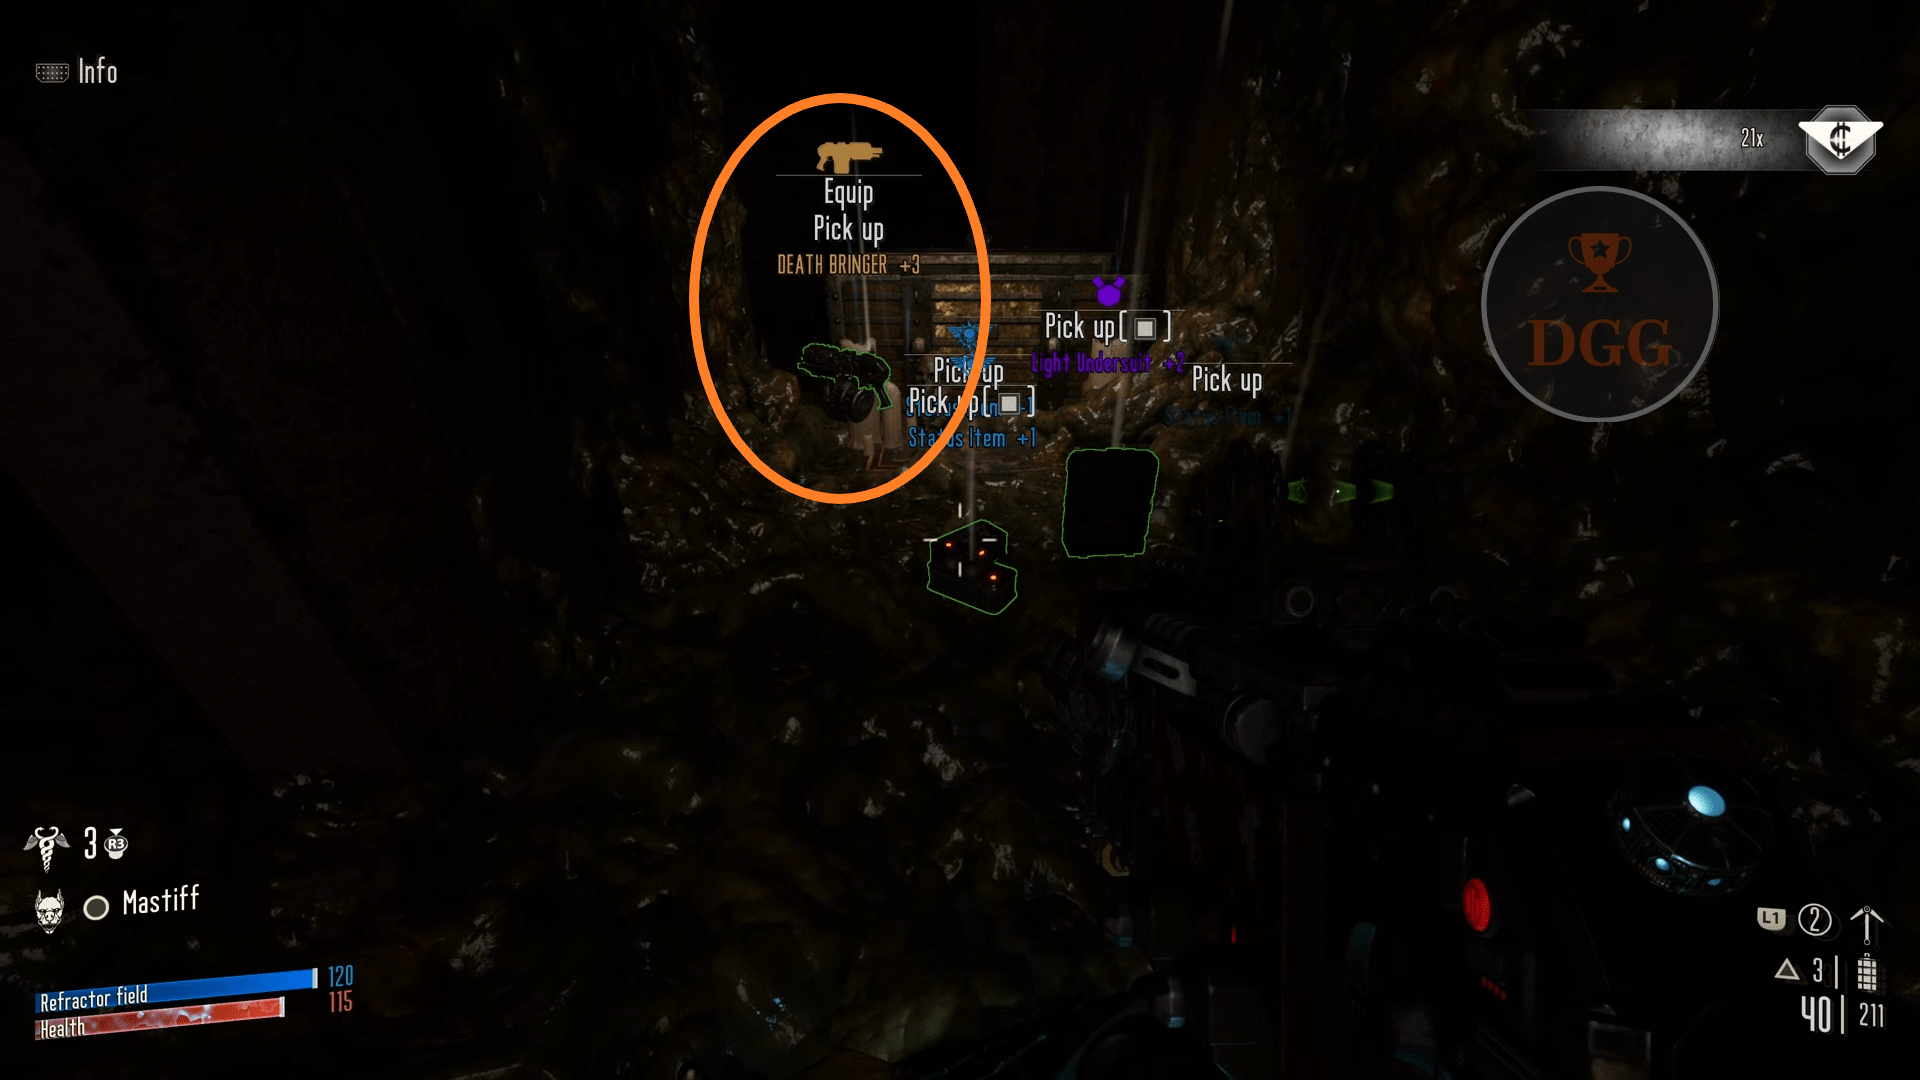
Find a +3 weapon
A +3 weapon is a yellow tier weapon. You’ll come across these as you play through the main missions. As I got later in the game, these became more commonly found in chests. You’ll notice a +3 next to the name of the weapon. This can even be seen before picking the weapon up. In the pre-chapter loadout screen, make sure to buy the Ratskin and Treasure Maps to help get this done. The maps are not required to find one, but they will help.
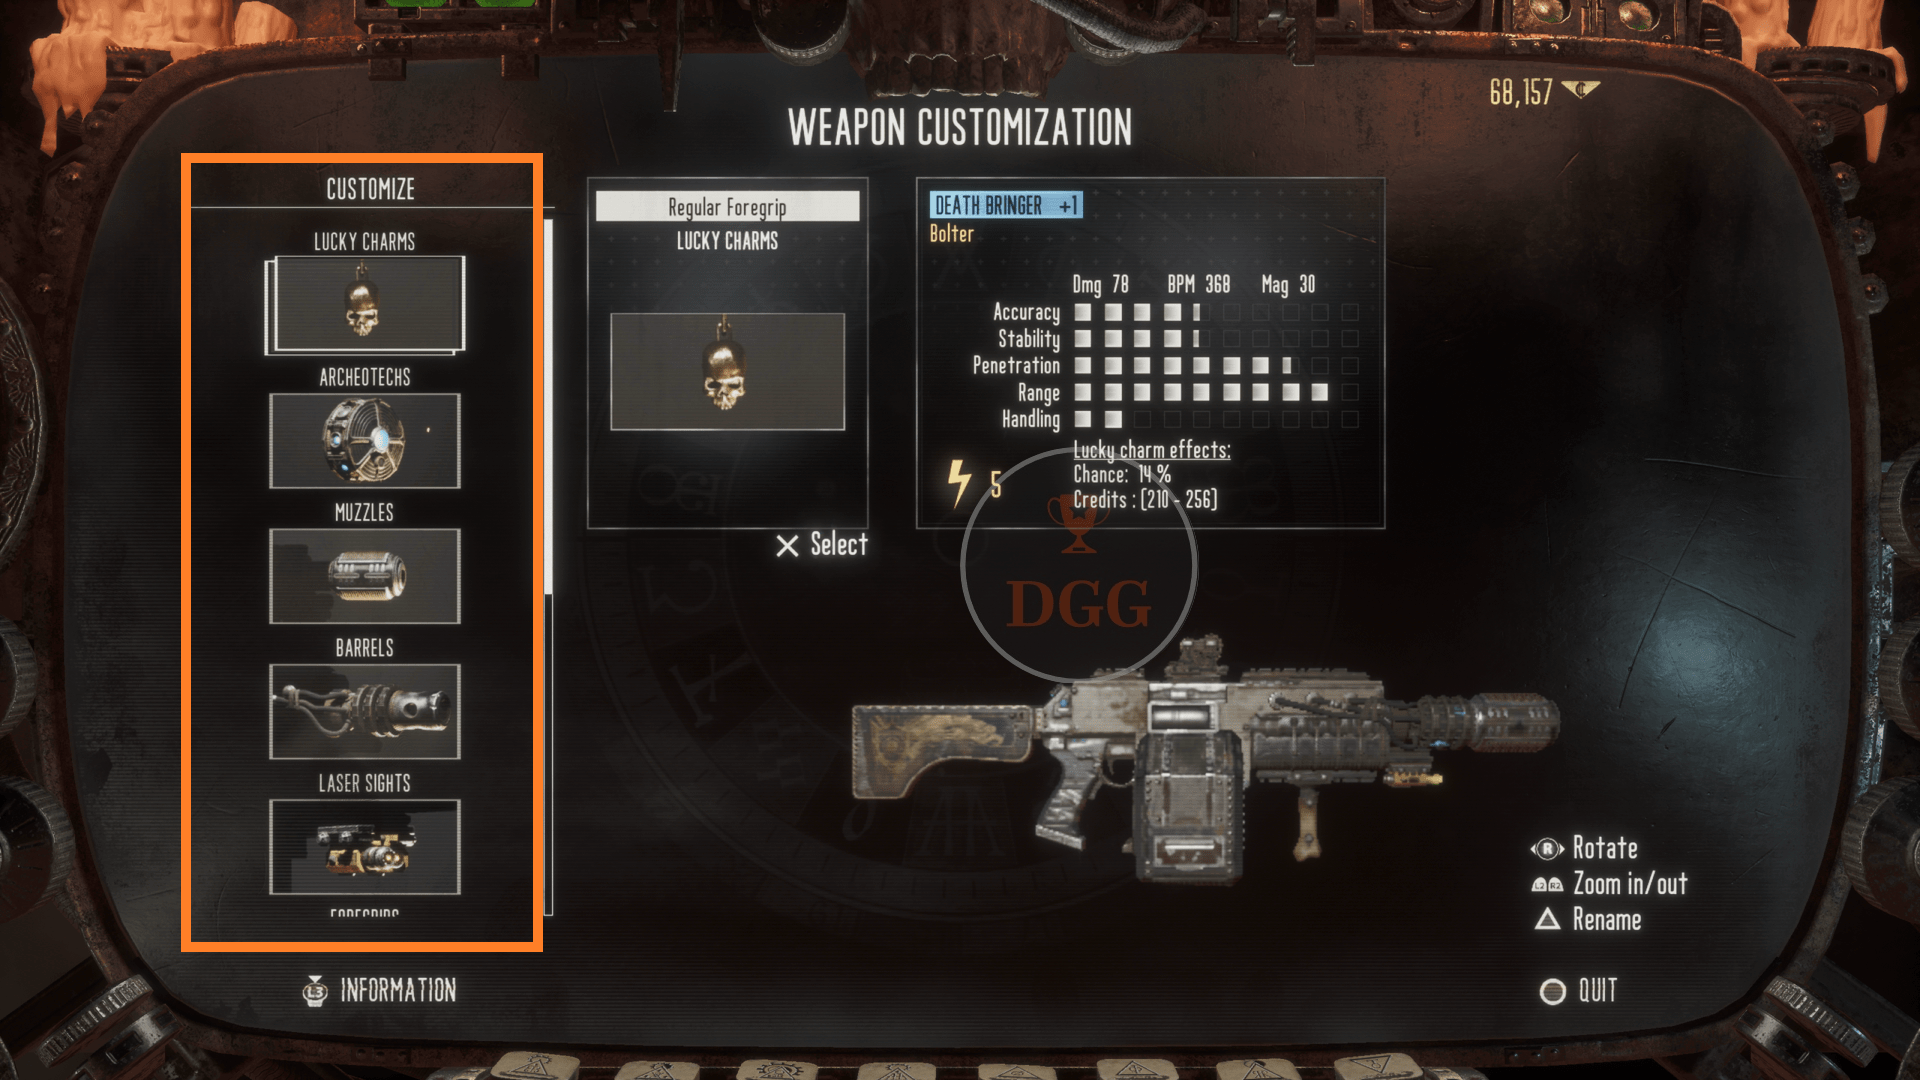
 Perfect Weapon
Customize every aspect of a single weapon
As mentioned in the intro, this is one of the Trophies that got “stuck” for me.
Weapons are customized at the Artificer in Martyr’s End. For this, you need buy at least one mod in every category for any weapon of your choice. Most of the mods are fairly cheap, but the weapon skins are expensive. If you don’t want to spend the 80,000 for a skin, back up your save, buy the skin, pop this and then redownload your save. Everything on the right side of the weapon needs to be modded.


 Banker
Amass 100,000 credits
This is accumulative. You don’t have to have 100,000 on you at one time. You can spend money without having to worry about that, All you have to do is play through the game and this will eventually pop. You can find credits through out the different Chapters and side missions, but most of your money will be earned by completing the Chapters and missions themselves. You’ll receive big pay outs at the end of missions.
 The One and Only
Finish Kaerus without using any other weapons than the Ironfist
This is earned by completing the very first level while only using the default pistol you begin with. The wording on this is a little off. The description says “weapon” but what it really means is gun. This popped for me and I used grenades, takedowns and the mastiff to kill enemies. I even picked up a different weapon from a chest, I just never used it. Seems that all you have to do here is not fire a shot with any other gun.
This will pop after exiting the post level score screen.
 Pedestrian
Finish Avarus without using the grapnel
Avarus is Chapter 8. For this, you cannot use your grapnel for the entire Chapter. You can’t use it for traversal or even in combat. If you use it, start the Chapter over. This isn’t very difficult. The beginning of the Chapter is really the only place where the grapnel would be useful as there is a big gap between you and the objective. From the start of the mission, stay to the left side of the map and you’ll find that there are passageways and combat areas that will take you the long way around the map and to the objective. There will be a few wall running sections that you’ll need to get through. Once you get to other side of the starting area, there are really no other sections where a grapnel would be needed here. This will pop after the post Chapter score screen.
 God Speed
Place the 5 bombs in a gap of less than 3 minutes in Escher Lab
Escher Lab is Chapter 11. The required section of the Chapter is immediately at the beginning. As the description states, there are five bombs to plant. There will two on the left side of the room, two on the right and one directly under where you start the Chapter. While you’re doing this, ignore any enemies and just head straight for the objectives. If you need, do a practice run through of the area first to know exactly where you’ll need to go. If done in time, this will pop immediately after planting the last bomb.
- Immediately drop all the way down from the starting area.
- There will be a small tunnel you can go through.
- Go through it and grapnel up to the first bomb site and plant it.
- Go back down and out through the tunnel you came in through.
- Head to your right toward the objective marker closest to you.
- It can be hard to see, but there is another small tunnel that you can go through.
- Go through it and grapnel up to the second bomb site and plant it.
- From here, drop down to a catwalk and follow it straight to the next objective.
- Plant the next bomb.
- From that bomb, look up to see a green light. Grapnel up here and run straight across to the other side of the area.
- Go through a doorway and grapnel up to another green light and then drop down to the objective.
- Plant the fourth bomb.
- Just like earlier, there is a catwalk right behind where the bomb was planted that’ll take you straight to the fifth and final bomb objective.
 Sniper
Kill 10 enemies in a row with headshots only
This can be a little tricky because the enemies tend to move around a lot and the aiming can be a little janky.
The easiest method for me was to use Heightened Senses ability. This can be purchased from the Rogue Doc in Martyr’s End. It is found under the “CEREBRAL” tab. This ability slows down time and will give you plenty of time to line up a headshot. Get as many headshot kills as you can in a use. Wait out the cooldown time and use it again. You can repeat this until you hit 10 kills. Remember, they need to be 10 consecutive kills. You can go long range with the Hashin’s Eye sniper rifle or even get in close with a pistol. I found the Scars Machina bolt pistol to be easy to use for this with the iron sights.
 Kill It With Fire
Kill a Genestealer with a grenade launcher
As mentioned in the intro, this is one of the Trophies that got “stuck” for me.
While playing through the game, you’ll either find a grenade launcher (Funeral Ball) or you can buy one from the weapon vendor in Martyr’s End directly across from the Rogue Doc. Once you have one, equip it and load up Chapter 7 Cold Black to find Genestealers. You’ll encounter a good number of them here. Just kill one to pop this. This popped for me immediately after killing one. Genestealers are the monster type enemies.

 I Hate Walking
Travel 5km using the grapnel
This is an accumulative total. All you have to do here is frequently use your grapnel. Each time you use it for traversal, however much distance you’ve traveled will be added to your overall total. This is something that will eventually pop as long as you use the grapnel often.
 The Specialist
Finish a mission using only special weapons
Special weapons are found just like everything else. They can be found by looting chests, dropped by enemies and bought from the vendor in Martyr’s End. When you have one, equip it and play any Chapter all the way through using only that weapon. Below are all the Special weapons that can be found. If you have multiple Special weapons, they can be used. It doesn’t have to be one only, it just has to be under the category “Special.” This must also be done in a main story mission.
Special
- Hashin’s Eye
- Burningsun
- Wrath
- Funeral Ball
 Who Needs Weapons
Kill 5 enemies in one use of Strength Booster
As mentioned in the intro, this is one of the Trophies that got “stuck” for me.
Strength Booster is an ability that can be bought from the Rogue Doc in Martyr’s End. It can be found under the “INTERNAL” tab. If you’re having trouble with this, upgrade it a few times to increase the ability’s duration. When activated, you’ll have temporary use of a melee weapon. Load up any Chapter and come across a group of at least five enemies. Activate the booster by pressing R1/RB and then select it when in combat. Kill five enemies before the ability ends.

 Future Best Friend?
Let Brickjaw live in Koloss 44
Both this and “Ruthless” are earned in Chapter 2. Toward the end of the Chapter, you’ll free Brickjaw. After you free him, he will open up a manhole for you to travel down and continue the Chapter. Here is where this can go two different ways.
After Brickjaw opens the manhole, drop down and continue on with the mission to earn “Future Best Friend.” This will pop after the post Chapter score screen.
After Brickjaw opens the manhole, shoot and kill him and “Ruthless” will pop immediately.
This isn’t missable becasue you can just replay the Chapter again and earn whichever you’re missing.
If you don’t want to play it again, here is what you can do.
- Free Brickjaw.
- Quit the game when he opens the manhole
- Back up your save file
- Load up the game
- Kill Brickjaw
- Quit the game and download your save from where ever you sent it back to your console
- Don’t kill Brickjaw and finish the Chapter
 Ruthless
Kill Brickjaw in Koloss 44
See “Future Best Friend?” above for more details.
 Zap
Zap
Kill 30 enemies with the Blast module
Blast can be purchased from the Rogue Doc in Martyr’s End. It will be listed under the “LUMINEN” tab. You will only need the first square unlocked in order to start working on this. Once purchased, Blast can be found by holding R1/RB while in combat. Select it to use it. There will be a cooldown period after using it, but 30 kills will not take long at all to get done.
 It’s Not Cheating!
Kill 60 enemies with the Perfect Aim module
Perfect Aim can be purchased from the Rogue Doc in Martyr’s End. It will be listed under the “CEREBRAL” tab. You will only need the first square unlocked in order to start working on this. Once purchased, Perfect Aim can be found by holding R1/RB while in combat. Select it to use it. When you use it, it will target enemies and then all you have to do is fire your weapon. You don’t have to aim while this is active. Any rounds you fire will automatically hit the targeted enemies.
 Kaboom
Kill 30 enemies with the Crush module
Crush can be purchased from the Rogue Doc in Martyr’s End. It will be listed under the “LUMINEN” tab. You will only need the first square unlocked in order to start working on this. Once purchased, Perfect Aim can be found by holding R1/RB while in combat. Select it to use it. You will need to be very close to an enemy when using this as it is a close combat ability.
 Defuser
Trigger all mines on Steel way
Steel Way is Chapter 9. This will take place over a couple different areas of the Chapter.
While progressing through the Chapter, you’ll come to a section where a dog will run toward you and step on two mines. Right after that, you’ll come to a sign warning you about mines. It will be a train track with mines all over the tracks and on the walkways to the left and right of the tracks. Slowly comb through this area and make sure to detonate every mine.
When the tracks and sidewalks are clear, look straight up and you should see a train car suspended up in the air. Use your Grapnel to reach the train. Go behind this train car to find a secret room with a chest. There will be a mine in front of the chest. Return to the front of the same train car to see another room directly across the way. Grapnel over to find another group of mines.
Drop back down to the ground to find a split in the path. Take the right path and you’ll quickly see another room of mines.
Continue on with the level until you repair an elevator. Ride the elevator and follow the pathway all the way down. You will eventually enter a room with a big hole in the ground. The last seven mines can be found lined around this hole.
Finish the Chapter and this will pop after the post mission score screen.